




NFPA 110 Compliance: 12 Inspection Checkpoints
Most emergency generator failures come back to missed inspection and maintenance steps. In this guide, I break NFPA 110 into 12 simple checkpoints that help you confirm your EPSS can start, transfer, carry load, and stay ready for review.
Here’s the short version:
- I check the generator for leaks, fluid levels, controller status, and hour-meter readings.
- I verify the ATS can transfer and retransfer within the required time.
- I review fuel, tanks, lines, and filters, because fuel problems can hide until the unit is under load.
- I test batteries and chargers, since weak starting batteries are a common no-start cause.
- I confirm alarms, annunciators, and BMS signals work during a power loss.
- I inspect ventilation and room temperature so the generator does not overheat.
- I log monthly test data like volts, amps, Hz, oil pressure, coolant temperature, and kW.
- I check clearance, labeling, lighting, and fire safety items in the generator room.
- I make sure logs, repairs, and retests are documented and kept on site for at least 3 years.
- I review replacement part fit and ratings before anything is installed.
- I use the same checklist when reviewing used or replacement EPSS equipment before purchase.
A few numbers stand out right away:
- About 70% of generator failures are tied to poor maintenance.
- Up to 37% of demand-time diesel failures can trace back to bad fuel.
- Type 10 systems must transfer within 10 seconds.
- Level 1 indoor rooms need to stay above 40°F (4°C).
- Indoor EPS equipment needs at least 36 inches of working clearance.
If you manage a facility, maintain generators, or buy replacement power equipment, this checklist gives you a clear way to spot problems early and document what you find.
| Checkpoint | What I’m Confirming |
|---|---|
| 1. Generator | Condition, leaks, fluids, controller in Auto |
| 2. ATS | Transfer, retransfer, contact condition |
| 3. Fuel | Level, tank condition, lines, filter status, fuel quality |
| 4. Batteries | Voltage, charger output, terminal condition |
| 5. Alarms | Local/remote alarm points and monitoring signals |
| 6. Ventilation | Airflow, dampers, room temperature |
| 7. Testing | Monthly run data and trend checks |
| 8. Safety | Clearance, shutdown access, lighting, extinguisher |
| 9. Records | Logs, signatures, test history, 3-year retention |
| 10. Repairs | Open items, work orders, retest proof |
| 11. Part match | Voltage, ampacity, ratings, physical fit |
| 12. Buyer review | Hours, records, load-bank results, condition |
This intro gives you the full map up front, so you can move into the inspection with a clear checklist instead of piecing NFPA 110 together line by line.
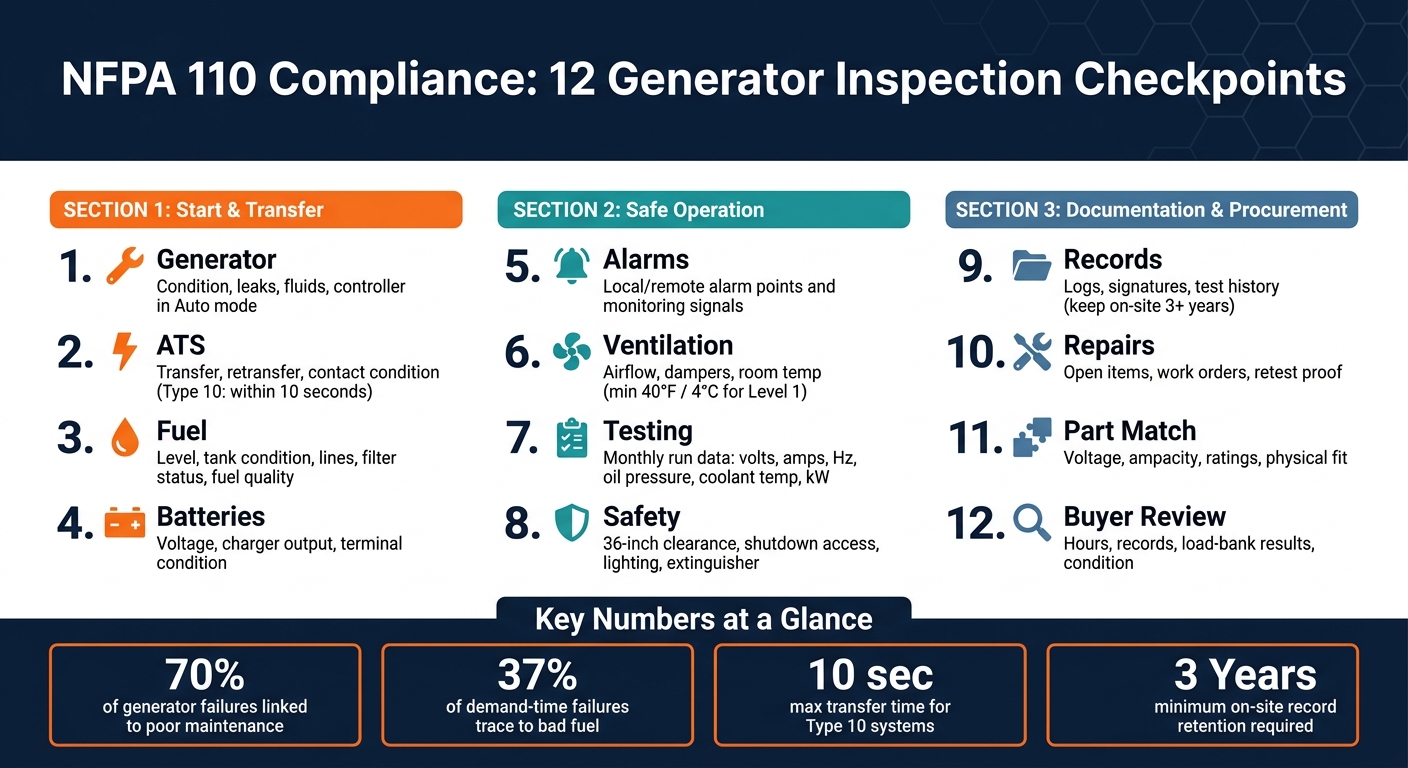
NFPA 110 Compliance: 12 Generator Inspection Checkpoints
NFPA 110 Level 1 EPSS Equipment Explained Generator and ATS
sbb-itb-501186b
Checkpoints 1 Through 4: Generator, ATS, Fuel, and Batteries
These four checkpoints cover the parts that decide whether your emergency power system will start, take the load, and stay online. If even one of them fails, the whole EPSS can be out of service right when you need it.
1. Generator Condition and Controller Status
Start with a weekly walk-around. Check under and around the generator set for oil, fuel, and coolant leaks at hoses, fittings, filters, and seals. Look at belts for cracking, glazing, or fraying. Inspect hoses for swelling or wear near clamps. Also check for debris or blockage inside or around the enclosure, especially near air inlets and exhaust paths. When the unit is safely shut down and cool, verify oil and coolant levels against the manufacturer’s add and full marks.
Then move to the controller. It should be in Auto/Ready mode, not Off or Manual. Review the display for active alarms or shutdowns like low coolant, overcrank, or low fuel. Check that remote start inputs, emergency stop functions, and any building management system interlocks are not stopping automatic operation. If anything could block an automatic start, log the corrective action before the next inspection. Record the hour meter reading on every visit so you can confirm exercise intervals and runtime.
2. Automatic Transfer Switch Condition and Transfer Performance
Open the ATS enclosure and inspect for dust, conductive debris, discoloration, or the smell of burned insulation. Check terminals and bus bars for corrosion, and make sure connections are tight based on manufacturer torque specs. Worn, pitted, or uneven contacts can build resistance and heat over time.
During the monthly generator test, track the transfer sequence. Note how long it takes from loss of the normal source to the generator start signal, then from the generator reaching rated voltage and frequency to load pickup, and then the retransfer back to normal. For Type 10 systems serving life safety and critical branches, transfer must happen within 10 seconds. Log any hesitation, contact chatter, or failure to transfer.
3. Fuel Supply, Tank Integrity, and Delivery Components
Record the fuel level in gallons and compare it with the minimum needed for your rated runtime. Inspect the outside of the tank for corrosion or coating damage. Check secondary containment for standing fuel or water. Walk the supply and return lines and watch for wet spots, staining, or fuel odor. Make sure all valves are in the right position. Check filter condition through differential pressure indicators, replacement records, or clear bowls where used. Run the transfer pump briefly to confirm normal operation and no odd vibration.
For diesel systems, fuel quality deserves close attention. Up to 37% of generator failures at the moment of demand trace back to degraded fuel that passed visual inspection but failed under load. That’s a big number, and it shows why clean-looking fuel can still be a problem. Periodically pull fuel samples from the tank bottom and mid-level. Look for water separation, cloudiness, a dark or acidic odor, or visible particulates. If contamination turns up, schedule fuel polishing or replacement and adjust filter change intervals to match.
4. Battery System, Charger, and Starting Readiness
Reports from the 2003 Northeast blackout indicate that about 20% of emergency generators failed to start or failed shortly after starting, and dead or weak batteries were the leading cause.
Measure battery terminal open-circuit voltage or float voltage and compare it with manufacturer specs. A fully charged open-circuit 12V lead-acid battery will usually read about 12.6–12.8 V. For flooded cells, check electrolyte levels. For sealed units, inspect for swelling, cracks, or leaks. Clean off any white or green terminal corrosion, verify cable tightness, and make sure the charger is energized and supplying the correct float voltage.
Also log the battery installation date and plan conductance or load testing on a regular basis. Many facilities replace batteries on a 3–5 year cycle, but test results should drive that call, not age alone.
Checkpoints 5 Through 8: Alarms, Ventilation, Testing, and Safety Conditions
These four checkpoints focus on the systems that keep the EPSS safe after it starts. A generator can fire up and still fail the bigger test. If it overheats, drops an alarm signal, or runs in a packed, unsafe room, you still have a compliance issue - and a clear operating risk.
5. Alarms, Annunciators, and Monitoring Signals
Once the system is ready to start, check the alarms and monitoring points that show it is running the way it should. These alarms confirm that the EPSS starts, transfers, and reports trouble as designed.
Level 1 systems need both local and remote annunciation. Level 2 systems need local annunciation only. Verify the system level before the inspection starts.
Local alarm points often include generator running, ATS on emergency, common fault, low fuel, high coolant temperature, low oil pressure, overspeed, and battery trouble. During inspection, make sure each point activates under test conditions. Don’t stop at seeing a light turn on. The signal itself has to work. Alarm circuits also need to stay powered during a utility outage, whether that power comes from the starting battery, a UPS, or an EPSS-fed branch circuit. If the alarm panel goes dark when normal power drops, that’s a deficiency.
If the system ties into a building management system (BMS), confirm that each mapped point uses the right logic. For example, an “ATS on emergency” signal should show the actual ATS position, not just a generator start command. If the BMS says one thing and the equipment is doing another, log it and fix it.
6. Ventilation, Cooling Airflow, and Room Temperature
Blocked air inlets and poor ventilation are common reasons generators overheat.
NFPA 110 requires ventilation that keeps room temperature within the manufacturer’s maximum ambient rating while the unit runs at rated load. For Level 1 indoor setups, the room also has to stay above 40°F (4°C) so starting stays dependable. During inspection, check intake louvers, discharge openings, and motorized dampers to make sure they open all the way when the generator runs. Radiator discharge has to leave the room. It can’t loop back toward the engine.
Take room temperature readings in °F at more than one location during a loaded test, including near the generator and near the exhaust area. Then compare those readings with the manufacturer’s data sheet. If temperatures are creeping toward the limit, note the deficiency and flag the likely fix, whether that means larger louvers, extra exhaust fans, or changed damper sequencing.
7. Monthly Load Exercise and Operating Measurements
Monthly exercise data gives you the clearest trend line for EPSS condition.
During the monthly run, record key operating values:
- Voltage
- Amperage
- Frequency
- Oil pressure
- Coolant temperature
- Battery voltage or charge rate
Voltage should stay within ±10% of nominal. Frequency should remain near 60 Hz, with only short transients during load switching. Watch for black smoke that doesn’t clear, since that can point to overfueling or poor combustion. Also note odd vibration or noise. When you track these numbers month after month - even in a simple spreadsheet - you can spot slow changes early, like coolant temperatures edging up or oil pressure drifting down, before they turn into a no-start or shutdown event.
8. Housekeeping, Access Clearance, and Physical Safety Items
NFPA 110 treats generator rooms as dedicated EPSS spaces. That matters. Combustible storage near hot exhaust parts or fuel system components creates a direct safety hazard.
NFPA 110-2022 set a minimum 36-inch working clearance around indoor EPS equipment for inspection, maintenance, and repair. Walk the room and confirm that this clearance exists around the generator, ATS, and control cabinets. Check that emergency shutdown controls are clearly labeled and easy to reach. Look for visible corrosion or leaks on exhaust piping. Make sure the room has a battery-powered emergency light source. Fire extinguishers, if present, should be rated for electrical and fuel fires and placed within immediate reach. Record every deficiency so Checkpoint 9 can document the inspection record and corrective action history.
Checkpoints 9 Through 12: Recordkeeping, Repairs, Component Fit, and Buyer Review
9. Inspection Logs, Test Records, and Corrective Action History
Once the physical inspection is done, the paperwork has to back it up. The record trail is what shows the EPSS was actually inspected, tested, exercised, repaired, or changed.
NFPA 110 requires you to keep records for all EPSS inspections, tests, exercises, repairs, and modifications, and those records must be available to the authority having jurisdiction (AHJ) if requested. Those records need to stay on site for at least 3 years.
Each log entry should show the date in U.S. format (MM/DD/YYYY), the test time, the equipment ID, and the type of work performed. Monthly logs should also record hour-meter readings, ATS ID, transfer and retransfer times, cooldown time, kW load, phase voltage and amperage, frequency, oil pressure, coolant temperature, exhaust temperature, and ambient temperature. Every entry also needs the performer's name, role, and signature.
This is one of those areas where small misses can turn into big headaches. Joint Commission surveyors often ask hospitals for 12 months of generator testing records, and they may cite missing kW readings, missing signatures, or skipped monthly tests. If your logs have holes, clean them up before the next inspection.
10. Open Deficiencies and Repair Follow-Through
After a deficiency is found, the job changes. It’s no longer about spotting the issue. It’s about making sure the issue gets fixed and stays fixed.
An open deficiency is any inspection or test issue that has not yet been corrected and confirmed by retest. Common examples include:
- Batteries that fail a voltage or load test
- Microbial growth or water in diesel fuel
- Excessive ATS contact wear
- Coolant leaks
- Annunciator alarms that fail to activate
Each open item should have a unique work-order number, a named party responsible for the repair, and a target completion date. After the repair, document the verification test. That should include transfer time in seconds, load level in kW, voltage stability, and confirmation that no alarms remain. The process is simple: find it, fix it, retest it, close it. Leaving deficiencies open can lead to CMS or accreditation findings.
Pay close attention to repeat issues. If the same battery failure or fuel contamination shows up again and again in recent logs, that usually points to a problem in the maintenance program itself, not just bad luck or a one-time breakdown.
11. Replacement Part and Component Compatibility Review
Before any replacement part goes in, make sure it matches the installed EPSS on every spec that matters. That includes voltage, ampacity, interrupting rating, phase, and fuel compatibility. Battery replacements must match the manufacturer's recommended voltage, amp-hour capacity, and cold cranking amps (CCA) for the starting duty and the expected ambient temperature range.
The electrical match is only part of the story. Control and communication links matter too. A replacement controller or remote annunciator needs to support the same monitoring points, alarm codes, and BMS integration as the unit already in place.
Then there’s the physical side. Dimensions, mounting, conduit entry points, and working clearances all need to line up. Indoor EPS equipment still has to meet U.S. code rules for working space, so a part that “almost fits” can cause trouble fast.
Buyers sourcing replacement EPSS equipment through Electrical Trader should check every spec against the installed system before buying. If anything looks off, bring in a professional engineer or an experienced electrical contractor to compare the replacement against your facility’s fault current calculations and coordination studies.
12. Pre-Purchase Inspection Points for Used or Replacement Emergency Power Equipment
Used equipment needs the same compatibility check as any replacement part, but it also needs a closer look at condition.
For used or surplus EPSS equipment, the key question is simple: can it meet NFPA 110 inspection, testing, and operating rules after installation? You can’t answer that with a guess. You need records.
Ask for manufacturer data sheets, nameplate photos, maintenance records, and recent load bank and ATS test results. Verify run-time hours from the built-in hour meter or the engine ECU. If a seller is quoting hours from memory, that’s a red flag in the used-equipment market. A load bank test should be run at 75% to 100% of rated capacity for at least 2 hours, with a written data log.
If you’re inspecting in person - or working from detailed seller photos - check:
- The controller for active alarms and current firmware
- The enclosure for corrosion, damaged seals, or signs of water ingress
- Oil or coolant leaks
- Frayed wiring
- Worn mechanical parts
- For ATS units, contact condition, mechanical operation, and any recorded transfer time and contact resistance test results
Document each finding against NFPA 110 and your facility’s risk tolerance, especially in hospitals and data centers. If something doesn’t match, write it down. That gives the next inspection a clean baseline instead of forcing someone to piece the story together later.
Conclusion: 12 Checkpoints That Keep NFPA 110 Inspections on Track
NFPA 110 compliance is not a once-a-year box to tick. It comes from steady checks across the full EPSS: generator, ATS, fuel, batteries, alarms, ventilation, testing, safety, and records. When teams apply these 12 checkpoints during monthly exercise runs and annual tests, they can spot small problems early. That gives them time to fix issues before they turn into a power-loss event. In day-to-day practice, this checklist makes NFPA 110 part of the normal workflow instead of just a code task.
The field data make that point pretty clear. Reliability in practice is closer to 98.5% than 99.95%, and many hospitals still miss safety and performance targets.
The same approach matters before buying any used or replacement equipment. For buyers using Electrical Trader to source used or replacement equipment, these 12 checkpoints help sort dependable units from risky ones. The condition of the generator, the ATS service history, fuel quality, battery age, and test records all point to whether a unit is likely to meet NFPA 110 after installation. If maintenance records can’t be verified, the risk goes up.
Key Points to Carry Into the Next Inspection
Use this as a final pre-inspection pass:
- Verify Auto status on the generator control panel.
- Perform and document an ATS transfer test, confirming transfer within the required time.
- Check fuel levels and recent quality records for water, contamination, or degraded diesel.
- Record battery voltage and charger output and inspect terminals for corrosion.
- Test alarm and annunciator functions, including remote monitoring and BMS integration points.
- Check room temperature in °F against manufacturer limits and keep air intakes and exhaust clear.
- Record kW, volts, amps, Hz, oil pressure, coolant temperature, and runtime during the monthly load exercise.
- Review open deficiencies, verify repairs, and close each item with a dated test result.
Each entry should include the date in MM/DD/YYYY format, the inspector’s name, and a clear pass/fail or deficiency note. Keeping records for at least 3 years helps the facility stay ready for AHJ review, Joint Commission surveys, or insurance audits without having to piece the story together later.
FAQs
What is an EPSS?
An Emergency Power Supply System (EPSS) is a backup power system that keeps electricity flowing when utility power goes out. Under NFPA 110, it includes the generator, transfer switches, switchgear, fuel systems, controls, and related accessories.
EPSS systems are defined by Level, Type, and Class. These labels show how critical the load is, how fast power must be restored, and how long the system must run at full load without refueling.
How often should NFPA 110 inspections be done?
NFPA 110 inspections and tests should follow a set schedule:
- Weekly: Do visual checks of the fuel, oil, coolant, batteries, and control settings.
- Monthly: Run a 30-minute load test at 30% or more of nameplate kW. This should also include Automatic Transfer Switch checks.
- Annually: Test fuel quality. If the monthly load requirement isn't being met, perform load bank testing.
- Every 36 months: Complete an extended load test for Level 1 systems.
What records should I keep for compliance?
Keep at least 36 months of detailed on-site records available to the Authority Having Jurisdiction.
Those records should include:
- Test dates
- Test durations
- Actual kW loads
- Voltage
- Frequency
- Oil pressure
- Coolant temperature
- Battery voltage
- Fuel levels
- Transfer times
You should also keep:
- A written maintenance program
- Deficiency logs
- Repair records, including parts replaced and follow-up testing
- Two sets of instruction manuals
- Fuel quality documentation
- Fuel inspection documentation





