Ultimate Guide to Generator Inspection Checklists
A generator checklist helps you catch small problems before they turn into a no-start or power-loss event. If I had to boil this guide down, I’d say this: check the same systems every time, change the depth by schedule, and log what you find.
Here’s the short version:
- Daily: visual-only walkaround with the unit off
- Weekly: closer look at wear items, plus a short exercise run if site rules allow
- Monthly: load test for 30+ minutes at at least 30% of rated load
- Always check: safety, fuel, oil, coolant, battery, controls, alarms, and ATS condition
- Write down: fuel level, fluid condition, battery voltage, fault codes, and any fixes
A few points stand out fast:
- Battery trouble is one of the top no-start causes
- Diesel units can wet stack if they don’t get enough load
- Standby systems need tighter testing and records than portable units
- Healthcare sites may need load acceptance within 10 seconds and fuel for 8 hours
- Harsh sites like dusty, cold, or humid locations need closer watch
If you want a simple rule, I use this one: look daily, inspect weekly, test monthly, and log every time.
| Interval | Main goal | What I’d focus on |
|---|---|---|
| Daily | Ready state | Alarms, leaks, fuel, oil, coolant, battery charger, site condition |
| Weekly | Wear check | Belts, hoses, lines, exhaust joints, terminals, short run test |
| Monthly | Proof of performance | Load test, ATS check, trend logging, fuel and battery follow-up |
The rest of the article explains what to check, how often to check it, and how to change the list for standby, healthcare, industrial, and portable generators.
Core Parts of a Generator Inspection Checklist
Safety, Enclosure, and Site Conditions
Before you touch a gauge or pop a panel, walk the site first. A lot of generator issues show themselves outside the unit.
Start with clearance. Keep at least 3 feet of open space around the generator. The area should also stay clear of debris and anything combustible. While you're there, check the ventilation louvers and make sure nothing is blocking airflow.
Next, inspect the enclosure and the area around it. Look for signs of pest activity, water intrusion, and any visible damage to the enclosure panels. Confirm that the fire extinguisher is in place, fully charged, and shows a current inspection tag. If the site uses bulk fuel storage, check that the secondary containment is dry and free of obstructions. Emergency shutoff labels should be easy to read and in the right location.
After the site looks good, move on to fluids and the battery.
Fuel, Oil, Cooling, and Battery Checks
Start with a visual walkaround. Check under the unit for wet spots, stains, or drips.
For fuel, make sure the tank level is enough for operation. Then inspect the lines, fittings, and water separator for contamination or microbial growth. Tank vents should be open, not blocked.
For engine oil, verify the level and take a look at the color. If the oil looks discolored or contaminated, it needs follow-up. Coolant should sit at the right level in both the radiator and the recovery tank. The standard mix is 50/50 antifreeze and water unless the manufacturer says otherwise. While you're in that area, inspect belts for cracks or fraying and hoses for soft spots, bulges, or clamp corrosion.
Battery checks need extra attention. Inspect the terminals for corrosion, make sure the cables are tight, confirm charger status, and check electrolyte level on flooded-cell batteries. Battery trouble is a common no-start reason.
Controls, ATS, and Electrical Condition
If the engine side looks fine, check the controls and transfer equipment next.
The Auto-Off-Manual switch should be in the "Auto" position for standby use. Scan the control panel for alarms, error codes, or warning lights. Common alerts include low fuel, high coolant temperature, and low oil pressure. Gauge readings such as voltage, frequency, and oil pressure should fall within the ranges listed in the OEM documentation.
Then inspect the Automatic Transfer Switch (ATS). Check breaker positions and look at contacts for pitting, heat discoloration, or corrosion. The source indicator should show the correct power source. For wiring, look for damaged insulation, loose connections, and unlabeled circuits. Every circuit should be clearly identified.
sbb-itb-501186b
Generator Inspection Checklist
Daily, Weekly, and Monthly Generator Inspection Routines
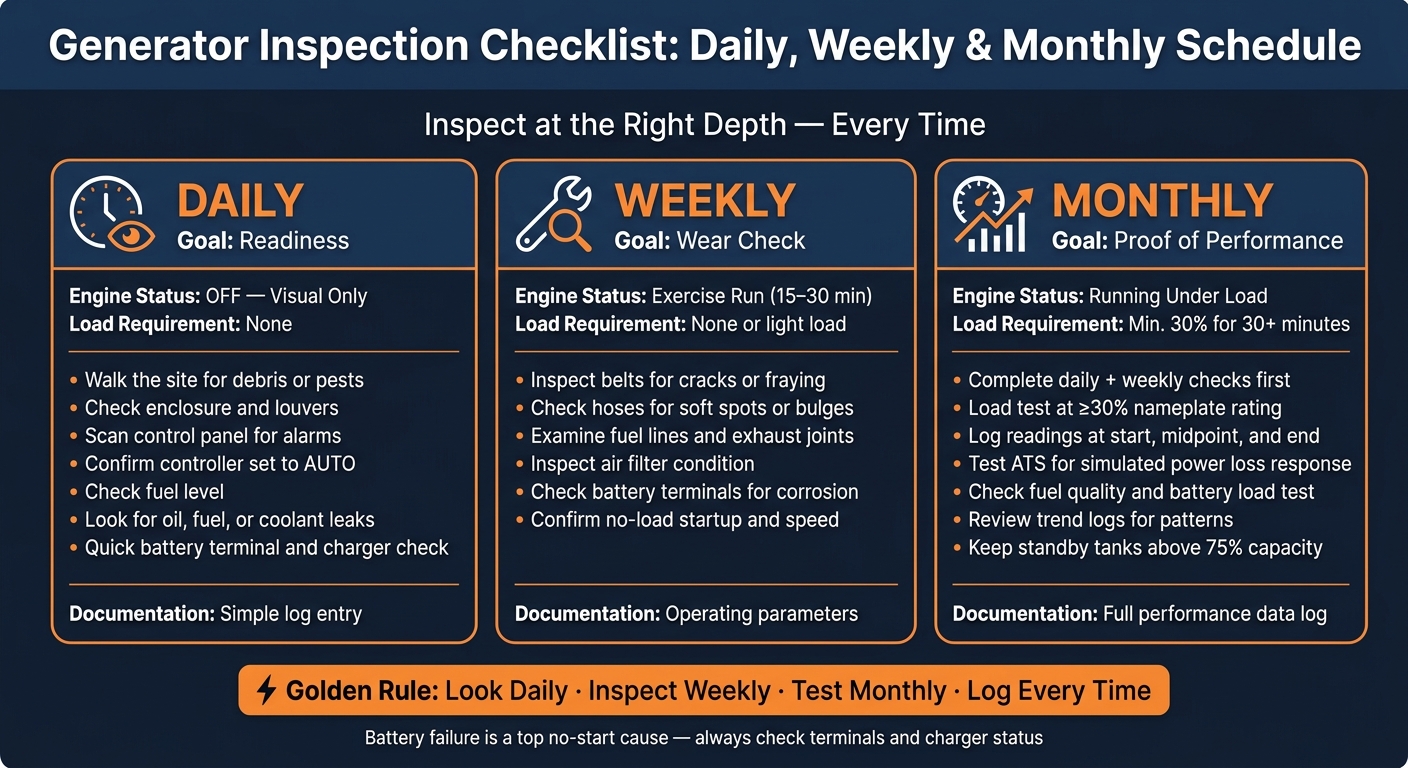
Generator Inspection Checklist: Daily, Weekly & Monthly Schedule
How often you inspect a generator matters just as much as what you inspect. The three standard intervals - daily, weekly, and monthly - each do a different job.
Think of it like this:
- Daily checks focus on readiness
- Weekly checks look for wear
- Monthly checks confirm performance
Use the same core checks at different depths. Daily is quick. Weekly goes a bit closer. Monthly adds a run test and logging. Always follow your site's own procedures first. The routines below are general guidelines for broad U.S. use.
Daily Checklist: Quick Walkaround Checks
Daily checks are visual only and done with the engine off. The goal is simple: make sure the unit looks ready to respond.
Start with a walk around the site. Look for debris, rodent intrusion, nesting materials, or anything else that shouldn't be there. Check the enclosure and louvers for damage or blockages. Look at the control panel for active alarms or warning lights. Confirm the controller is set to "AUTO" so the generator can start during a power outage.
Then check the fuel level. Look under the unit for visible oil, fuel, or coolant leaks. Do a quick visual check of oil and coolant levels. Finish with a brief battery check by looking at the terminals and the charger indicator light.
Keep daily checks visual only.
Weekly Checklist: Closer Visual Review and Basic Exercise
Weekly checks go beyond the daily walkaround and focus more on wear points.
Look over belts, hoses, fuel lines, exhaust joints, the air filter, and battery terminals. These parts often show early signs of trouble, and a close look can help you catch problems before they turn into a no-start event.
If site rules allow it, run a 15- to 30-minute no-load or light-load exercise. This helps confirm startup and operating speed.
Monthly Checklist: Functional Testing and Trend Logging
Monthly checks add a load test.
After you complete the standard daily and weekly items, run the generator under load for at least 30 minutes at a minimum of 30% of its nameplate rating.
During the run, log readings at the start, midpoint, and end of the test. Small startup delays or extra vibration can point to larger faults. That's where trend logs matter. They turn a simple checklist into a record you can track over time.
| Inspection Depth | Daily | Weekly | Monthly |
|---|---|---|---|
| Engine Status | Off - visual only | Exercise run (15–30 minutes) | Running under load |
| Load Requirement | None | None or light load | Min. 30% for 30+ minutes |
| Key Tasks | Fluid levels, alarms, leaks | Belts, hoses, battery terminals | Fuel quality, battery load test, trend logging |
| Documentation | Simple log entry | Operating parameters | Full performance data log |
Different applications need different inspection depth, which the next section breaks down.
Adapting the Checklist for Different Generator Applications
Once the daily, weekly, and monthly routine is in place, the next step is simple: adjust the checklist based on how the generator is used. The core checklist stays the same for every unit. Then you tighten the items that match the site, the load, and the cost of failure.
Standby and Emergency Generators in Commercial Facilities
For offices, warehouses, retail buildings, and mixed-use facilities, test the ATS every month to make sure it responds to a simulated power loss within the required timeframe. In commercial standby systems, monthly ATS transfer testing isn't optional. It's a key part of keeping the system ready.
It also helps to pay close attention to signs of animal activity. Look for rodent intrusion, chewed wiring, nesting material, and exhaust leaks. Exhaust condition matters a lot in occupied buildings because carbon monoxide can put people at risk.
Fuel checks need a tighter standard too. Keep standby tanks above 75% capacity to limit condensation and help make sure the unit can run through a long outage.
If a facility supports critical loads, transfer performance, ventilation, and fuel checks should happen with more care and on a tighter schedule.
Healthcare, Industrial, and Portable Generator Checks
Healthcare generators have stricter rules. NFPA 110 Level 1 requires the system to accept load within 10 seconds of a utility failure. Inspections should also confirm an 8-hour fuel supply and keep records for at least 5 years for regulatory audits.
Industrial units that run at variable loads need closer watch for wet stacking. A monthly load test at a minimum of 30% of nameplate rating for at least 30 minutes helps deal with that risk.
Portable generators need a different kind of attention. Focus on:
- Cords
- Receptacles
- Outdoor fueling safety
- Transport damage
Site conditions also shape what tends to fail first. That means inspection frequency shouldn't stay fixed if the setting is harsh. The table below shows the main shifts to make:
| Environment | What to Check More Often | Why |
|---|---|---|
| Extreme cold | Battery terminals and cranking capacity | Batteries can show full voltage but fail under load |
| Dusty/industrial sites | Air filters, radiator fins, cooling fans | Restricted airflow can raise fuel consumption by up to 15% |
| High humidity/coastal | Enclosure seals, electrical terminals, fuel water separators | Faster corrosion and microbial fuel growth |
| Infrequent use | Battery voltage trends, fuel condition | Diesel stored over 12 months degrades and may need polishing |
In rough conditions, shorten visual-check intervals. And don't just inspect - write it down. Those application-based records make it much easier to spot patterns before a small issue turns into a shutdown.
Documentation, Common Failures, and Final Checklist Takeaways
What to Record After Each Inspection
After each inspection, log the same details every time. That way, changes stand out fast instead of getting buried in messy notes.
Record the date, hour-meter reading, fuel level, fluid condition, battery voltage, fault codes, corrective actions, and technician initials.
For load tests, record the start time, load percentage, voltage, frequency, and temperatures at the start, midpoint, and end of the run. When records stay consistent, side-by-side comparisons get much easier.
A standard spreadsheet or CMMS helps keep entries aligned across shifts and technicians. It also makes day-to-day work smoother with real-time entry, photo uploads, automatic timestamps, and fast access during audits or shift handoffs.
Sort findings by urgency so the right repairs move first:
| Severity | Description | Example |
|---|---|---|
| Emergency | Unit won't start or transfer | Dead battery, failed starter |
| Urgent | Runs, but reliability is compromised | Significant coolant leak, fuel contamination |
| Routine | Standard maintenance due | Oil change, air filter replacement |
| Watch | Non-critical; monitor for trends | Slight oil weepage, minor belt wear |
Key Points to Remember
The log should do more than store inspection notes. It should help you build a failure history. Over time, that history shows patterns you might miss in a single visit.
Battery issues deserve urgent attention because they often show up before a no-start event. Routine checklists also help spot coolant leaks, fuel contamination, corrosion, vibration, control alarms, and wet stacking before those issues get worse. Most problems start small. Then they snowball.
Use daily, weekly, and monthly routines to check the same main systems with more detail each time. Follow the manufacturer's manual and any code rules that apply. If the same problem appears across multiple inspection cycles, treat that as a clear sign to schedule repair or replacement, not just another note in the log.
The same goes for repeated faults in breakers or transfer equipment. At that point, another routine entry isn't enough.
FAQs
How do I know if my generator is wet stacking?
Wet stacking happens when a diesel generator runs with too little load. When that happens, fuel doesn’t burn all the way, and carbon starts to collect in the exhaust system.
Watch for black, oily liquid coming from the exhaust pipes, unusual exhaust smoke, or signs during operation or maintenance checks that the engine is running under-loaded.
What should I do if the battery voltage looks normal but the unit won’t start?
If the battery voltage looks normal but the generator still won’t start, take a close look at the starter motor and solenoid. Make sure both are mounted securely and that all connections are in place.
It also helps to inspect the battery cables. They should be tight, clean, and free of corrosion or sulfation. A cable can look fine at a glance and still cause trouble, so it’s worth checking each connection by hand.
During a test run, watch how the starter engages and pay attention to cranking speed. Slow or uneven cranking can point to a mechanical problem.
Also confirm that the charger is active, and check the battery’s specific gravity or conductance status.
When should I inspect my generator more often?
Inspect your generator more often than standard maker or compliance rules call for if it operates in harsh conditions. That includes temperatures below 40°F or above 85°F, dusty sites, high-humidity areas, and coastal locations with salt air.
You should also step up inspection frequency if the generator has heavy cycling, high runtime hours, or older equipment. And for NFPA 110 Level 1 facilities, a strict, high-frequency maintenance schedule is mandatory.