




Step-by-Step Ground Rod Installation Guide
If you install one ground rod, you may still need two. Under NEC rules, the rod must be at least 8 ft long, have 8 ft of soil contact, use a listed direct-burial clamp, and if that single rod is not proven to be 25 ohms or less, a second rod is required.
If I were skimming this before a job, here’s what I’d want up front:
- Check local permit and inspection rules first
- Call 811 at least 2–3 business days before digging
- Place the rod close to the service equipment
- Keep it at least 2 ft from the foundation
- Use a rod that meets NEC minimums, usually 5/8 in. diameter and 8 ft long
- If rock blocks a vertical drive, NEC allows up to 45° from vertical or a horizontal trench at least 30 in. deep
- Size the grounding electrode conductor (GEC) from NEC Table 250.66
- For a rod connection, the GEC does not need to be larger than #6 AWG copper
- If two rods are needed, space them at least 6 ft apart
- Do not cut the rod
This guide breaks the job into the parts that matter most: where to place the rod, what tools and parts to use, how to drive it to code depth, how to connect the GEC, and what inspectors often flag before sign-off.
A few terms also matter here: the ground rod goes in the earth, the GEC runs from the rod to the service equipment, and the equipment grounding conductor (EGC) is the branch-circuit safety path that helps a breaker trip during a fault. That mix-up causes a lot of field errors.
Read this as a short field summary of the full install process, with the main NEC checkpoints pulled to the front.
Installation of grounding electrodes rods for residential electrical service
sbb-itb-501186b
Plan the Installation Before You Drive the Rod
Plan the job before you start. That helps you avoid common headaches: a rod that won’t reach full depth, a GEC that comes up short, or a spot that no one can get to later for inspection. Once you’ve confirmed the route and access, you can move into the install.
Choose a Code-Compliant Location
Set the rod close to the service equipment so the GEC run stays short and direct. Keep the rod at least 2 ft from the foundation to avoid the footing and disturbed fill.
Try to place it in loose, undisturbed soil. Stay away from compacted fill or backfill when you can. And make sure the connection point stays accessible.
Check Soil, Utilities, and Site Conditions
Call 811 at least 2 to 3 business days before installation so underground utility lines, cables, and pipes can be marked. Skipping this step creates a serious safety risk.
After the utilities are marked, check the soil conditions. Clay holds moisture well, which helps conductivity, but it’s dense and harder to drive through. Sandy or dry soil is easier to penetrate, but it has higher electrical resistance.
If bedrock prevents full-depth installation, NEC 250.53(G) allows the rod to be driven at an angle up to 45 degrees or buried horizontally in a trench at least 30 in. deep.
Once the site is clear and full depth looks possible, you’re ready to start driving the rod.
Gather Tools, Materials, and Safety Gear
Get everything together before you begin so you don’t have to stop halfway through. For a standard residential or light commercial installation, these are the core items:
| Item | Specification | Purpose |
|---|---|---|
| GEC Wire | Sized per NEC Table 250.66 based on service conductor size | Connects rod to service equipment |
| Clamp | UL-listed for direct burial, acorn style | Rod-to-wire connection |
| Driving Tool | 4-pound sledgehammer or rotary hammer with ground rod driver attachment | Drives rod to full depth |
| Excavation Tool | Shovel or post-hole digger | Pilot hole and GEC trench |
| PPE | Safety glasses, work gloves, steel-toed boots | Personal protection |
Size the GEC per NEC Table 250.66.
Use a 4-pound sledgehammer in soft soil. In hard clay or rocky ground, use a rotary hammer with a rod driver to help prevent mushrooming.
Step-by-Step Ground Rod Installation
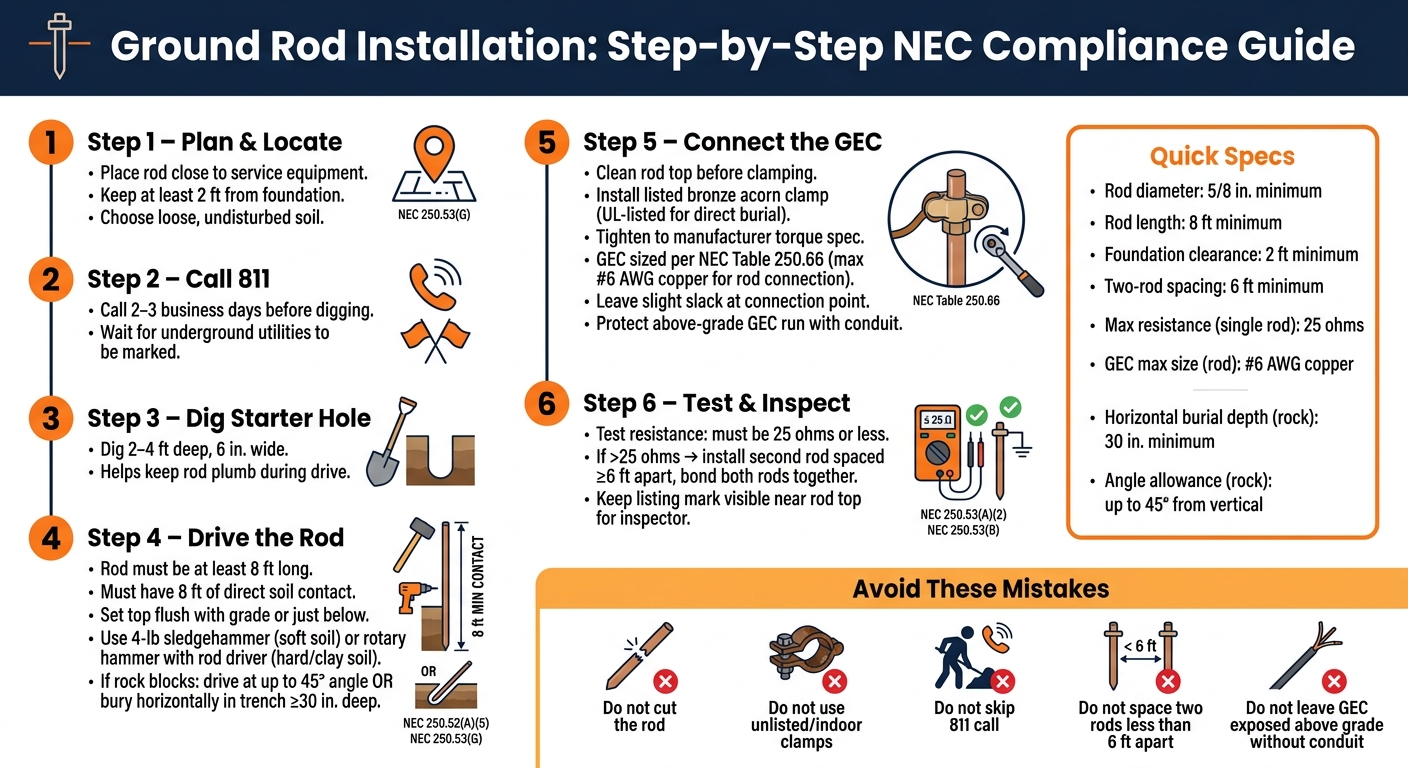
Ground Rod Installation: Step-by-Step NEC Compliance Guide
With the layout set, the job comes down to three parts: mark, drive, and connect.
Mark the Location and Start the Rod
Mark the exact rod location with a stake or spray paint. Pick a spot as close as you can to the main electrical panel.
Next, dig a starter hole about 2–4 ft deep and 6 in. wide with a shovel or post-hole digger. This makes the first part of the drive easier and helps keep the rod plumb as it starts into the ground.
If bedrock or another obstruction blocks a straight vertical drive, the NEC allows the rod to go in at an angle of no more than 45 degrees from vertical. If that still doesn’t work, you can bury the rod horizontally in a trench at least 30 inches deep.
Drive the Rod to Full Depth
The rod needs at least 8 ft in direct contact with the soil. Drive it steadily using the rod driver that fits the site.
If bedrock stops a vertical install, switch to the NEC-approved angled or horizontal method.
Set the top of the rod flush with grade or just below it. Once the rod is at full depth, clean the top and get it ready for the clamp connection.
Connect the GEC and Finish the Area
Once the rod is fully seated, make the bond and clean up the work area.
Clean the rod before installing the clamp so you remove dirt, corrosion, or coating. Then install a listed bronze acorn clamp and tighten it to the manufacturer’s torque spec.
Per NEC 250.66(A), the GEC connected to a ground rod does not need to be larger than #6 AWG copper, no matter the service size. Leave a little slack at the rod connection so the wire isn’t stretched tight if the soil shifts. If the GEC runs above grade or passes through spots where it could be hit or damaged, protect it with conduit.
Bond the other end at the service equipment, then backfill and restore the trench. Seal any wall penetrations with caulk or spray foam.
Inspect, Test, and Correct Common Problems
After backfilling, do one last code check before inspection.
Verify NEC Compliance Before Inspection

Before inspection, make sure the rod is fully driven, uncoated, listed, and connected with a listed direct-burial clamp. The rod’s listing mark should still be visible near the top. Also check that the GEC has a little slack at the connection point, and that any conductor exposed above grade is protected from physical damage.
It’s also smart to review local AHJ amendments before the inspector shows up. A small local rule can trip up an otherwise clean install.
When a Second Ground Rod Is Required
If the rod does not test at 25 ohms or less, you need to install a second rod. Space the rods at least 6 ft apart under NEC 250.53(A)(3), and bond them together as one grounding electrode system.
If the bonding jumper runs within 18 inches of the earth, it must be copper.
Common Installation Errors to Avoid
This is the short list of mistakes that tend to fail inspection.
| Common Mistake | NEC Reference | Corrective Action |
|---|---|---|
| Rod stopped by rock | 250.53(G) | Drive at a 45-degree angle or bury horizontally in a 30-inch-deep trench |
| Two rods spaced less than 6 ft apart | 250.53(A)(3) | Re-install the supplemental rod at least 6 ft away |
| Unlisted or indoor-rated clamp used | - | Replace with a listed acorn clamp or exothermic weld rated for direct burial |
| GEC undersized for the service | Table 250.66 | Resize per NEC Table 250.66 |
| Rods not bonded together | 250.50 | Add a bonding jumper between all electrodes to form one system |
One last point: do not cut the rod. If rock blocks the install, use the 45-degree angle method or place the rod horizontally in a 30-inch-deep trench.
Conclusion: Key Steps for a Reliable, Code-Compliant Ground Rod Installation
A ground rod installation comes down to four core steps: choose a code-compliant spot, call 811 before you dig, drive a listed 8-foot rod to full depth, and bond it with a listed direct-burial clamp.
One small detail matters more than people think: leave the listing mark visible near the top so the inspector can confirm the rod is approved.
In the field, a single rod often doesn't hit the 25-ohm target. That's why many installations use a second rod set at least 6 ft apart and bonded to the first.
You also need to size the GEC based on NEC Table 250.66, protect any exposed run above grade, and keep the path as direct as possible. That gives you an installation that's set up for inspection and built to last.
FAQs
Do I always need two ground rods?
No. If one rod reaches 25 ohms or less resistance to earth, you don't need a second rod.
The catch is that proving this usually takes special test equipment. So in day-to-day NEC work, installers often skip the test and put in two ground rods instead.
Those rods need to be at least 6 feet apart and bonded together as one grounding electrode system.
Can I install a ground rod in rocky soil?
Yes. If bedrock blocks a straight vertical install, NEC rules let you drive the rod at an angle of up to 45 degrees from vertical.
If that still won’t work, bury the rod horizontally in a trench that’s at least 30 inches deep.
Either way, the rod still needs 8 feet of contact with the soil. Do not cut it shorter.
How do I know what size GEC to use?
Use NEC Table 250.66 to size the grounding electrode conductor (GEC) based on your largest service-entrance conductor.
For most residential 100-amp to 200-amp services, 6 AWG copper is common. That said, 200-amp services often use 4 AWG copper or 2 AWG aluminum.
There’s one key exception here: if the GEC connects only to a ground rod, it does not need to be larger than 6 AWG copper.





