




OSHA Lockout Rules for Electrical Maintenance
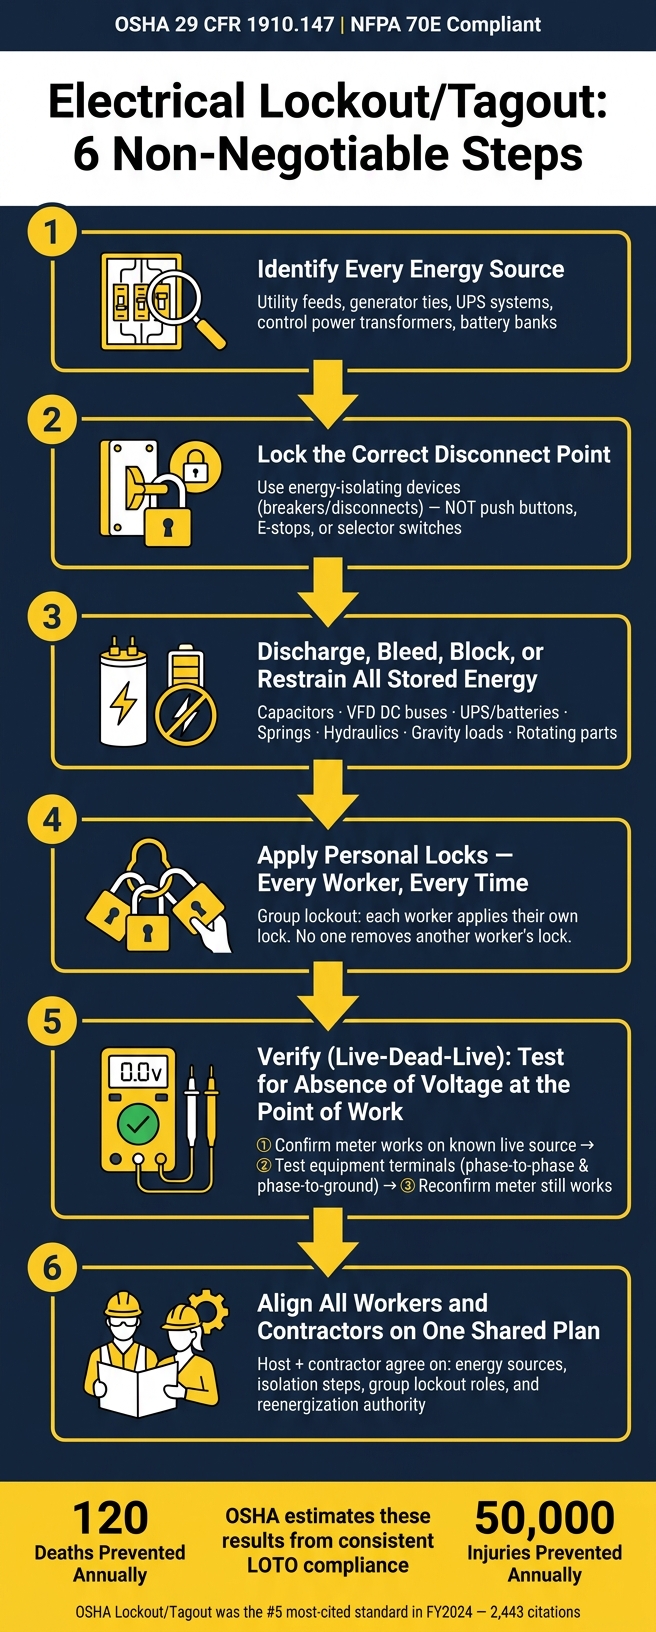
If you skip one lockout step, someone can get shocked, burned, or crushed. This article comes down to six things: find every energy source, lock the right disconnect, deal with stored energy, use group lockout the right way, test for zero voltage, and make sure contractors and site staff follow the same plan.
OSHA says lockout/tagout helps prevent about 120 deaths and 50,000 injuries each year. The main rules here are 29 CFR 1910.147 and 29 CFR 1910.333. In plain terms, I’d sum up the job like this: don’t trust an OFF button, don’t trust a breaker by itself, and don’t touch anything until you test it.
Here’s the full article in one short list:
-
Stored energy still hurts people after shutdown
- Capacitors, UPS systems, batteries, springs, rotating parts, hydraulics, and gravity loads can still cause injury.
-
The wrong isolation point is a common failure
- Push buttons, selector switches, and E-stops are not lockout points.
- You need the energy-isolating device, such as a disconnect or breaker.
-
Voltage must be tested before work starts
- Use the live-dead-live meter check.
- Test at the point of work, not just upstream.
-
Group lockout must protect each worker
- On crew jobs, each person needs their own lock on the lockbox or hasp.
- One person must not remove another worker’s lock.
-
Contractor jobs need one shared plan
- The host employer and outside crew must agree on energy sources, lockout steps, and who can reenergize.
-
Most OSHA problems trace back to weak procedures
- Missing machine-specific steps, poor labels, skipped testing, and early lock removal keep showing up in citations.
Electrical Lockout/Tagout: 6 Steps to Zero Energy (OSHA Compliant)
OSHA 6 Steps of Lockout Tagout: LOTO Procedure for Electrical Work
sbb-itb-501186b
Quick Comparison
| Issue | Wrong Move | Right Move | Main Risk |
|---|---|---|---|
| Stored energy | Assume shutdown made it safe | Discharge, bleed, block, or secure all stored energy | Shock, motion, release of pressure |
| Isolation point | Use a push button or control switch | Lock the breaker or disconnect that stops energy flow | Unexpected startup or live parts |
| Voltage check | Skip testing | Test with a rated meter using live-dead-live | Shock or arc flash |
| Group work | One lock covers the whole crew | Each worker applies a personal lock | A worker is left exposed |
| Contractor coordination | Separate procedures on one job | One shared lockout plan and clear roles | Confusion and unsafe reenergization |
| Program control | Rely on memory | Use written equipment-specific procedures and annual reviews | Repeat errors and OSHA citations |
If you want the short version, it’s this: identify, isolate, release stored energy, lock, test, and coordinate. Everything in the article supports those steps.
Stored Energy Hazards and OSHA Control Requirements
Opening a breaker does not make equipment safe. OSHA says all stored or residual energy must be relieved, disconnected, restrained, or otherwise made safe before servicing starts. That point matters more than many crews think. In one NIOSH review of fatal incidents, failure to completely deenergize, isolate, block, or dissipate energy played a role in 142 of 152 cases.
Treat stored energy as its own lockout step, not as something that “probably went away” when the disconnect opened.
This hazard is not abstract. It can still sit in capacitors, batteries, springs, rotating parts, and pressure systems long after shutdown.
Electrical and Mechanical Energy That Stays After Shutdown
Some energy sources stay live even after the main disconnect is open. Capacitors, VFD DC buses, filter circuits, battery banks, and UPS systems can stay energized after shutdown. On the mechanical side, danger can remain in spring-charged mechanisms, coasting rotors, hydraulic pressure, and gravity loads.
Hydraulic actuators must be depressurized before maintenance. If that step gets skipped, parts can move the moment a fitting is loosened or a control is touched.
How NFPA 70E Supports an Electrically Safe Work Condition
NFPA 70E lines up with OSHA’s stored-energy rule by laying out the field method used to meet it. NFPA 70E requires stored electrical energy to be discharged and mechanical energy to be blocked or released before absence-of-voltage testing.
The sequence is straightforward:
- Lock out all energy sources
- Discharge stored energy
- Control mechanical and hydraulic hazards
- Verify absence of voltage with a properly rated meter
NFPA 70E also uses the live-dead-live method. First, confirm the meter works on a known live source. Next, test the equipment. Then confirm the meter still works. That last check matters. A dead meter can fool you just as fast as a live conductor.
Where induced voltage is still possible, temporary protective grounding should be applied before contact.
The table below shows the main stored-energy types, the risks they create, and the controls OSHA-compatible procedures should require.
Stored Energy Types and Required Controls: Comparison Table
| Energy Type | Typical Equipment | Hazard After Shutdown | Required Control Method | Common Field Mistake |
|---|---|---|---|---|
| Electrical – capacitors | VFD cabinets, power factor banks, surge protective devices | Charged DC bus can deliver lethal shock or arc flash on contact | Wait the manufacturer's specified time, then discharge, short-circuit, and ground capacitors per procedure | Relying on breaker position instead of discharge time |
| Electrical – batteries/UPS | UPS systems, DC control circuits, switchgear control power | AC breaker open but DC output or bypass paths still energize downstream loads | Open and lock DC isolators and battery disconnects; confirm bypass and alternate feeds are isolated; test output terminals for absence of voltage | Locking out only the utility feed and ignoring the UPS bypass or battery source |
| Mechanical – spring mechanisms | Electrically operated breakers, switchgear | Stored spring energy can move contacts or doors unexpectedly | Discharge or block springs using manufacturer-specified procedures before entering the compartment | Racking out a breaker without confirming springs are discharged |
| Mechanical – rotating equipment | Motors, fans, pumps | Coasting or back-driving can create motion or voltage | Allow complete stop; mechanically block or secure driven components if motion could injure workers | Starting work immediately after power removal without waiting for full stop |
| Hydraulic/pneumatic | Breaker operating mechanisms, hydraulic actuators, pneumatic systems | Pressurized actuators move components when seals or fittings are disturbed | Bleed pressure to zero and verify before opening any pressure lines or controls | Treating hydraulic hazards as outside the electrical work scope |
| Gravitational | Elevated machine components, hoist loads controlled by electrical systems | Loss of electrical control causes unexpected drop or movement | Lower to a safe position or provide mechanical supports independent of electrical control | Relying on electrical brakes or interlocks to hold elevated loads during maintenance |
Once stored energy is under control, the next move is picking the right disconnect point and proving the circuit is deenergized.
Choosing the Right Disconnect Point and Confirming Deenergization
Once stored energy is under control, the job shifts to the actual power source. That means locking out the true isolation point and then checking for absence of voltage before anyone touches conductors or parts.
Why Control Circuits and Push Buttons Are Not Lockout Points
OSHA's lockout/tagout standard says an energy-isolating device must be a mechanical device that physically stops energy from reaching equipment. Push buttons, selector switches, interlocks, and emergency stop buttons do not count. They stop a control signal. Disconnects isolate power.
The right isolation point depends on the equipment in front of you. For a panelboard, that usually means the main breaker or the upstream feeder breaker. For an MCC, it means the main feeder breaker and often the bucket disconnect too. For a transformer, it means the primary disconnect, with the secondary breaker opened as well to stop backfeed. And in newer systems, there may be more than one source in play, such as utility power, generator power, UPS supply, and control-power feeds. Each source has to be isolated.
After the correct disconnect is opened, every conductor still needs to be proven deenergized.
Step-by-Step Verification Before Touching Conductors or Components
After isolation, follow NFPA 70E's ESWC sequence. Start by reviewing single-line diagrams and panel schedules so you can spot every source feeding the equipment, including generator ties, UPS feeds, and control power transformers. Then use normal controls to stop the equipment before operating the isolating device. After that, open each energy-isolating device and apply personal locks and tags to every one.
Then comes voltage testing. Use the live-dead-live method to check for absence of voltage at all required points: phase-to-phase and phase-to-ground at the equipment terminals, plus any control circuits fed from separate sources. NFPA 70E says this test must happen at each point of work, not just once at some upstream location. If that step is missed, workers and employers can face citations under 29 CFR 1910.147. Work should not start until voltage testing is conclusive.
The table below shows some of the most common isolation mistakes and the compliant fix.
Incorrect vs. Compliant Isolation Methods: Comparison Table
| Equipment Type | Incorrect Lockout Method | Compliant Isolation Method | Likely Consequence of Error |
|---|---|---|---|
| Panelboard | Locking only the branch breaker feeding the circuit; panel bus remains energized | Open and lock the panelboard main breaker or upstream feeder breaker; verify absence of voltage on the bus and load side | Workers contact energized bus conductors; shock or arc flash exposure |
| Motor Control Center (MCC) | Locking the local start/stop station or only the bucket's control circuit disconnect | Lock out the MCC main feeder breaker and, often, the individual bucket disconnect; verify bus and motor feeder are deenergized | Remote start signal re-energizes the motor; shock or electrocution injury |
| Switchgear | Locking the control selector switch in "OFF" while the main breaker line side stays live | Open and lock all sources feeding the section (utility main, generator tie); test both line- and load-side conductors | Line-side exposure during maintenance; OSHA citation under 29 CFR 1910.147 |
| Transformer | Deenergizing only the secondary breaker while the primary remains energized | Open and lock the primary disconnect or breaker; open the secondary breaker to prevent backfeed; verify voltage on both sides | Backfeed or induced voltage reaches workers inside the enclosure |
| Motor (local disconnect) | Using an emergency stop button as the lockout point | Lock out the fusible or non-fusible disconnect switch at the equipment; verify absence of voltage at motor terminals | Control logic override or remote signal energizes the equipment during work |
Group Lockout and Contractor Coordination on Multi-Person Jobs
After equipment has been isolated and verified deenergized, the next place jobs can go wrong is job control. On a multi-person task, one worker's lock is not enough. Group lockout protects every authorized employee on the job so no one can reenergize the equipment while someone else is still inside the work area.
Group Lockout on Shared Equipment
The usual setup is a group lockbox or a similar device. One designated lead authorized employee isolates the energy source and places the isolation key inside the lockbox. Then each worker adds a personal lock to the box or hasp. The equipment stays isolated until the last personal lock is removed. The lockbox controls access to the key, while the lead authorized employee still has to confirm the isolation step.
Key control needs to stay strict. Each personal lock should belong to one worker only and stay under that worker's control. No one removes another person's lock.
Shift changes need a formal handoff. Incoming workers put their locks on before outgoing workers take theirs off.
Some jobs need tighter controls from the start. If the work involves multiple energy sources, multiple crews, or continues across shifts or several days, it should be handled as multi-source lockout. That means a written lockout plan, a designated lead authorized employee, group LOTO devices, and a worker accounting roster at the lockbox.
That same discipline carries over when outside contractors are part of the job.
Host Employer and Contractor Responsibilities
Before work begins, host and contractor employers need to share the lockout plan, the energy-source list, and who has authority to reenergize the equipment. Both crews need to follow the same isolation plan. One crew does not remove the other crew's locks unless that step is part of the agreed process.
Single-Worker, Group, and Multi-Source Lockout: Comparison Table
| Scenario | Typical Job | OSHA Control Method | Verification Duty | Administrative Controls |
|---|---|---|---|---|
| Single-worker lockout | One electrician replacing a motor starter or breaker | One personal lock on one disconnect | Worker independently verifies absence of voltage at the point of work | Worker retains sole key custody |
| Group lockout | Multiple electricians or mechanics servicing the same MCC or panel | Group lockbox with a primary lock; each worker applies a personal lock to the box | Lead authorized employee verifies isolation; others may but are not required to independently verify | Worker sign-in at lockbox; key-control log; shift-handoff records |
| Multi-source lockout | Multiple crews, trades, or employers; work spans shifts or days | Written lockout plan; group LOTO devices; designated lead authorized employee; clear isolation sequence | Lead authorized employee coordinates periodic rechecks; all energy sources confirmed isolated before each work period | Written energy isolation plan, contractor coordination notes, worker accounting roster |
The next step is stopping the field mistakes that cause lockout to fail in day-to-day work.
Common OSHA Lockout Mistakes in Electrical Maintenance and How to Fix Them
Once the rules are clear, the next problem is execution. In the field, small shortcuts cause a lot of the trouble.
Field Errors That Lead to Injuries and OSHA Citations
Lockout failures in the field usually come back to the same few mistakes. The most dangerous one is skipping the absence-of-voltage test. A breaker can fail. A backfeed can still be present. A control circuit can remain live even after shutdown. Miss that check, and you open the door to shock or arc flash.
Other repeat problems show up just as often. Some crews use tagout even when lockout can be done. Others lock only the main disconnect but miss secondary feeds or control power. Inconsistent labeling also creates confusion, which makes it harder to confirm the correct isolation point. OSHA's lockout/tagout standard was the #5 most-cited OSHA standard in FY2024, with 2,443 citations. Shared lock keys, early lock removal, and reenergizing before all workers are clear are also common violations - and serious ones. Each of these failures cuts into the basic protection lockout is supposed to give workers.
Most of the time, these mistakes don't come out of nowhere. They point to weak procedures, unclear labels, and poor job coordination.
Program Fixes That Improve Compliance and Job Execution
The best fix starts with written, machine-specific lockout procedures. OSHA 1910.147(c)(4) requires them, and failure to develop and document them is the single most common violation. Each procedure should spell out the exact disconnect points, the steps for stored-energy control, and the verification method.
Good labeling matters just as much. Disconnects and breakers should match the written procedures exactly so technicians can find the right device without guessing. Annual periodic inspections should review active lockout jobs and spot gaps before they turn into citations or injuries. Training also needs to go past the classroom. Hands-on practice with voltage testing, group lockout, and complex isolation helps turn the process into habit.
For contractor work, pre-job meetings should cover site LOTO rules, shared procedures, group lockout roles, and who has the authority to reenergize equipment. When these program pieces are in place and used the same way each time, OSHA estimates that lockout/tagout compliance prevents about 120 fatalities and 50,000 injuries each year.
Conclusion: The Core Steps That Make Electrical Lockout Work
The answer isn't more complexity. It's doing the same few steps every single time.
Effective electrical lockout comes down to six non-negotiable steps:
- Identify every energy source
- Isolate the correct disconnect point
- Control stored energy
- Apply lockout wherever physically possible
- Verify deenergization every time with a rated test instrument using the live-dead-live method
- Coordinate clearly with every worker and contractor on the job.
Keep those core steps fixed: identify, isolate, control, verify, and coordinate.
FAQs
What counts as stored energy?
Stored energy is any hazardous energy that stays in a machine even after the main power source is shut off.
That can include electrical charge in capacitors, compressed air, pressurized hydraulic fluid, tensioned springs, flywheels, elevated loads, and residual heat.
Every one of these energy sources must be neutralized or blocked before maintenance starts.
When is group lockout required?
Group lockout is required any time more than one authorized employee is involved in maintenance or servicing.
Here’s how it works: each worker applies their own uniquely keyed personal lock to a group lockbox.
That matters because it avoids putting control in the hands of one coordinator lock. The equipment stays locked out and cannot be re-energized until every worker has removed their own lock.
Who can remove a lockout device?
Under OSHA 29 CFR 1910.147, only authorized employees may install and remove lockout or tagout devices. And each worker should use a personal lock, so they stay in control of their own safety.
Before any device is removed, the work area needs to be clear of tools and other objects. All personnel must be safely out of the area. Site-specific procedures should also spell out who can remove devices and who can approve re-energizing the equipment.





