Electrical Risk Assessment: 5 Key Steps
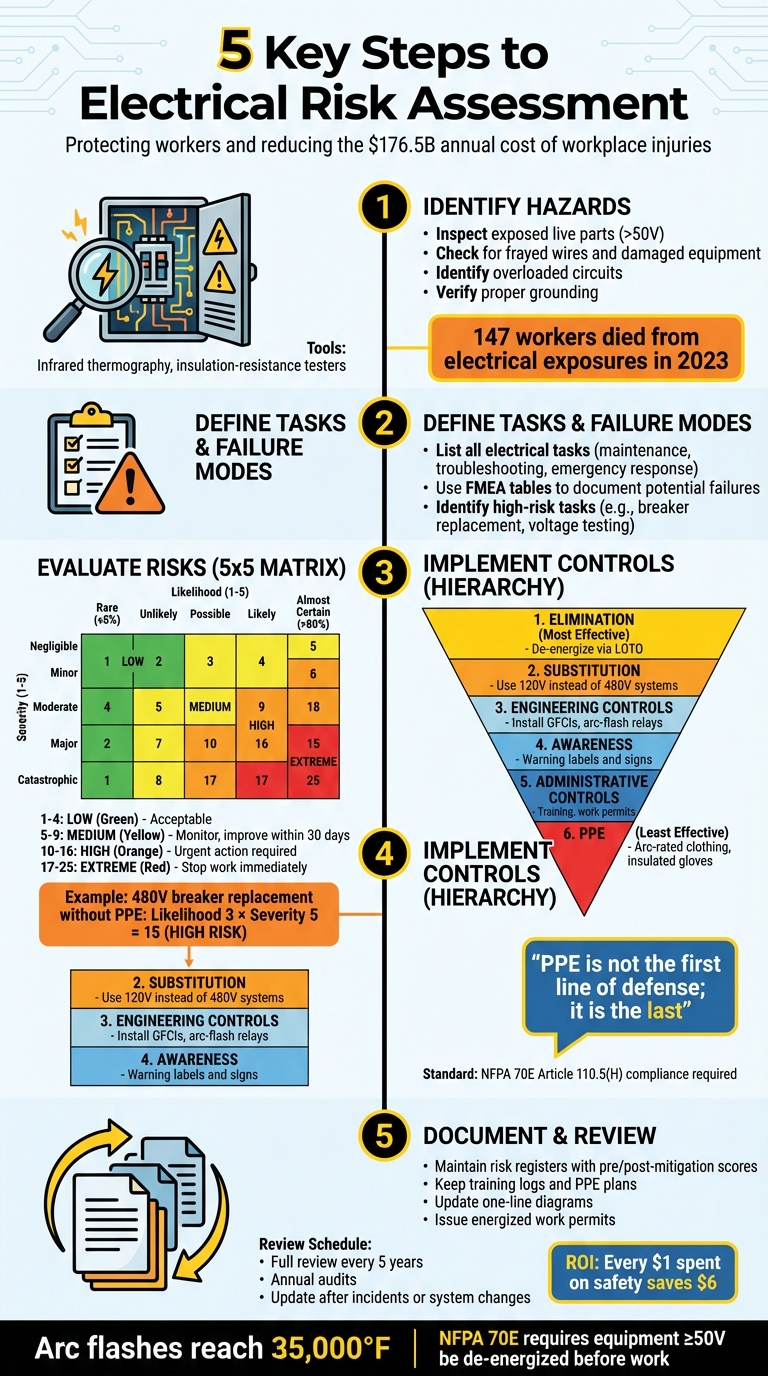
Electrical systems pose serious dangers, including shocks and arc flashes, which can lead to injuries, fatalities, and costly damages. A proper risk assessment helps identify these hazards, evaluate their risks, and implement controls to prevent accidents. Here's a quick breakdown of the five steps:
- Identify Hazards: Inspect for issues like exposed live parts, frayed wires, and overloaded circuits.
- Define Tasks and Risks: List electrical tasks and analyze potential failure modes.
- Evaluate Risks: Use a 5x5 matrix to assess the likelihood and severity of each hazard.
- Implement Controls: Apply measures like de-energizing equipment, installing safety devices, and using PPE.
- Document and Review: Maintain detailed records and update assessments regularly.
With electrical incidents costing businesses $176.5 billion in 2023, these steps are essential for safety and cost reduction. Regular reviews and compliance with standards like NFPA 70E ensure long-term protection.
5-Step Electrical Risk Assessment Process with Hierarchy of Controls
Electrical Risk Assessments & Control: How to Identify & Address Electrical Hazards in The Workplace
sbb-itb-501186b
Step 1: Identify Electrical Hazards
The starting point for any electrical risk assessment is pinpointing potential hazards. This involves a detailed walk-through to spot areas prone to equipment failures and exposure risks. To get started, gather essential documents like one-line diagrams, equipment labels, maintenance logs, and a five-year history of incidents. As Scott King, PMP from Hallam-ICS, explains:
"The electrical one-line diagram is the facility electrical distribution road map and is a key part of an Arc Flash Analysis".
Combine this document review with hands-on inspections to identify undocumented updates, such as panel modifications or unsafe temporary power setups. Dennis Neitzel, Director Emeritus at AVO Training Institute, stresses the importance of scheduling these evaluations:
"Safety assessments of electrical equipment and systems should be a planned and scheduled event to help ensure a safe and reliable electrical system".
This groundwork helps uncover the most frequent electrical hazards lurking in your facility.
Common Electrical Hazards
Detailed inspections often reveal recurring electrical risks in industrial settings. One major issue is exposed live parts, which pose a shock hazard when workers come into contact with energized components operating at 50 volts or higher. Another frequent problem is damaged equipment, such as frayed wires, cracked cables, or missing insulation - issues that often go unnoticed until an incident occurs. Overloaded circuits are also a concern, typically caused by using wires or extension cords that aren’t designed to handle heavy electrical loads. Similarly, improper grounding, like missing ground pins on plugs or ungrounded devices, can create serious risks.
Aging systems bring their own set of hidden dangers, including outdated panels, concealed faulty wiring, and deteriorating insulation. Herbert Post, a Compliance Expert at Tradesafe, highlights the importance of thorough assessments:
"Hidden dangers like faulty wiring or degraded insulation can go unnoticed... making it crucial to conduct a thorough assessment".
Environmental factors, such as moisture, dust, and extreme temperatures, can further accelerate equipment degradation and amplify risks.
Tools for Hazard Identification
Modern tools make it easier to identify these hazards. For instance, infrared thermography can spot hot connections with temperature differences exceeding 40°F, which often indicate loose connections or overloaded circuits. Insulation-resistance testers are another essential tool, helping to detect worn-out cable insulation that could lead to short circuits or shocks. Always use insulated hand tools rated for at least 1,000 volts during these evaluations.
To avoid overlooking potential risks, assemble a well-rounded inspection team that includes maintenance staff, safety officers, and insurance representatives. Pay special attention to high-risk areas, such as devices operating near their maximum load, temporary power setups exposed to harsh weather, and panels that have been modified. Ensure that no materials are stored beneath overhead power lines, and maintain a minimum clearance of 10 feet.
Step 2: Define Electrical Work and Failure Modes
Once hazards are identified, the next step is to clearly define electrical tasks and potential failure modes. This clarity ensures targeted and effective safety measures.
Start by creating a detailed inventory of tasks, including routine maintenance, commissioning, troubleshooting, and emergency responses. Finalizing this list early helps prevent scope creep and allows for timely implementation of safety controls. If new tasks emerge later, address them separately in a Phase 2 evaluation.
This structured approach helps align each task with its specific risks. For instance, testing voltage on energized conductors involves greater danger compared to operating a circuit breaker. To sharpen the focus, pair each task with its associated hazards. For example, replacing a breaker could be linked to the risk of arc flash exposure.
Use Failure Mode and Effects Analysis (FMEA) tables to document potential issues. For instance, a breaker contact failure during racking could lead to an arc flash and thermal injuries to the operator. Temporary power installations deserve extra attention - they face higher risks from weather exposure, physical damage, and frequent reconfiguration. Additionally, poorly maintained or improperly rated components can increase failure risks during routine tasks.
This categorization isn’t just about listing hazards - it’s about addressing real-world risks. For example, in 2023, 147 workers lost their lives due to electrical exposures, and workplace injuries that year cost $176.5 billion. Defining tasks and failure modes with precision is crucial for effective protection and lays the groundwork for the evaluation and control steps that follow.
Step 3: Evaluate Severity and Likelihood of Risks
Once tasks and failure modes are clearly defined, the next step is to assess each risk using a 5x5 matrix. This matrix quantifies risks by multiplying two factors: likelihood (rated 1–5) and severity (rated 1–5). The result is a risk value ranging from 1 to 25, where higher numbers signal more urgent hazards. This scoring system provides a solid foundation for prioritizing safety measures, especially during audits, by focusing resources on the most critical risks.
Using a Risk Matrix
The 5x5 matrix evaluates risk along two axes:
- Likelihood: This measures how often an event might occur annually, from "Rare" (≤ 5% chance per year) to "Almost Certain" (> 80% chance).
- Severity: This assesses the level of harm, ranging from "Negligible" (no injury expected) to "Catastrophic" (fatality or permanent disability).
Here’s an example of how it works: Imagine a qualified electrician replacing a circuit breaker in an energized 480V panel without proper arc flash PPE. This task might score a 5 for severity (potential fatality) and a 3 for likelihood (possible during breaker removal). Multiply these scores: 3 × 5 = 15, categorizing it as High Risk. Similarly, transformer maintenance with high-voltage arc flash exposure could score 4 for likelihood and 5 for severity, resulting in a 20 - an Extreme Risk requiring immediate action.
To assign likelihood scores, use historical data, equipment failure rates, and industry benchmarks. For severity, factor in both direct injuries (like burns or shocks) and secondary effects, such as falls caused by electrical contact. Once risks are scored, you’ll move on to interpret these numbers systematically.
Interpreting Risk Scores
Risk scores are categorized into four levels, each with specific actions:
- 1–4 (Low): These risks are acceptable with current controls in place.
- 5–9 (Medium): These require monitoring and possible improvements within 30 days.
- 10–16 (High): These demand urgent attention, with engineering or administrative controls implemented promptly.
- 17–25 (Extreme): These are unacceptable. Work must stop immediately, and tasks must be redesigned or eliminated.
| Risk Score | Classification | Action Required |
|---|---|---|
| 17–25 | Unacceptable / Extreme | Stop work immediately; implement elimination or engineering controls |
| 10–16 | Tolerable / High | Urgent mitigation required; implement controls within 30 days |
| 5–9 | Adequate / Medium | Monitor trends; consider further analysis |
| 1–4 | Acceptable / Low | Maintain existing controls; no immediate action needed |
"A risk assessment matrix is a practical tool for prioritizing risk, not a guarantee of safety. When used alongside a proper risk assessment process, a 5×5 matrix helps teams focus effort where it matters most and communicate risk decisions clearly." - Hanaan Parkinson-Ramsbottom, BrightHR
This process is essential because electrical hazards are responsible for roughly 4,000 injuries and one fatality every day in the U.S.. Workplace injuries cost $176.5 billion in 2023 alone, making it crucial to address high-risk tasks first for both safety and financial benefits. Additionally, NFPA 70E requires these assessments to be reviewed every five years or whenever significant system changes occur. By prioritizing risks effectively, teams can ensure timely and impactful safety measures in the steps that follow.
Step 4: Implement Controls to Reduce Risks
Once you've scored the risks, the next step is putting controls in place to either remove or reduce those hazards. This process follows a structured hierarchy of controls, a six-step framework ranked by effectiveness. Mandated by NFPA 70E Article 110.5(H), this approach focuses on not just protecting workers from hazards but actively working to prevent them in the first place. Using the risk scores identified earlier, these controls directly address hazards at their source.
Hierarchy of Controls
The hierarchy starts with the most effective methods and works down to the least effective. At the very top is Elimination, which involves removing the hazard entirely by de-energizing equipment through lockout/tagout (LOTO) procedures. For instance, if a task falls into the High Risk category with a score of 20 (as outlined in Step 3), establishing an electrically safe work condition via LOTO can drastically lower the risk. NFPA 70E requires de-energizing equipment operating at 50V or more unless doing so would create a greater danger.
Next is Substitution, where you replace a high-risk situation with a safer alternative. This might mean using a 120V system instead of a 480V panel or installing current-limiting fuses to reduce incident energy. After that comes Engineering Controls, which physically separate workers from hazards. Examples include installing ground fault circuit interrupters (GFCIs), arc-flash relays, or Permanent Electrical Safety Devices (PESDs) that allow voltage testing without opening an enclosure. These measures are effective because they don't rely on human actions.
Lower down the hierarchy are Awareness (like warning signs and labels), Administrative Controls (such as training programs and work permits), and Personal Protective Equipment (PPE) (like arc-rated clothing and insulated gloves). These methods are about managing exposure rather than eliminating the hazard itself. As Tommy Northcott, Senior Power Engineer at Jacobs Technology Inc., puts it:
"Immediately jumping to protect yourself from the hazard with PPE is essentially assuming it will happen no matter what, prompting you to shield yourself from the hazard's effects".
Tim Piemonte, Vertical Market Manager at Littelfuse, echoes this sentiment:
"PPE is not the first line of defense; it is the last".
Here’s a quick breakdown of the hierarchy:
| Hierarchy Level | Effectiveness | Example |
|---|---|---|
| Elimination | Most Effective | De-energizing equipment via LOTO |
| Substitution | High | Using 120V systems instead of 480V panels |
| Engineering Controls | Moderate | Installing GFCIs or arc-flash relays |
| Awareness | Low-Moderate | Warning labels and arc flash signs |
| Administrative Controls | Low | Safety training and work permits |
| PPE | Lowest | Arc-rated clothing and voltage-rated gloves |
In practice, combining several levels of control often works best. For example, for a High Risk task, you might de-energize the equipment (Elimination), install a PESD for future maintenance (Engineering Controls), issue an energized work permit if de-energization isn’t feasible (Administrative Controls), and require arc-rated PPE as a backup.
Compliance with NFPA 70E Standards

NFPA 70E Section 110.5(H) doesn’t just recommend the hierarchy of controls - it makes it mandatory. Recent updates to the standard now require that any equipment operating at 50V or more be placed in an "electrically safe work condition" before work begins, unless doing so is impractical or would increase the risk.
Compliance also includes thorough documentation at every stage. This means keeping risk registers with both pre- and post-mitigation scores, issuing energized work permits when necessary, and maintaining training logs with proof of worker competency. For High Risk tasks (scores of 15–25), NFPA 70E Article 120 demands immediate control measures, including de-energization, while Medium Risk tasks (scores of 8–14) require mitigation within 30 days using engineering or administrative controls. Proper documentation not only demonstrates compliance during OSHA investigations but can also help reduce insurance costs. The standard also requires that incident energy analyses be reviewed every five years or after significant system changes.
With workplace injuries costing $176.5 billion in 2023 and OSHA research showing that every $1 spent on safety programs saves $6, following NFPA 70E guidelines is both a safety and financial win. The key is prioritizing higher-level controls, like Elimination and Engineering Controls, over measures that rely on human behavior, such as Administrative Controls or PPE. These human-dependent methods can fail under pressure or fatigue. Once controls are in place, document and regularly review risk assessments to ensure the mitigation process is complete.
Step 5: Document, Implement, and Review Risk Assessments
Once you've identified hazards, evaluated risks, and implemented control measures, the next critical step is documenting everything. Proper documentation not only creates a clear record but also serves as protection in case of OSHA inspections, insurance claims, or legal disputes. As Rimkus highlights, thorough records can shield your organization from potential liabilities.
Creating Risk Registers and Plans
A risk register acts as a centralized database that tracks all identified hazards, their risk levels (both before and after mitigation), and the specific controls applied to address them. For each hazard, include details like the job description, the equipment involved, the location, and numerical risk ratings based on the 5x5 matrix. For instance, a high-risk task initially scoring 20 might drop to a much safer 4 after applying measures like lockout/tagout procedures.
Your documentation should also cover:
- PPE plans: Specify arc-rated clothing requirements based on calculated incident energy levels.
- Training records: Include logs that verify competency through written tests or practical demonstrations - not just sign-in sheets.
- System updates: Maintain current one-line diagrams reflecting the latest configurations.
- Energized work permits: Record approvals for tasks within restricted approach boundaries.
Dennis Neitzel, Director Emeritus at AVO Training Institute, Inc., underscores the importance of regular assessments, stating:
"Regularly scheduled assessments are used to identify unsafe equipment; inadequate or non-existent electrical equipment maintenance programs; unsafe employee work practices; [and] compliance or non-compliance with regulations".
These detailed records not only support compliance but also serve as a foundation for improving safety over time.
Regular Reviews and Updates
Risk assessments should never be treated as a one-time task. Conduct a full review every five years or whenever there are major system changes. Annual audits are another proactive way to strengthen safety protocols. Additionally, update all records annually or after any significant changes.
Electrical incidents - whether it's a spark, a shock, or even a near-miss - should prompt an immediate reassessment. Such events might reveal gaps in your existing controls. Monitor near-miss reports, PPE usage, and pre-job briefings to catch early warning signs of potential hazards. To avoid delays caused by expanding project scopes, finalize your task inventory before scoring risks. Any new tasks can be addressed in a later "Phase 2" assessment.
And here's a financial incentive: OSHA research shows that every $1 invested in safety programs saves $6. Keeping your documentation thorough and up to date isn't just about compliance - it’s also a smart financial decision.
Conclusion
Wrapping up the five essential steps - from identifying hazards to thorough documentation - highlights a structured approach to managing electrical risks. Conducting a detailed electrical risk assessment not only safeguards lives but also ensures smoother operations, reducing potential downtime and financial losses.
Risk assessments shouldn't be a one-and-done task. Make them part of your routine by scheduling comprehensive reviews every five years and performing annual audits. These regular check-ins can help you catch changes in equipment, personnel, or processes before they turn into serious hazards. Consider this: arc flashes can reach temperatures over 35,000°F, making proactive safety measures absolutely critical. As Dennis Neitzel, Director Emeritus at AVO Training Institute, wisely points out:
"Safety assessments of electrical equipment and systems should be a planned and scheduled event to help ensure a safe and reliable electrical system".
Another key step in reducing risks is ensuring that any replacement or upgraded components meet strict safety standards. Hidden dangers - like faulty wiring, worn insulation, or mislabeled parts - can lead to unexpected incidents. Platforms like Electrical Trader offer a reliable source for high-quality electrical components, whether you need new or used equipment such as breakers, transformers, or high-voltage distribution gear. Replacing outdated or hazardous parts with compliant alternatives builds a safer and more reliable system.
Prevention is always more cost-effective than dealing with accidents. With workplace injuries costing $176.5 billion in 2023, investing in thorough risk assessments and high-quality equipment isn’t just about safety - it’s about smart financial planning. Regular reviews and updates to your electrical systems help create a safe workplace where your team can focus on getting the job done, not worrying about the next arc flash or electrical shock.
FAQs
Who should perform an electrical risk assessment?
Individuals tasked with working on or near electrical systems should carry out electrical risk assessments. This group typically includes electricians, safety personnel, risk managers, and facility operators. Their primary responsibility is to pinpoint potential hazards and take steps to reduce risks in a way that keeps everyone safe.
How do I choose likelihood and severity scores in a 5x5 risk matrix?
The 5x5 risk matrix is a straightforward tool for evaluating and prioritizing risks by assessing two key factors: likelihood (probability of occurrence) and severity (impact of the hazard). Each factor is rated on a scale from 1 to 5, making it easier to visualize and manage potential risks.
Likelihood Ratings (1–5)
This scale measures how probable it is that a risk will occur:
- 1 - Rare: Extremely unlikely to happen.
- 2 - Unlikely: Possible, but not expected under normal circumstances.
- 3 - Possible: Could occur occasionally.
- 4 - Likely: Expected to happen in many instances.
- 5 - Certain: Almost guaranteed to occur.
Severity Ratings (1–5)
This scale evaluates the potential impact if the risk materializes:
- 1 - Negligible: Minimal or no noticeable impact.
- 2 - Minor: Slight impact, easily managed.
- 3 - Moderate: Noticeable effect requiring intervention.
- 4 - Major: Significant impact with serious consequences.
- 5 - Catastrophic: Severe, potentially disastrous outcomes.
Using the Matrix
To prioritize risks, multiply the likelihood score by the severity score. The result provides a risk level that helps in determining how urgently a risk should be addressed:
- Low Risk (1-6): Minimal action required.
- Moderate Risk (7-14): Requires monitoring and some mitigation efforts.
- High Risk (15-25): Needs immediate and significant mitigation measures.
This structured approach ensures risks are assessed objectively and managed effectively, focusing resources where they are needed most.
When is an energized work permit allowed instead of de-energizing?
When it’s riskier to de-energize equipment than to work on it while energized, an energized work permit may be issued. This aligns with NFPA 70E guidelines, which require thorough documentation and justification for such cases. For instance, shutting down power might jeopardize critical operations, put lives at risk, or disable essential systems. These scenarios demand careful consideration to ensure safety while maintaining operational integrity.