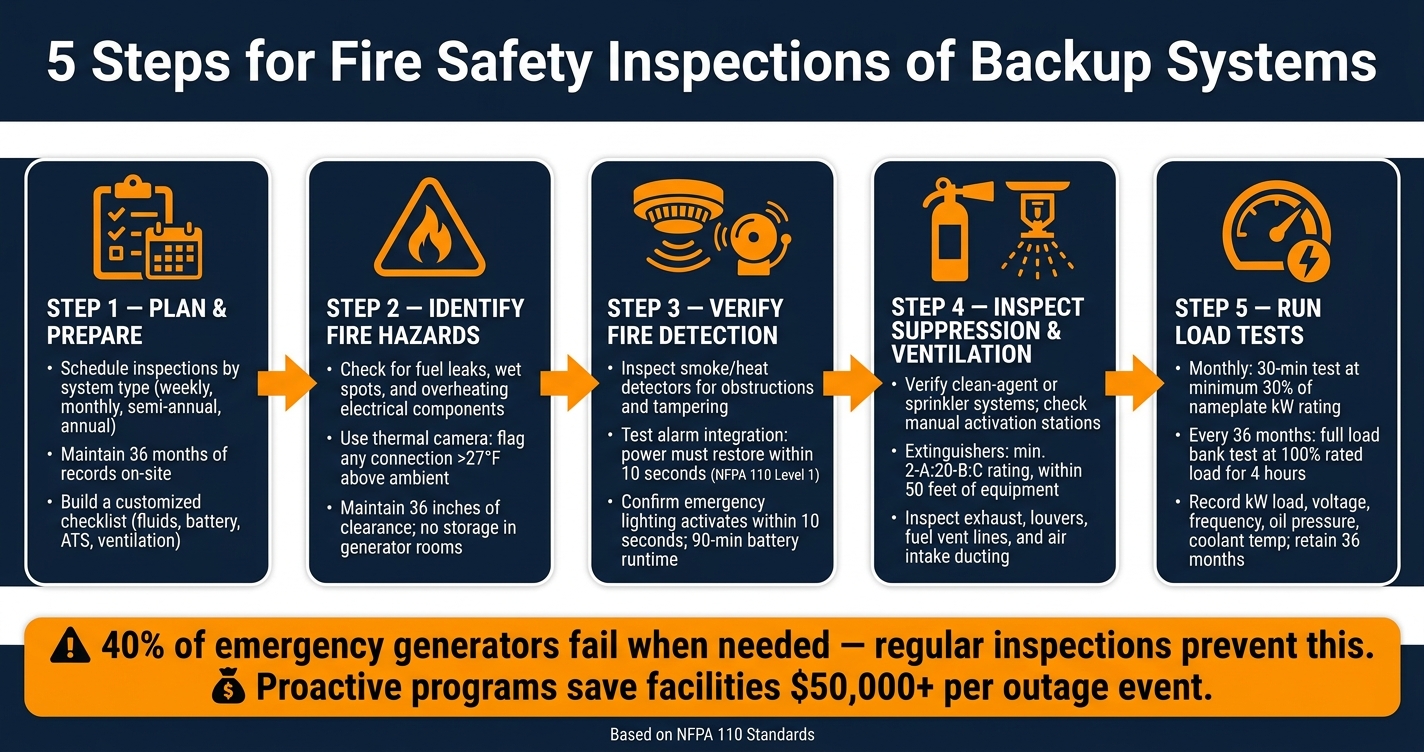
5 Steps for Fire Safety Inspections of Backup Systems
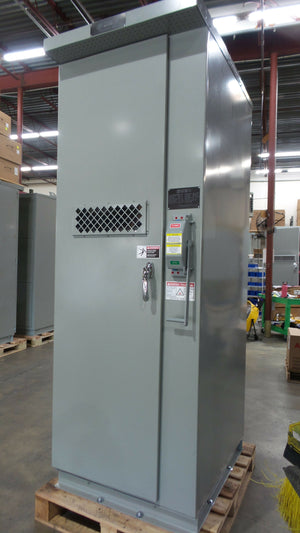
When power outages strike, backup systems like generators, UPS, and ATS ensure critical safety equipment - such as fire alarms and emergency lighting - keeps running. However, 40% of emergency generators fail when needed, often due to skipped maintenance. To avoid this, follow these five steps for thorough inspections:
- Plan and Prepare: Schedule inspections based on system type (e.g., weekly visual checks, monthly load tests) and maintain at least 36 months of records.
- Identify Fire Hazards: Check for fuel leaks, overheating electrical components, and ensure proper ventilation and housekeeping.
- Verify Fire Detection: Inspect smoke and heat detectors, test fire alarm integration with backup power, and ensure emergency lighting activates within 10 seconds.
- Inspect Suppression and Ventilation: Assess fire suppression systems, confirm proper placement of extinguishers, and ensure ventilation systems are unobstructed and functional.
- Run Load Tests: Perform monthly and extended load tests to detect hidden issues like battery degradation or exhaust leaks.
Skipping any of these steps can lead to compliance violations or equipment failure during emergencies. Regular inspections not only ensure safety but also help facilities avoid costly downtime and regulatory penalties.
5-Step Fire Safety Inspection Checklist for Backup Power Systems
EST 3 | How to do Backup Battery Load Test | NFPA 72 2025 Edition
Step 1: Plan and Prepare for the Inspection
Getting ready for an inspection starts with solid planning. A well-structured schedule, accurate documentation, and a detailed checklist tailored to your system are essential.
Set Your Inspection Schedule
The frequency of inspections depends on the type of system you're dealing with. For instance, Level 1 systems (used in critical settings like hospitals and high-rises) and Level 2 systems (supporting non-life-safety operations) have different requirements under NFPA 110. Here's a quick breakdown:
| Test Type | Frequency | Minimum Duration | Key Requirement |
|---|---|---|---|
| Visual Inspection | Weekly | N/A | Check fuel, oil, coolant, and battery levels |
| Exercise/Load Test | Monthly | 30 minutes | Minimum 30% of nameplate kW rating |
| General Inspection | Semi-Annual | N/A | Thorough check of prime mover and transfer switches |
| Load Bank Test | Annual | 1.5–2 hours | Required if monthly loads fall below 30% |
| Extended Load Test | Every 36 months | 4 hours | Run at full rated load to verify system stamina |
Local regulations, enforced by the Authority Having Jurisdiction (AHJ) - often the fire marshal - might require stricter schedules than the national code. Always confirm with your AHJ before finalizing your inspection calendar. Once you’ve done that, create a master annual calendar that outlines all required inspection tasks.
"Your emergency generator is only as reliable as your maintenance program. In an emergency, there are no second chances to get it right." - JD @ CLS, Confirmed Life Safety
After setting your schedule, review the system’s past performance by examining its records.
Review System Documentation
Before heading out for the inspection, gather all relevant documents. This includes operational logs, monthly test results, fuel quality reports, battery maintenance records, and Automatic Transfer Switch (ATS) transfer logs. These records provide a clear picture of how the system has been functioning and can help pinpoint any potential issues.
Here’s a cautionary tale: In March 2024, a Texas hospital failed to maintain 18 months of emergency power documentation, including logs for monthly testing, fuel quality checks, and equipment maintenance. The fire marshal gave the facility just 30 days to comply with NFPA 110 standards or face closure. Missing or incomplete records are one of the most common violations during inspections - and one of the easiest to avoid.
Keep 36 months of records on-site, as inspectors typically review this period. Also, be on the lookout for suspicious patterns in manual logs, such as identical entries repeated week after week. These can indicate falsified data rather than actual readings.
Build Your Inspection Checklist
With your schedule and records in place, it’s time to create a customized inspection checklist. The specifics will depend on your system. For example, a diesel generator with a battery-backed UPS and an ATS will have different requirements than a natural gas standby unit.
Your checklist should include:
- Fluid levels (oil, coolant, fuel)
- Battery terminal condition and charger status
- ATS transfer time verification
- Control panel mode (ensure it reads "AUTO")
- Ventilation clearances
For monthly tests, document actual numbers like voltage, frequency, oil pressure, and coolant temperature. Recording precise values allows you to track trends and spot issues early - something a simple checkbox won’t reveal.
"The gap between what the standard requires and what facilities actually document is the gap that regulators, insurers, and accreditation bodies close during an audit." - Jhon Polus
Step 2: Identify and Address Fire Hazards
With your tailored checklist ready, it’s time to assess the generator's environment and condition for potential fire risks.
Check for Combustible and Electrical Hazards
Start by visually inspecting the generator's base frame, fuel lines, and hose connections for any signs of leaks. Look for wet spots or stains - these are clear indicators of a problem. If you spot anything, document it with photos, log the issue, and flag it for immediate repair. Remember, diesel fuel, oil, and coolant are flammable, and even a slow drip near a hot exhaust manifold can become a fire hazard.
Next, examine the electrical components. Overheating at ATS contacts, bus connections, or control wiring is a major fire risk. Use tools like a thermal camera or infrared thermometer to check temperatures. If any connection point is running more than 27°F (15°C) above the surrounding temperature, it demands immediate attention.
Watch out for wet stacking - a buildup of unburned fuel and carbon in the exhaust caused by running the generator at low loads. This can create a fire risk in the exhaust manifold. To address this, perform annual load bank testing at 100% of the generator's rated load for at least two hours. This is the only reliable way to clear these deposits.
"A generator that has never been tested at 100% load may carry 60% of rated load successfully and then trip on overload or governor instability when the transfer switch connects the building's actual emergency circuits." - Thomas Mackay, PE, Licensed Electrical Engineer and NFPA 110 Technical Committee Member
After addressing these hazards, confirm that the generator's surroundings are properly maintained to support overall fire safety.
Maintain Clearances and Housekeeping
Generator and UPS rooms should never double as storage areas. Storing items in these spaces can block ventilation louvers, restrict airflow, and add fuel to an area already containing flammable fluids and ignition sources. Always maintain at least 36 inches of working clearance around all equipment, ensuring there’s enough space to fully open hinged doors.
Check that ventilation louvers are clean and free of debris. Exhaust outlets should be positioned away from operable windows and combustible building materials. Also, look for signs of rodent activity - nesting materials inside an enclosure can lead to electrical shorts or even fires.
Record and Rank Identified Hazards
Every hazard you identify needs to be documented thoroughly. Include a photo, the equipment ID, the date, and a clear severity rating. Avoid vague notes like "checked OK", as these don’t meet AHJ standards. Use a structured four-tier classification system to prioritize repairs:
| Classification | Condition | Required Action |
|---|---|---|
| Emergency / Critical | Unit will not start or transfer (e.g., dead battery, active fuel leak) | Immediate repair before next load event |
| Urgent / Action | Unit runs but reliability is compromised (e.g., coolant leak, terminal corrosion) | Repair within 30 days or before next test |
| Routine / Monitor | Maintenance needed or trend developing (e.g., minor exhaust discoloration) | Log and increase inspection frequency |
| Non-Compliant | Documentation or labeling issue | Correct to meet AHJ standards |
This method ensures that hazards are addressed efficiently, repairs are prioritized, and proper documentation is maintained to meet regulatory requirements.
Step 3: Verify Fire Detection and Alarm Systems
This step ensures your fire detection and alarm systems are ready to respond when needed. Even with spotless housekeeping in a generator room, risks remain if a smoke detector is obstructed or disconnected from its backup power.
Inspect Fire Detection Devices
Start by visually inspecting all smoke, heat, and monitoring devices in the generator and UPS rooms. Look for any physical obstructions, like dust buildup, stored items, or debris, that could block sensor operation. Check that each device is securely mounted and shows no signs of tampering.
Proper placement is just as critical. Detectors should cover the room completely, avoiding blind spots near corners or behind large equipment. If detectors have been relocated or added without proper documentation, flag them for review against the original design drawings. These devices must meet the strict response standards outlined in NFPA 110.
Once inspections are complete, verify that these devices integrate seamlessly with your emergency power systems.
Test Alarm and Emergency Power Integration
Testing the connection between your fire alarm and emergency power systems is a must. Simulate a utility failure and confirm the sequence of events: utility failure, generator startup, engine run-up, and ATS (Automatic Transfer Switch) transfer to support the fire alarm load.
One critical metric here is the 10-second rule. NFPA 110 mandates that Level 1 systems restore power within 10 seconds of a utility failure. This includes engine cranking, reaching the rated speed and voltage, and completing the ATS transfer. Record the time it takes for the fire alarm system to receive rated voltage.
"A generator left in manual mode after a test is a compliance failure point at every AHJ inspection." - Oxmaint
After the transfer, check that all remote annunciator points display "utility failure" and "emergency power on" status. Confirm the retransfer timer - usually set between 5 and 30 minutes - prevents switching back to utility power until the supply is stable.
Test Emergency Lighting and Exit Signs
Once the alarm system tests are done, move on to emergency lighting and exit signs. Both must activate immediately - within 10 seconds of a power failure. Verify that egress paths maintain at least 1 foot-candle of illumination at floor level and that exit signs provide at least 5 foot-candles.
Check for immediate activation, confirm a 90-minute backup runtime, and inspect batteries monthly for issues like terminal corrosion, swelling, or leakage. Measure the float voltage against the manufacturer's specifications, ensuring it stays within ±0.5V. Plan to replace batteries every 3 to 5 years, regardless of their condition, as battery failure is a leading cause of generator start issues in commercial facilities.
Exit signs should be spaced no more than 100 feet apart, and emergency lighting circuits must operate independently, as required by NEC Article 700.
Finally, document all test results, including dates, measured illumination levels, and any deficiencies. Most Authorities Having Jurisdiction (AHJ) require these records to be kept on-site for at least 36 months.
sbb-itb-501186b
Step 4: Inspect Suppression Systems and Ventilation
Once detection systems are verified, the next step is to ensure that suppression systems and ventilation are capable of controlling or preventing a fire effectively.
Review Fire Suppression Systems
With hazards identified and alarms addressed, it's time to focus on suppression systems and ventilation for a well-rounded fire safety plan.
Start by identifying the type of suppression system in place. This could include wet-pipe sprinklers, clean-agent systems like FM-200 or Novec 1230, or a combination of both. Tailor your inspection based on the system type.
For clean-agent systems, verify that each zone has a manual activation station that is easy to access. Automatic detection equipment should be linked to a pre-discharge alarm, giving personnel enough time to evacuate before the agent is released. Ensure hazard warning signs are clearly posted at entrances and in areas where the suppression agent could pose health risks.
In high-rise buildings, fuel lines supplying generators must be protected by fire-resistant pipe assemblies rated for at least 2 hours - or 1 hour if the building has an automatic sprinkler system throughout. Facilities using stationary fuel cell systems should have gas detection systems that trigger at no more than 25% of the lower flammable limit (LFL). These systems should automatically shut down the fuel supply and activate both audible and visible alarms.
Check Fire Extinguishers
Portable fire extinguishers should meet a minimum rating of 2-A:20-B:C and be located within 50 feet of the equipment. During your walkthrough, confirm their placement, as this is a common oversight flagged by AHJ inspectors.
For fixed extinguishing systems, inspect refillable containers semi-annually for weight and pressure. If weight loss exceeds 5% or there’s a pressure drop greater than 10%, immediate maintenance is required. Keep detailed inspection records, including the service date, technician's name, and a summary of findings. These records should be attached to the container or stored in a central log.
Inspect Ventilation and Exhaust Systems
Proper ventilation in generator rooms is critical to maintaining airflow and avoiding thermal trips during high loads. These checks ensure compliance with NFPA standards and play a vital role in fire safety.
"Generator rooms require adequate ventilation for combustion air intake and heat rejection. Facilities that use generator rooms for storage or allow debris to accumulate near intake and exhaust openings create both a code violation and a fire hazard." - FCH Editorial Team
Inspect the exhaust system from the manifold to the outlet. Look for discoloration on the manifold, leaks at flexible couplings, and condensation pooling in low sections of piping. Examine exhaust outlets for signs of wet stacking.
Ensure that fuel vent lines terminate outside the building and that screens or caps are intact. Confirm that exhaust outlets are not located near operable windows or building air intakes. In battery rooms, check that mechanical exhaust ventilation is supported by a standby power source capable of running for at least 2 hours, preventing flammable gas buildup during outages.
| Component | Key Checkpoints | Frequency |
|---|---|---|
| Ventilation Louvers | Check for blockages, debris, pest ingress, and proper actuation | Monthly |
| Exhaust System | Inspect for leaks, manifold discoloration, and condensation in low points | Monthly (post-test) |
| Fuel Vent Lines | Ensure termination outside the building and check for screen/cap obstructions | Annual |
| Air Intake Ducting | Look for blockages, physical damage, and moisture ingestion | Semi-Annual |
| Exhaust Outlets | Verify they are clear of operable windows and building air intakes | Weekly |
Step 5: Run Operational Tests for Fire Safety
After completing inspections and addressing potential hazards, operational testing becomes the final safeguard. Once suppression systems and ventilation are confirmed, it's time to evaluate your backup power equipment in real-world conditions. Load testing is crucial, as it can reveal hidden issues like battery degradation, charger malfunctions, or exhaust leaks.
Run Load Tests on Generators and UPS Systems
According to NFPA 110, Level 1 and Level 2 emergency power systems must undergo a monthly load test for at least 30 minutes at 30% of the nameplate kilowatt rating. Additionally, Level 1 systems require a full load bank test every 36 months. These tests are essential for identifying fire risks that might otherwise go unnoticed.
"When teams test at too low of a load, equipment may pass and still fail under real alarm conditions." - Kord Fire Protection
During testing, keep a close eye on ATS (Automatic Transfer Switch) contacts and bus connections for unusual temperature increases. Any connection exceeding the ambient temperature by 27°F (15°C) should be flagged as a potential fire hazard. Also, monitor the exhaust carefully. Persistent black smoke is a warning sign of incomplete combustion, which can lead to carbon buildup and increase the risk of fire.
Inspect and Document Results After Testing
Once the test is complete and the system has cooled down for at least 5 minutes, confirm that the ATS resets to "AUTO" mode. Record critical data points such as kW load, voltage, frequency, oil pressure, coolant temperature, and ambient conditions. Photograph any flagged issues, ensuring the equipment ID and date are visible. NFPA 110 mandates that these records be maintained for at least 36 months for review by the Authority Having Jurisdiction (AHJ).
| Post-Test Data Point | Requirement |
|---|---|
| Cool-down Duration | Minimum 5 minutes (or per manufacturer) |
| ATS Status | Must return to "AUTO" mode |
| Transfer Time (Level 1) | 10 seconds maximum |
| Load Level | Minimum 30% of nameplate kW rating |
| Record Retention | Minimum 36 months for AHJ review |
Replace or Upgrade Faulty Equipment
Any deficiencies identified during testing must be addressed promptly. Issues like a failing battery charger or damaged ATS contacts require immediate attention. Non-critical problems should be resolved within 30 days or before the next compliance test.
Pay special attention to starting batteries. Flooded lead-acid batteries should be replaced every 2 to 3 years - or sooner if their performance drops below 80% of the rated Cold Cranking Amps (CCA). Reliable replacement components for backup power systems are widely available through suppliers like Electrical Trader, ensuring your equipment stays dependable when it matters most.
Conclusion: Keeping Your Inspection Process on Track
A well-organized inspection program is the backbone of reliable backup systems. Without it, you risk being part of the 40% of emergency generators that fail to start during actual emergencies - a staggering statistic that highlights the importance of regular checks.
The five steps outlined in this guide - planning and preparation, hazard identification, fire detection verification, suppression and ventilation checks, and operational load testing - work together to ensure your system's safety and reliability. Skipping even one step can leave vulnerabilities that inspectors, insurers, or the AHJ (Authority Having Jurisdiction) are bound to uncover. In fact, 45% of all regulatory violations tied to backup power stem from incomplete or missing test records.
"NFPA 110 compliance is not simply a regulatory checkbox - it is a commitment to the safety and continuity of the people and processes within your facility." - FCH Editorial Team, Facility Compliance Hub
By following these steps consistently, you create a safeguard for your backup power system, ensuring it remains dependable and compliant. Beyond meeting regulations, regular inspections can also lead to significant cost savings. Facilities with proactive programs often save an average of $50,000 or more per outage event, avoiding the expense of emergency equipment rentals and downtime.
Addressing deficiencies is key: tackle critical issues right away and plan routine fixes for the next service cycle. Make sure every issue is documented with a corrective work order. When it comes to replacing faulty parts, ensure compliance by sourcing code-approved components. Electrical Trader offers a reliable hub for new and used power generation equipment, including generators, transfer switches, and other essential components, to help you stay aligned with NFPA and NEC standards.
FAQs
What are the most common causes of generator failure during an outage?
Generators can fail during outages for several reasons, with battery issues, fuel contamination, and lack of regular maintenance being the most common culprits.
- Battery Problems: Batteries often give out due to sulfation, corrosion, or simply old age, leaving the generator unable to start when needed.
- Fuel Contamination: Water intrusion, clogged filters, or other fuel-related problems can lead to shutdowns or reduced performance.
Other factors include automatic transfer switch malfunctions, low coolant levels, and insufficient oil. Additionally, generators that are rarely used or miss critical load bank tests are more prone to these failures. Regular upkeep and testing are essential to avoid these pitfalls.
How do I know if my facility is an NFPA 110 Level 1 or Level 2 system?
Your system's classification isn't directly assigned by NFPA 110. Instead, it’s determined by your local Authority Having Jurisdiction (AHJ). Here's how it typically works:
- Level 1 systems: These are essential in situations where a power failure could lead to loss of life or serious injury, such as in hospitals or emergency response facilities.
- Level 2 systems: These are used in less critical environments where the impact of power loss is less severe.
To ensure compliance, always confirm your system's classification with written approval from your AHJ.
What documentation will an AHJ typically ask for during an inspection?
When dealing with an Authority Having Jurisdiction (AHJ), you'll often need to provide written records of your backup power system's testing and maintenance. These records should align with NFPA 110 standards and include details like test dates, durations, load levels (kW), ambient conditions, and any identified issues. Staying on top of this documentation not only ensures compliance but also keeps your system running smoothly. If you're in need of replacement parts or upgrades, Electrical Trader has a broad range of professional-grade electrical components to choose from.