




Top 5 Corrective Actions After Calibration Audits
If a calibration audit finds a problem, I treat it like a system issue, not just an equipment issue. The right response is simple: contain the problem, check what past work it touched, find the root cause, fix the process, train the team, and confirm the fix worked.
Here’s the short version of what matters most:
- Take the instrument out of service at once
- Open and track the NCR/CAR
- Review past measurements for the affected date range
- Run root cause analysis, not blame analysis
- Update calibration schedules, labels, and controls
- Retrain staff and tighten records
- Check results again after about 1 to 2 months
If I skip any of those steps, the same finding can come back in the next audit.
Calibration findings often trace back to a few repeat issues: missing records, overdue calibration, and out-of-tolerance equipment left in use. Under ISO 9001 Clause 7.1.5, equipment must be calibrated at set intervals, tied to traceable standards such as NIST, and reviewed when results are suspect. In plain terms: if a meter failed, I may also need to review work already done with it.
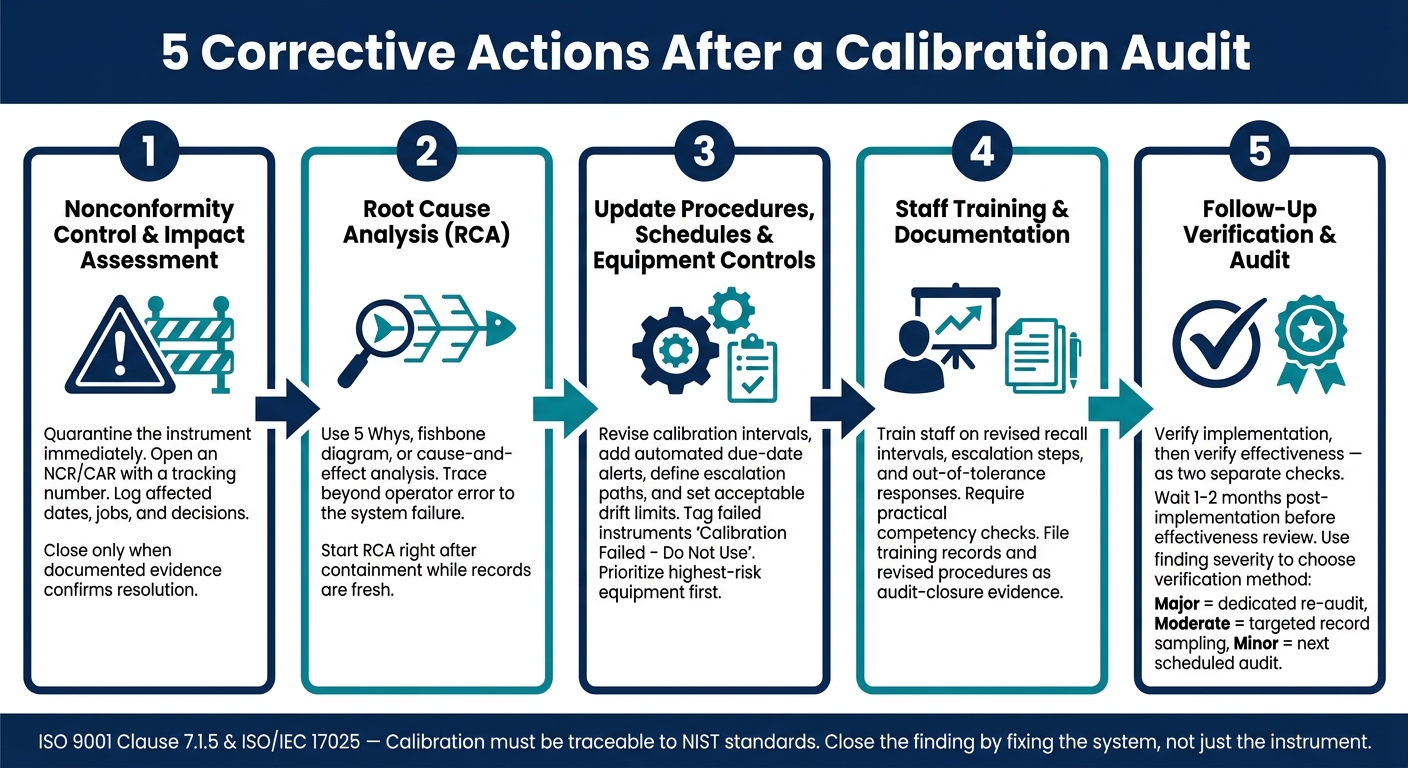
5 Corrective Actions After a Calibration Audit
Corrective Action in ISO 17025
sbb-itb-501186b
Quick Comparison
| Corrective action | Main goal | What I check first | What good closure looks like |
|---|---|---|---|
| Nonconformity control and impact review | Stop bad use and define scope | Affected instrument, dates, jobs, decisions | Instrument quarantined and impact logged |
| Root cause analysis | Find why it happened | Process gaps, recall failures, training gaps | Root cause documented with action plan |
| Procedure, schedule, and control updates | Fix the system | Due dates, labels, alerts, hold steps | Revised controls in use |
| Staff training and documentation | Make daily use match the procedure | Training records, forms, competency checks | Staff trained and records complete |
| Follow-up verification and audit | Prove the fix held | Repeat issues, sample records, stable readings | Separate implementation and effectiveness checks passed |
I see the five actions as one chain. First I stop the risk. Then I fix the cause. Then I prove the fix stayed in place.
Why Acting Quickly After a Calibration Audit Matters
When a calibration audit flags a nonconformity, you need to move right away. Every day you wait can add more affected measurements and more retesting. If a transformer test set or hi-pot tester was out of tolerance during insulation testing, results from that time may need review and retest. That means duplicate work and slower project delivery.
As Jack Forster of Test Meter Group notes, inaccurate measurements force duplicate work and undermine confidence in results.
The stakes get even higher in safety-critical testing. Bad readings can make protection systems and insulation checks unreliable. That creates a clear safety risk, because poor calibration can lead to false results and leave assets or infrastructure faulty.
There’s also the business side of it. If services depend on failed equipment, downtime can lead to financial losses. And if poor measurements come to light, companies may also lose future partnerships.
Once the risk is clear, the next step is to contain the nonconformity and figure out what it affected.
1. Set Up a Nonconformity Control and Impact Assessment Process
Once the issue is contained, document it and measure the impact. As soon as an audit flags a calibration issue, open an NCR or CAR, assign a tracking number, and log it in the QMS.
Assess Measurement Impact
Quarantine the instrument right away. Take it out of service, label it out of service, and stop using its results.
Then run a structured impact assessment. Record what was measured, the affected date range, the device error, and whether any accept/reject decisions might have changed.
Traceability relies on a documented, unbroken chain of calibrations with stated uncertainties. If that chain is broken, earlier results need to be reassessed. A simple example helps here: if a torque wrench used on breaker connections was under-reading by 5% for two months, every assembly torqued during that time may need re-inspection before it can be cleared.
Standards Alignment
Each NCR should also trigger a system-wide check. Look at whether the same kind of nonconformity shows up in other instruments, with other technicians, or inside other procedures. This check belongs in every NCR. It shouldn't be treated like a side task.
Recurrence Prevention
Don't close the NCR just because the instrument was recalibrated. Close it only when documented evidence shows the issue is resolved and under control.
Set the corrective action plan due within 30 days after root-cause analysis is completed.
After the impact is documented, move to root cause analysis.
2. Carry Out a Root Cause Analysis
Once containment is done, move straight into root cause analysis. This step is where you find the process failure that let the nonconformity happen in the first place. ISO/IEC 17025 guidance makes this point clear: RCA is a critical part of corrective action because simply naming a mistake does not prevent recurrence.
Start RCA right after containment, while records, notes, and equipment status are still fresh. Use a structured method like 5 Whys, a fishbone (Ishikawa) diagram, or cause-and-effect analysis to follow the issue back to the process breakdown. And don't stop at operator error. That answer is usually too shallow. Trace the flaw behind the mistake. Keep asking why until you reach the system failure underneath it, whether that's a flawed recall procedure, a training gap, or an unclear procedure step.
Measurement Validity Impact
If the audit finding may have affected past measurements, use the RCA to pin down the affected time window and review every result from that period. Then rank those results by risk, especially based on how close they were to tolerance limits and whether a different result could have changed a decision. That review shows whether previous outputs are still trustworthy or whether they need re-verification, recall, or customer notification.
Recurrence Prevention
The output of the RCA should lead straight to corrective actions that remove the root cause, not just cover the symptom. Common causes include drift, missed maintenance, outdated procedures, weak recall systems, and training gaps. The fix should match the cause. That may mean:
- automating reminders
- revising out-of-tolerance steps
- adding a second-person review
- blocking software bypasses
Each action should deal with the actual breakdown, not just the visible error.
Standards Alignment
ISO/IEC 17025 requires review of the nonconformity, its cause, any similar issues, and the effectiveness of corrective actions. Document the problem, the RCA method used, the identified root cause, the actions taken, and the effectiveness check. Then use those findings to update procedures and controls in the next step.
3. Update Calibration Procedures, Schedules, and Equipment Controls
Use the RCA output to update calibration procedures, schedules, and equipment controls before the affected equipment goes back into service. The point is to fix the control system, not just mark the audit finding as closed.
Recurrence Prevention
When the same error shows up across multiple people or shifts, the problem usually sits in the process. In that case, revise the process instead of relying on training alone. Procedure updates should add unscheduled calibration triggers, clear escalation paths, and defined acceptable drift limits.
A simple example: if an instrument is found out of tolerance, the procedure should require it to be placed on hold at once. Any measurements tied to that instrument should be reviewed, and a documented disposition should be completed before the instrument is used again.
The master calibration schedule should also match actual risk. High-use or high-drift instruments need more frequent calibration. Stable, lower-risk tools can have longer intervals, but only when the history supports that decision. Automated due-date alerts and backup owners also help prevent overdue calibrations. Manual spreadsheet tracking is more likely to miss due dates.
Measurement Validity Impact
Any instrument found out of tolerance or past due must be removed from service at once, tagged "Calibration Failed – Do Not Use", and quarantined until it is recalibrated or repaired.
Updated procedures should also require technicians to verify calibration status before each critical reading and document any suspect readings right away. That keeps results traceable and easier to defend if someone later questions a past measurement.
Standards Alignment
Procedure updates should line up with the standards your organization follows. For laboratories, ISO/IEC 17025 requires calibrated equipment to be labeled, or otherwise identified, with its calibration status, last calibration date, and due date.
Document the standard involved, the root cause, and the exact control change made. That way, the update is tied to a clear reason instead of looking like a one-off fix.
Implementation Priority
Start with the highest-risk equipment first. That includes instruments used for final release decisions, regulated processes, or safety-critical functions.
Then move through the key actions:
- Update the affected procedure
- Reset overdue schedules
- Verify the fix through a controlled verification
- Plan an effectiveness review 1 to 2 months after implementation
That follow-up review should confirm that overdue rates are dropping, alerts are working, and similar findings have not returned. Those updates should also feed straight into staff training and documentation changes.
4. Improve Staff Training and Documentation Practices
Once procedures are updated, the next job is simple: make sure people use them the same way every day. That means training the team and requiring complete records. This is the step that turns a revised process into normal practice and gives you the evidence needed to close the finding.
Recurrence Prevention
When the same audit finding shows up again and again, there’s often a training issue behind it. If technicians don’t fully understand why calibration intervals matter - or what can happen when an instrument drifts out of tolerance - the same mistakes can keep happening.
Formal training helps fix that. Train staff on:
- the revised recall interval
- escalation steps
- the out-of-tolerance response
Standards Alignment
Work instructions should be clear, simple, and tied to the right standards and internal QMS requirements. Use only current work instructions, forms, and record templates, and remove obsolete copies from use.
Each instruction should clearly state the instrument’s tolerance limits, what staff must do if a reading falls outside those limits, and who the issue should be escalated to. Calibration records should also state outright whether an instrument is performing within tolerance limits, not just show a pass/fail note.
Implementation Priority
Start with the staff who handle the most safety-critical instruments. That gives the highest-risk areas attention first. After that, roll out the documentation updates across the rest of the team.
Before anyone goes back to independent work, require a short practical competency check. Then file the revised procedure, training record, and competency check as audit-closure evidence.
These records support the effectiveness check in the next step.
5. Confirm Corrective Action Results and Schedule Follow-Up Audits
Corrective actions only count when you can show they worked. First, verify that the action was put in place. Then, verify that it solved the problem. Record those as two separate checks. Once the fix is live, test it against the original finding.
Recurrence Prevention
If you close corrective actions too soon, the same issue can come right back. Wait until you have enough post-implementation data before doing the effectiveness review. In many cases, that means about 1 to 2 months after the change goes live.
During that review, look for repeat findings and any other sign that the issue has returned. Track the percentage of closed actions that are later verified as effective. If the follow-up shows the fix didn’t hold, go back to root cause analysis instead of pushing it to closure.
Measurement Validity Impact
If equipment failed the audit, measurement validity must be checked again. Confirm that affected instruments have current calibration certificates traceable to NIST, that post-correction readings remain stable and within spec, and that verification records meet ISO/IEC 17025 or your internal SOP requirements.
For high-impact applications, such as testing high-voltage breakers or power transformers, cross-check results with two independently calibrated instruments to confirm consistency.
Implementation Priority
Not every finding needs a full re-audit. Save follow-up re-audits for major or system-level findings. Use severity to choose the right verification method. Moderate issues can usually be checked through targeted record sampling or process observation. Minor findings can wait until the next scheduled internal audit.
| Finding Severity | Verification Method | Suggested Timeframe |
|---|---|---|
| Major | Dedicated follow-up re-audit | Soon after implementation |
| Moderate | Targeted record sampling + process observation | After the fix has been in use long enough to review results |
| Minor | Review during next scheduled internal audit | Next audit cycle |
Document the full check: the verification test protocol, the instruments used and their calibration status, the sampling plan, the pass/fail criteria, and who performed the review and when. Keep that verification record with the audit trail for reporting and follow-up.
Tables and Visual Aids to Support the List
Use this table as a fast reference for the corrective steps outlined above.
| Quick Reference | What to Remember |
|---|---|
| Purpose of calibration | Keeps instruments within tolerance on a steady basis. |
| Why correction matters | Poor calibration can lead to bad readings, which can affect equipment decisions and safety. |
| Post-audit impact | Poor calibration can cause costly errors, downtime, and safety risk. |
If the audit finding points to equipment damage or drift, use the next section to decide whether to repair, recalibrate, replace, or retire the instrument.
Repair, Recalibrate, Replace, or Retire: How to Decide
After the impact assessment, decide the instrument’s final disposition. Base that call on three things: accuracy, safety risk, and total cost. Get it wrong, and you either add risk or spend money you didn’t need to spend. The goal is simple: pick the least disruptive option that brings back accuracy, safety, and traceability.
Use the table below to match the instrument’s condition to the lowest-risk action. Cost savings only count if the action still restores compliance.
| Action | When to Choose | Cost Impact | Safety Impact |
|---|---|---|---|
| Recalibrate | Functional, slightly out of tolerance, and worth restoring | Lowest - standard service fee | Low; restores confidence in measurement accuracy |
| Repair | Physical damage or component failure exists, but repair cost is significantly lower than replacement | Moderate - parts and labor | Moderate; requires post-repair verification |
| Replace | Instrument is beyond economical repair, obsolete, or newer models offer better efficiency | Higher upfront cost | Lowest; new equipment often includes updated safety features and warranties |
| Retire | Unsafe, noncompliant, or no longer needed | Disposal cost only; removes the instrument from service | Removes the instrument from service |
A common rule of thumb is this: if repair costs go past 50% of the replacement value, replacement is usually the smarter financial move. That guideline helps, but cost isn’t the whole story. If the instrument is used for safety-critical measurements in electrical, gas, or construction work, inconsistent performance should push the team toward repair or replacement.
Once you make the call, record the disposition. Then put the instrument back into service only after verification.
Conclusion
After disposition and verification decisions, the last step is stopping the problem from coming back. A failed calibration audit usually points to a gap in the system, not just one mistake. If that gap stays in place, it will show up again in the next audit cycle.
These actions only work when you handle them in order and close them with evidence. Contain the issue, find the cause, tighten controls, retrain staff, and verify the result. Skip even one step, and you’re dealing with symptoms instead of the cause.
Calibration only works when accuracy stays steady over time. That’s the difference between closing an audit and fixing the program behind it. The goal isn’t fast closure. It’s making sure the same finding doesn’t come back. Close the finding by fixing the system, not just the instrument.
FAQs
How far back should I review past measurements?
There’s no set deadline here. If equipment is found to be out of tolerance, look at how far the error may have spread based on how the device was used and its history since the last time it passed calibration.
Why does that matter? Because once an instrument drifts out of tolerance, later measurements can’t be taken at face value. That can put past results into question.
If earlier data may have been affected, take corrective action. That includes reviewing prior results and, if needed, issuing product recalls.
What if the root cause seems to be human error?
If a calibration failure comes back to human error, focus on process improvement and staff competence. Start by reviewing your standard operating procedures to spot steps that are unclear, skipped, or easy to misread. Then document the training needed for each role so expectations are plain.
If you find gaps, update the quality manual and work instructions. Bring your team into that work so the documents match what actually happens day to day and help stop the same mistakes from happening again.
When should I recalibrate, repair, replace, or retire a tool?
It depends on how serious the issue is and how the tool has been used. Most tools should be recalibrated on a set schedule, usually every 6 to 24 months. You should also recalibrate after drops, heavy vibration, electrical overloads, extreme conditions, or repairs.
If a tool keeps drifting out of tolerance or shows signs of aging parts, it may need repair or replacement. If it has physical damage, or the repair cost is higher than what the tool is worth, it’s time to retire it.





