




Common Calibration Issues and Solutions Explained
Calibration ensures your measurement tools - like multimeters and power analyzers - stay accurate and reliable. Without it, you risk equipment failures, safety hazards, and compliance violations. Common issues include drift from aging components, environmental factors like temperature or humidity, and damage from mishandling or overloads. Here’s what you need to know:
- Drift: Instruments lose accuracy over time due to wear and tear. Regular adjustments or recalibrations fix this.
- Zero/Span Errors: Incorrect baseline or scale readings. Use proper warm-up and multi-point testing to address these.
- Environmental Factors: Conditions like temperature and EMI can impact accuracy. Use controlled settings for calibration.
- Damage: Drops, electrical overloads, and user errors can disrupt calibration. Inspect and recalibrate after incidents.
To maintain accuracy, follow a structured calibration program. Schedule intervals based on usage, document procedures, and ensure compliance with standards like ISO/IEC 17025. Proper calibration saves money, reduces risks, and ensures safety.
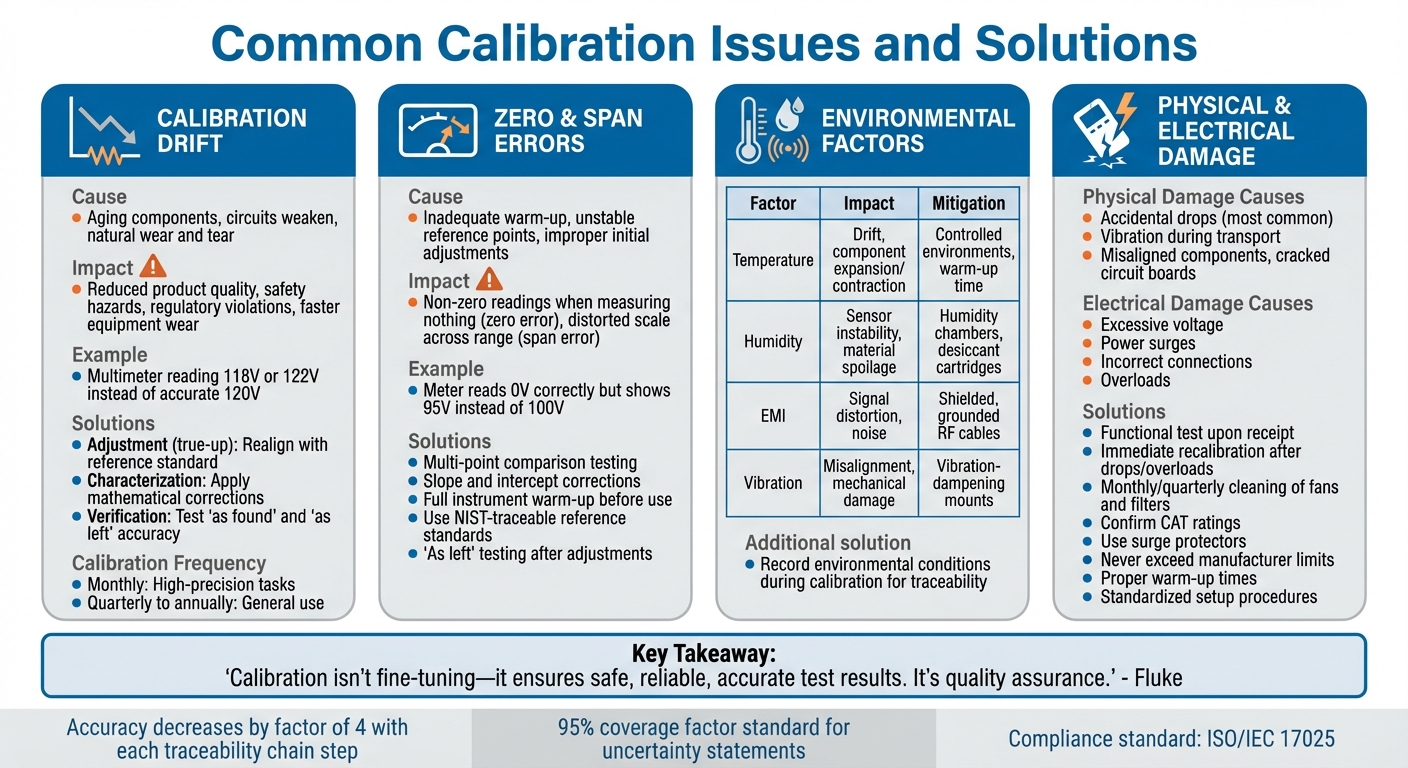
Common Calibration Issues: Causes, Impacts, and Solutions Guide
How Do You Troubleshoot Test Equipment That Fails Calibration? - Electrical Engineering Essentials
Common Calibration Problems and How to Fix Them
Electrical instruments naturally lose accuracy over time. Factors like aging components, environmental stress, and improper adjustments can lead to measurement errors, which can jeopardize safety and compliance. Knowing these issues - and how to address them - helps keep your equipment dependable and your operations efficient.
Calibration Drift and Aging Components
All instruments experience wear and tear as they age. Components degrade, circuits weaken, and measurements start to drift. This gradual change, known as calibration drift, can impact readings for voltage, current, and resistance.
"Instruments naturally experience wear, drift, and environmental impact over time, which can compromise their performance." - Fluke
Ignoring calibration drift can lead to serious consequences: reduced product quality, safety hazards, regulatory violations, and faster equipment wear. For example, a multimeter that once measured 120V accurately might now display 118V or 122V - errors that could cause problems when diagnosing electrical systems or ensuring circuit safety.
Addressing drift involves three main techniques. Adjustment - also called "true-up" - realigns the instrument's output with a reference standard, either physically or electronically. For non-adjustable tools like precision resistors or Zener diodes, characterization applies mathematical corrections, such as slope and intercept calculations, to account for drift. Lastly, verification tests the instrument's accuracy both before ("as found") and after ("as left") adjustments.
Set calibration intervals based on the importance of your measurements and the manufacturer's recommendations: monthly for high-precision tasks, or quarterly to annually for general use. Recalibrate after dropping equipment, completing repairs, or exposing instruments to extreme conditions. Storing tools in stable environments and replacing aging components promptly can help maintain accuracy.
Zero and Span Errors
Zero errors occur when an instrument displays a non-zero reading when measuring nothing, while span errors distort the scale across the measurement range. For instance, a meter might read correctly at 0V but show 95V instead of 100V. These issues often arise from inadequate warm-up, unstable reference points, or improper initial adjustments.
Such errors are usually identified during multi-point comparison testing, where readings are compared to reference standards across the instrument's range. The "as found" verification shows any bias before corrections are applied. Mathematical methods like slope and intercept corrections are then used to realign the instrument's response with the reference standard.
"When reporting the result of a measurement of a physical quantity, it is obligatory that some quantitative indication of the quality of the result be given so that those who use it can assess its reliability." - GUM (Guide to the Expression of Uncertainty in Measurement)
To prevent these errors, allow instruments to warm up fully before use, and always use reference standards traceable to NIST. After making adjustments, confirm accuracy with "as left" testing. During data analysis, watch for and remove outliers near the calibration range's endpoints, as they can skew results. These steps help lay the groundwork for managing environmental influences, which we'll explore next.
Environmental Factors Affecting Calibration
External conditions like temperature, humidity, and electromagnetic interference (EMI) can significantly impact calibration accuracy. Temperature fluctuations, for instance, can cause instruments to drift from their calibrated settings - this is especially problematic for RTDs, thermocouples, and thermistors. High or low humidity can destabilize sensors, which is a major concern in industries like food processing and pharmaceuticals where precise readings are critical. Meanwhile, EMI can distort electrical signals during the calibration of high-frequency or RF equipment.
"Conducting calibration in controlled environmental conditions minimizes external factors, such as temperature, humidity, and electromagnetic interference, that could affect measurement accuracy." - Fluke
| Environmental Factor | Impact on Calibration | Mitigation Strategy |
|---|---|---|
| Temperature | Causes drift and component expansion/contraction | Use controlled environments with sufficient warm-up time |
| Humidity | Affects sensor stability and risks material spoilage | Use humidity chambers and desiccant cartridges |
| EMI | Distorts signals and adds noise | Use shielded, grounded RF cables to reduce interference |
| Vibration | Causes misalignment or mechanical damage | Use vibration-dampening mounts and recalibrate after shocks |
To ensure reliable results, always calibrate instruments in controlled conditions. Record environmental factors like temperature, humidity, and pressure during calibration to maintain traceability and monitor long-term drift patterns. For critical applications or highly sensitive equipment, consider performing a calibration check right before use to confirm accuracy.
Preventing Damage from Mishandling and Overload
Instruments can lose accuracy when subjected to shocks, electrical stress, or improper setup steps. Understanding these potential damage sources is key to protecting your equipment and ensuring calibration remains accurate. Below, we’ll explore how physical, electrical, and procedural factors can disrupt calibration.
Physical Damage from Mishandling
Accidental drops are one of the most common reasons for immediate calibration failure. A single drop can misalign internal components, crack circuit boards, or damage sensors, leading to inaccurate measurements. Even vibration during transport or regular use can gradually loosen connections or shift mechanical parts. Instruments are particularly vulnerable during shipping, as many labs report problems even after recent calibrations.
"Packages get dropped or treated roughly sometimes, which can undo the calibration that was just done." - Fluke Calibration
To minimize these risks, perform a functional test as soon as you receive the instrument to identify any transit damage. If an instrument is dropped or exposed to excessive vibration, schedule a recalibration immediately. Regular maintenance, such as monthly or quarterly cleaning of fans and filters, is also essential to prevent dust buildup, which can lead to overheating and performance issues.
Electrical Overload and Power Surges
Electrical overloads - caused by excessive voltage, power surges, or incorrect connections - can severely damage components and throw off calibration accuracy. Unlike gradual wear and tear, electrical damage often results in sudden and dramatic errors, which can pose safety risks if not quickly identified.
To avoid these issues, always confirm that your instruments are rated for the electrical conditions they’ll encounter. Pay close attention to CAT (Category) ratings, especially for multimeters and other test equipment used in high-voltage applications. Use surge protectors when necessary, and never exceed the manufacturer’s specified limits. If an overload is suspected, perform an "as found" calibration check to assess the extent of the damage. If the instrument’s performance falls outside acceptable limits, repairs and an "as left" calibration verification will be required to confirm it’s back in working order. Keep detailed records of these incidents - repeated failures may point to underlying power quality issues at your site that need to be addressed.
Setup Mistakes and User Errors
User errors such as selecting the wrong range, skipping warm-up times, or making improper connections can also compromise calibration accuracy. Instruments often require time to stabilize thermally after being powered on; taking measurements too soon can introduce errors. For electrical and RF devices, using incompatible cables can result in signal attenuation, while loose plumbing connections in pressure instruments can cause leaks that distort readings.
To prevent these mistakes, document and standardize your setup procedures. This ensures proper warm-up times and the correct selection of accessories. For instance, dry-block calibrators need properly sized well inserts to maintain good thermal contact, and humidity sensors should always be calibrated by moving from lower to higher relative humidity levels. By following these steps, you can significantly reduce the risk of errors during operation.
sbb-itb-501186b
Calibration Issues by Instrument Type
Continuing from earlier discussions on calibration challenges, it’s clear that different instruments require unique strategies to maintain their accuracy. Understanding these specific issues allows for more targeted troubleshooting and ensures reliable performance across your equipment.
Digital Multimeters and Clamp Meters
Over time, component shift in multimeters and clamp meters can lead to gradual inaccuracies. This happens as voltage references, input dividers, and current shunts begin to drift. Symptoms like DC offsets, noisy readings, or incorrect measurements often indicate that internal components are no longer within acceptable tolerances.
"Three common causes of calibration problems are: Component shift... Drops... Overloads." - Fluke Calibration
Physical damage is another concern, especially for clamp meters. A single drop can harm the clamp mechanism, leading to measurement errors that may not be immediately obvious without proper testing. High-voltage transients can also bypass input protection devices, such as fuses or breakers, knocking the instrument out of calibration - even if the protection devices don’t trip.
To mitigate these issues, adopt multi-point calibration to verify accuracy across the entire range of the instrument, rather than focusing solely on zero and span. Use an electrical calibrator with precise standard outputs and a 4:1 accuracy ratio to ensure reliable results. After any overload, inspect the meter for internal damage, even if the fuses appear intact.
Power Quality Analyzers and Power Meters
Power quality analyzers face unique challenges, such as electrical overloads and systematic bias, which can affect phase angle measurements, harmonic analysis, and overall power readings. Large voltage inputs or transients can bypass protection devices, causing calibration issues even when the device seems to operate normally. Without regular checks, these instruments may drift or experience unpredictable errors that compromise accuracy.
To address these issues, allow the analyzer to thermally stabilize before calibration to minimize temperature-related errors. Start with a preliminary verification to identify significant errors or physical damage before proceeding with a full multi-point calibration. Regular calibration should be paired with statistical control methods to track drift between service intervals. Automating the calibration process with specialized software can also help reduce human errors and simplify the calculation of measurement uncertainty. Remember, uncertainty statements typically include a 95% coverage factor, indicating a 95% probability that the true value lies within the stated range.
Relay and Breaker Test Equipment
Relay and breaker test equipment must provide precise timing signals and clean waveforms to accurately evaluate protective devices. Issues like timing errors, waveform distortion, and amplitude drift can compromise test results, potentially leaving faulty equipment in operation. Additionally, operator variability can introduce inconsistencies, as manual measurements often vary between technicians.
To ensure accuracy, perform both "as found" and "as left" tests to document drift and verify that timing, waveform, and amplitude meet required specifications. Use traceable timing standards linked to the National Institute of Standards and Technology (NIST) to maintain measurement integrity. It’s also crucial to calibrate this equipment under load conditions that reflect real-world use, as performance often differs under load compared to no-load conditions. Automating the calibration process can further reduce operator-dependent variations and improve efficiency.
"When reporting the result of a measurement of a physical quantity, it is obligatory that some quantitative indication of the quality of the result be given so that those who use it can assess its reliability." - Guide to the expression of Uncertainty Measurement (GUM)
Building an Effective Calibration Program
After addressing common calibration challenges, the next logical step is to create a structured calibration program. This ensures that measurements remain accurate and reliable over time.
An effective calibration program depends on careful planning, consistent scheduling, and thorough documentation. Without these elements, even the most advanced equipment can gradually lose accuracy, leading to expensive mistakes and potential compliance issues.
"Calibration control transforms measurement from a series of scheduled events into a continuous assurance process." - Fluke Corporation
Managing Calibration Schedules
Skipping calibrations can lead to gaps in accuracy, which can have serious consequences. The best way to avoid this is by maintaining a centralized registry that tracks all instruments affecting quality or testing outcomes. This registry should include unique identifiers, criticality ratings, and the current status of each instrument. Instead of sticking to rigid 6- or 12-month cycles, consider risk-based scheduling. This approach uses factors like historical performance, instrument stability, frequency of use, and environmental conditions to determine calibration intervals. For instance, stable instruments may require less frequent calibration, while those prone to drift need closer monitoring.
To measure the effectiveness of your program, monitor metrics like turnaround times, overdue calibration rates, and the frequency of out-of-tolerance results. Once schedules are optimized, focus on creating clear procedures and maintaining traceable records to further strengthen your program.
Maintaining Procedure Quality and Traceability
Calibration procedures should be detailed and specific, covering everything from stabilization times to connection settings and uncertainty levels for each device. Well-documented procedures and traceability ensure accuracy and help prevent recurring problems. All reference standards should be traceable to a National Metrology Institute. Remember, accuracy decreases with each step in the traceability chain - typically by a factor of four. Regularly review your procedures against the latest standards from organizations like NIST or ISA to stay up to date.
If an instrument fails to meet its specified limits, follow a documented out-of-tolerance workflow. This process should identify potentially affected products, quarantine them, and include a root-cause analysis, as required by ISO 17025 §7.10.
Documentation and Compliance Records
Each calibration certificate should include key details such as traceability, reference standards, raw data, calibration dates, and pass/fail results. Use standardized asset tags to clearly indicate calibration status and due dates, reducing the risk of using expired equipment. Digital record management systems can simplify this process by offering time-stamped, searchable records and real-time dashboards for audits and compliance monitoring. Additionally, control charts can help visualize measurement trends over time, allowing you to detect early signs of drift before an instrument fails.
"When reporting the result of a measurement of a physical quantity, it is obligatory that some quantitative indication of the quality of the result be given so that those who use it can assess its reliability." - Guide to the Expression of Uncertainty Measurement (GUM)
Conclusion
Calibration plays a key role in keeping your electrical equipment safe and dependable. As Fluke explains, "Calibration isn't a matter of 'fine-tuning' your test instruments. Rather, it ensures you can safely and reliably use instruments to get the accurate test results you need. It's a form of quality assurance". Whether you're working with multimeters, power analyzers, or breaker test equipment, regular calibration addresses the natural drift that happens over time and helps avoid the costly risks of inaccurate measurements.
A structured approach to calibration is essential, especially when tackling challenges like aging components, environmental changes, or equipment misuse. For tools purchased through platforms like Electrical Trader, starting with baseline calibrations ensures initial accuracy. Pair that with risk-based scheduling and thorough documentation, and you'll create a solid foundation for long-term reliability.
Ignoring calibration doesn’t just affect the instruments - it can hit your bottom line. Mistakes caused by inaccurate measurements can lead to material waste, product recalls, and downtime, all of which are far more expensive than routine calibration services. Plus, adhering to industry standards like ISO/IEC 17025 not only keeps you compliant but ensures your measurements are trusted during audits and quality checks.
For professionals working with breakers, transformers, and power distribution gear, calibration is also a safety measure. It confirms that protective devices will function properly during faults and that power quality measurements are accurate. This becomes even more critical when dealing with equipment for essential infrastructure or industrial use.
To stay ahead, regularly audit your instruments and maintain a centralized calibration registry. Make calibration part of your routine maintenance, and always recalibrate after incidents like drops, overloads, or exposure to extreme conditions. Treating calibration as an ongoing process ensures your operations remain accurate, safe, and compliant.
FAQs
How often should I recalibrate my electrical equipment to ensure accurate performance?
The timing for recalibration usually follows the manufacturer's guidelines, which often suggest doing it once a year. However, there are situations where more frequent recalibration is necessary. For example, if your equipment is used for high-precision tasks, has experienced significant events like repairs or physical impacts, or needs to meet industry standards like ISO 9000 or MIL-STD, you may need to recalibrate sooner.
To maintain accuracy and dependability, stick to the manufacturer's recommendations while also considering how often and under what conditions the equipment is used. Adjusting the recalibration schedule accordingly can help ensure consistent performance.
How can I reduce calibration drift caused by environmental factors?
To minimize calibration drift caused by external conditions, it’s crucial to keep instruments in a stable and controlled setting. Factors like temperature swings, excess humidity, and pressure variations can disrupt sensitive components, leading to drift over time. To counter this, store devices in climate-controlled spaces, keep them out of direct sunlight, and allow them to adjust for at least 30 minutes after being moved. Using protective enclosures can also help shield equipment from moisture, dust, and sudden temperature shifts.
Routine maintenance plays a big role as well. Regularly clean fans, filters, and vents to prevent overheating, which can exacerbate drift. Follow the calibration schedule recommended by the manufacturer or your lab, and always rely on high-quality reference standards for precise results. If you’re looking for tools to support these efforts, Electrical Trader provides a range of calibration instruments and environmental monitoring equipment designed to meet these requirements.
How do I detect and fix zero and span errors in my instruments?
To identify a zero error, start by applying the lowest value within the instrument's range and compare its reading to the expected reference value. For a span error, apply the highest value in the range and check for any discrepancies in the reading.
To fix these errors, use the zero trim adjustment to correct the lower-range reading. Then, use the span trim adjustment to bring the upper-range reading in line with the expected value. Repeat these steps as necessary until both ends of the range are properly calibrated. Proper calibration is key to ensuring your instrument delivers reliable and accurate measurements.





