




Checklist for Salt Spray Testing Compliance
Salt spray testing evaluates how well materials and coatings resist corrosion in harsh conditions. It's essential for ensuring voltage equipment like electrical housings and terminals meet durability and safety standards. Here's what you need to know:
- Purpose: Simulates years of corrosion to test coatings like electroplating or powder coating.
- Key Standards: ASTM B117 (neutral salt spray), ISO 9227 (varied tests), and MIL-STD-810G (military-grade testing).
- Preparation: Clean samples thoroughly, position them at a 15–30° angle, and protect non-tested areas.
- Execution: Use a 5% sodium chloride solution, maintain 95°F chamber temperature, and monitor pH (6.5–7.2) and mist rate.
- Post-Test: Inspect for corrosion (white rust, red rust, blistering) and document results, including photos and compliance status.
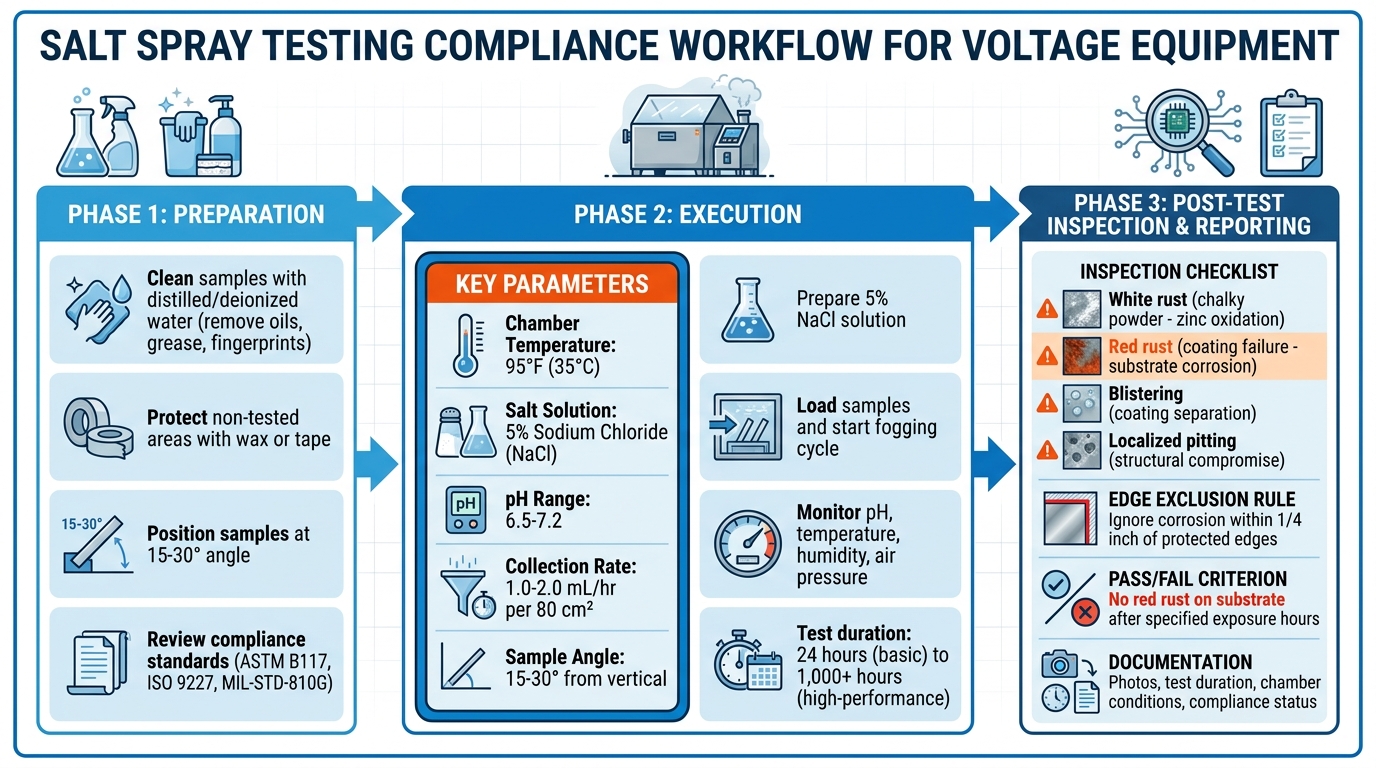
Salt Spray Testing Compliance Process: 3-Phase Workflow from Preparation to Reporting
How to Use a Salt Spray Chamber | ASTM B117, ISO 9227, JIS Z 2371 Explained | Presto Corrosion Test
sbb-itb-501186b
Preparation Checklist for Salt Spray Testing
Getting voltage equipment ready for salt spray testing requires careful attention to detail. Proper preparation is critical because any shortcuts can lead to invalid results or hide coating defects. The process starts well before the samples even enter the testing chamber.
Cleaning and Preparing Equipment Samples
Contaminants like industrial oils, grease, fingerprints, and debris can interfere with the salt spray test. Even a small amount of residual oil can act as a barrier, making a defective coating seem more effective than it actually is. To avoid this, clean the specimens thoroughly, especially during the final stages, using distilled or deionized water. Regular tap water isn't ideal because it contains minerals that could affect the results.
After cleaning, protect areas that won't be tested - such as edges, joints, or specific components like terminals or housing sections - using specialized wax or tape. This step ensures that only the intended areas are exposed to the test conditions.
Orientation of the samples is equally important. Position them at a 15–30° angle to ensure even coverage of the saline mist. Placing them flat or at the wrong angle could lead to uneven exposure, which might compromise the accuracy of your compliance records.
Once cleaning and positioning are complete, double-check that all procedures align with the required standards.
Reviewing Compliance Standards
With the samples prepared, the next step is to confirm compliance by reviewing the relevant standards for salt spray testing.
Several key standards guide this process:
- ASTM B117: This is the foundational protocol for neutral salt spray (NSS) testing, focusing on continuous fogging. ASTM B117-26 specifically addresses metal coatings and steel fittings.
- ISO 9227: This standard expands testing options to include NSS, acidic salt spray (AASS), and copper-accelerated salt spray (CASS). AASS is suited for anodized aluminum, while CASS is used for high-performance coatings.
- MIL-STD-810G: Designed for military-grade hardware, this standard often includes cyclic testing with drying periods to better replicate real-world conditions.
Key parameters for ASTM B117 testing include:
| Parameter | ASTM B117 Requirement (Test Preparation) |
|---|---|
| Chamber Temperature | Constant 95°F (35°C) |
| Salt Solution | 5% Sodium Chloride (NaCl) |
| pH Range | 6.5 to 7.2 |
| Collection Rate | 1.0–2.0 mL/hr per 80 cm² |
| Sample Angle | 15 to 30 degrees from vertical |
To ensure the test is conducted correctly, use digital controllers to monitor and log critical factors like pH, humidity, temperature, and air pressure. Keeping detailed records not only confirms compliance but also guarantees that the test results are dependable.
Salt Spray Test Execution Checklist
Preparing the Salt Solution and Chamber
Start by mixing a 5% sodium chloride (NaCl) solution using distilled or deionized water. Check that the pH level is within the range of 6.5–7.2. Set the chamber temperature to 95°F (35°C). Make sure the reservoir is filled with enough solution to last the entire test duration, which can vary from 24 hours for basic finishes to over 1,000 hours for coatings designed for higher durability.
Inspect the atomizing nozzles to ensure there are no blockages, as blockages can result in uneven misting. Properly position the collection funnels to achieve a rate of 1.0–2.0 mL/hr per 80 cm². Once the chamber is prepped and the solution is ready, you can load the samples and begin the test.
Executing the Test
Carefully place the prepared samples inside the chamber, ensuring they are positioned at an angle between 15–30°. Close the chamber and start the fogging cycle. The salt mist should spread evenly across all samples. If you notice any dry areas or excessive pooling, pause the test to adjust the nozzle alignment or air pressure to ensure uniform misting.
Pay close attention to the fog distribution at the start of the test. Uneven misting can lead to inconsistent exposure, which may affect the reliability of the results. The duration of the test should align with the specific standards or compliance requirements you are following.
Monitoring and Maintaining Testing Conditions
Use digital controllers to continuously monitor and log key parameters like pH, temperature, humidity, and air pressure throughout the test. Adjustments may be necessary to keep the collection rate steady at 1.0–2.0 mL/hr per 80 cm². For longer tests, especially those exceeding 1,000 hours, you’ll likely need to refill the solution reservoir. Be cautious during this process to avoid sudden temperature changes or pH imbalances that could disrupt the test conditions.
Post-Test Inspection and Reporting
Inspecting Samples for Corrosion
Once the test cycle is complete, remove the samples and rinse them with deionized water. Allow them to dry at room temperature before conducting any inspections. Carefully examine the samples for corrosion, as this will provide insight into the coating's effectiveness.
- White rust: This chalky white powder indicates oxidation of the sacrificial zinc layer. It's not necessarily a failure - it shows the protective coating is functioning as intended.
- Red rust: This signals that corrosion has reached the underlying steel or iron, representing a complete failure of the protective coating.
- Blistering: Look for areas where the coating has lifted away from the substrate.
- Localized pitting: These small, concentrated corrosion spots can compromise structural integrity or lead to leaks.
For chromate conversion coatings, discoloration alone is not considered a failure unless zinc hydroxide or oxide is present. To confirm whether staining is due to corrosion, wipe the area with a cotton swab soaked in deionized water, acidify the liquid, and test for zinc using an atomic absorption spectrophotometer.
When inspecting cut samples, apply the edge exclusion rule: ignore any corrosion within 1/4 inch of a protected cut edge. For more detailed analysis, you can calculate the corrosion rate by measuring the mass loss of components before and after exposure, expressed in grams per square meter.
Every observation during this process is critical for verifying compliance. Be sure to document all findings with precision.
Documenting and Reporting Results
After completing the inspection, thoroughly document your findings. Include details like the test duration, chamber conditions, and the standard followed. Take photographs of each sample from multiple angles to create a detailed visual record.
The most common pass/fail criterion is straightforward:
A pass is typically defined as the absence of red rust on the substrate after a specified number of exposure hours.
Record whether each sample meets this benchmark based on the required exposure time for the specific coating - this could range from 24 hours for basic finishes to over 1,000 hours for high-performance coatings.
Make sure to clearly state the pass/fail status for each sample. Also, note any occurrences of white rust, pitting, or blistering, ensuring they fall within compliance limits. This documentation is a critical part of the certification process and may be required for regulatory approvals or to meet customer specifications.
Conclusion
Using a structured checklist ensures that voltage equipment meets the required durability and safety standards before it’s put to use. Standards like ASTM B117 and ISO 9227 provide a shared framework for evaluating whether protective coatings and finishes can endure years of corrosive conditions - compressed into days or weeks through controlled testing.
This checklist approach addresses every important step, from preparing samples correctly to maintaining precise test conditions. It allows manufacturers to compare different finishing techniques and catch potential issues before they become costly problems.
"By following a controlled and repeatable procedure, manufacturers can ensure their products meet high standards of durability and performance." - Effective Lab India
For high-stakes voltage equipment, this testing helps prevent structural damage, fluid leaks, and even system-wide failures. Salt spray testing not only minimizes risks but also assures quality, protecting your equipment investment and ensuring user safety. Detailed documentation - such as pass/fail results, photos, and corrosion rate data - provides proof of compliance and helps avoid expensive setbacks in the future.
FAQs
Which standard should I use: ASTM B117, ISO 9227, or MIL-STD-810G?
The right standard depends on what you're testing for. ASTM B117 is a go-to in the U.S., often used for assessing corrosion resistance and meeting compliance requirements. If you're aiming for consistency on an international scale, ISO 9227 is the standard to consider. On the other hand, MIL-STD-810G is tailored for military applications, where durability under extreme conditions is a priority.
For most commercial purposes, ASTM B117 is a solid choice. However, if you're working on projects that need to meet global benchmarks, ISO 9227 is the better fit. If your focus is defense-related or requires rigorous durability testing, MIL-STD-810G is the way to go.
What typically causes invalid salt spray test results?
Proper salt spray test results hinge on careful procedures, clean conditions, and surfaces that meet required standards. Errors often arise from issues like contamination, poor preparation, or misinterpreting stains as corrosion. To avoid invalid outcomes, ensure the test setup is correct, surfaces are well-prepared, and you can clearly differentiate between actual corrosion and harmless stains.
How do I define a pass or fail after salt spray testing?
A pass in salt spray testing indicates that there is little to no corrosion, such as rust or pitting, within the specified criteria and time frame of the test. On the other hand, a fail happens when noticeable corrosion or coating deterioration surpasses the acceptable thresholds outlined by standards or protocols, such as IEC 60068.





