How to Test Solvent Resistance in Electrical Components
Electrical components face exposure to harsh solvents during manufacturing, which can degrade markings, coatings, and finishes. Testing for solvent resistance ensures components maintain their durability and functionality under these conditions. The process follows MIL-STD-202 Method 215K, a standard for evaluating small electrical components like capacitors and resistors against various solvent solutions. Here's how the testing works:
- Purpose: Verify that markings and protective coatings remain intact after exposure to industrial solvents.
-
Procedure: Components are divided into three groups, each tested with a specific solvent mix. Each test involves:
- A 3-minute immersion.
- 10 brush strokes per cycle.
- Three cycles total.
- Failure Criteria: Markings that become unreadable or coatings that show visible damage fail the test.
Solvent Groups:
- Isopropyl Alcohol & Mineral Spirits: Simulates standard cleaning agents.
- Terpene Defluxer: Mimics citrus-based cleaners.
- Water-Based Solution: Tests resistance to high-temperature cleaning methods.
Tools Needed:
- Non-reactive immersion vessels.
- Hard-bristled toothbrushes for brushing.
- Air-blow dryer and water rinse setup.
Solvent Resistance Double-Rub Test
Tools and Materials Needed for Testing
When conducting solvent resistance testing, it's essential to use equipment that complies with MIL-STD-202 standards. The immersion vessel should be made from non-reactive materials and large enough to fully submerge the test specimens. For temperature-controlled baths, maintain temperatures at either 25°C ± 5°C or 63°C–70°C, depending on the specific test requirements.
Solvents and Their Compositions
Three distinct solvent groups are used to simulate various industrial cleaning processes:
- Group 1: A mix of one part isopropyl alcohol and three parts mineral spirits. Alternatively, you can use a blend of 80% kerosene and 20% ethylbenzene.
- Group 2: A terpene defluxer solution made of at least 90% d-limonene and 10% surfactant.
- Group 3: A mixture of 42 parts water, one part propylene glycol monomethyl ether, and one part monoethanolamide.
These formulations are designed to replicate real-world cleaning methods and assess the durability of components under industrial conditions.
Testing Equipment
For brushing, use a non-reactive toothbrush with hard bristles. The brush should have three or four rows, with each row containing 8–12 tufts. Each bristle should measure 1 1/8 ± 1/8 inch in length. Replace any brush with softened, bent, or worn bristles. To avoid contamination, use a different brush for each solvent type.
Additional equipment includes:
- Air-blow dryer: Used to dry specimens after immersion.
- Water rinse setup: For tests requiring a rinse at approximately 25°C before drying.
Always wear the appropriate personal protective equipment (PPE) as specified in the manufacturer's MSDS guidelines.
Sourcing Electrical Components
For consistent testing results, source high-quality electrical components like breakers, transformers, capacitors, and resistors. A reliable option is Electrical Trader, which provides a centralized marketplace for both new and used components. This ensures you can establish baseline performance standards across a variety of product categories.
Preparing Components for Testing
After gathering all necessary tools and solvents, the next step is to prepare your components properly to ensure accurate and reliable test results.
Cleaning and Marking Components
Begin with a visual inspection to spot any contaminants like residues, dendrites, or flux. As Techspray explains:
Visual inspection is the first and the cheapest method of cleanliness testing which requires only two human eyes to identify any white residues, dendrites, or any visible flux.
For high-density boards, use 20X magnification for a closer look, and increase to 40X magnification for finer details.
Once inspected, remove solder flux, fingerprints, and other contaminants. This ensures that solvents interact only with permanent markings and protective coatings. After cleaning, confirm that all components have clear markings or color coding, as these are the focus of the test. Keystone Compliance emphasizes:
Resistance to solvents testing serves a number of purposes. It verifies that markings or color coding will not become illegible or discolored when exposed to solvents.
Make sure all components are completely dry before moving on to the next step.
Grouping Test Specimens
After cleaning and drying, organize the components based on the test solvent and their construction type.
Divide the specimens into three groups:
- Group 1: Isopropyl alcohol-mineral spirits mix
- Group 2: Terpene defluxer
- Group 3: Water-propylene glycol-monoethanolamine solution
Pay close attention to construction types when grouping. For example:
- Keep open-construction parts in a separate group and limit brushing to a 0.5-inch square area.
- Components with markings protected by sleeves should also be grouped together, as brushing will target the sleeve rather than the component body.
This systematic organization ensures consistent handling and precise tracking throughout the testing process.
sbb-itb-501186b
Conducting the Solvent Resistance Test
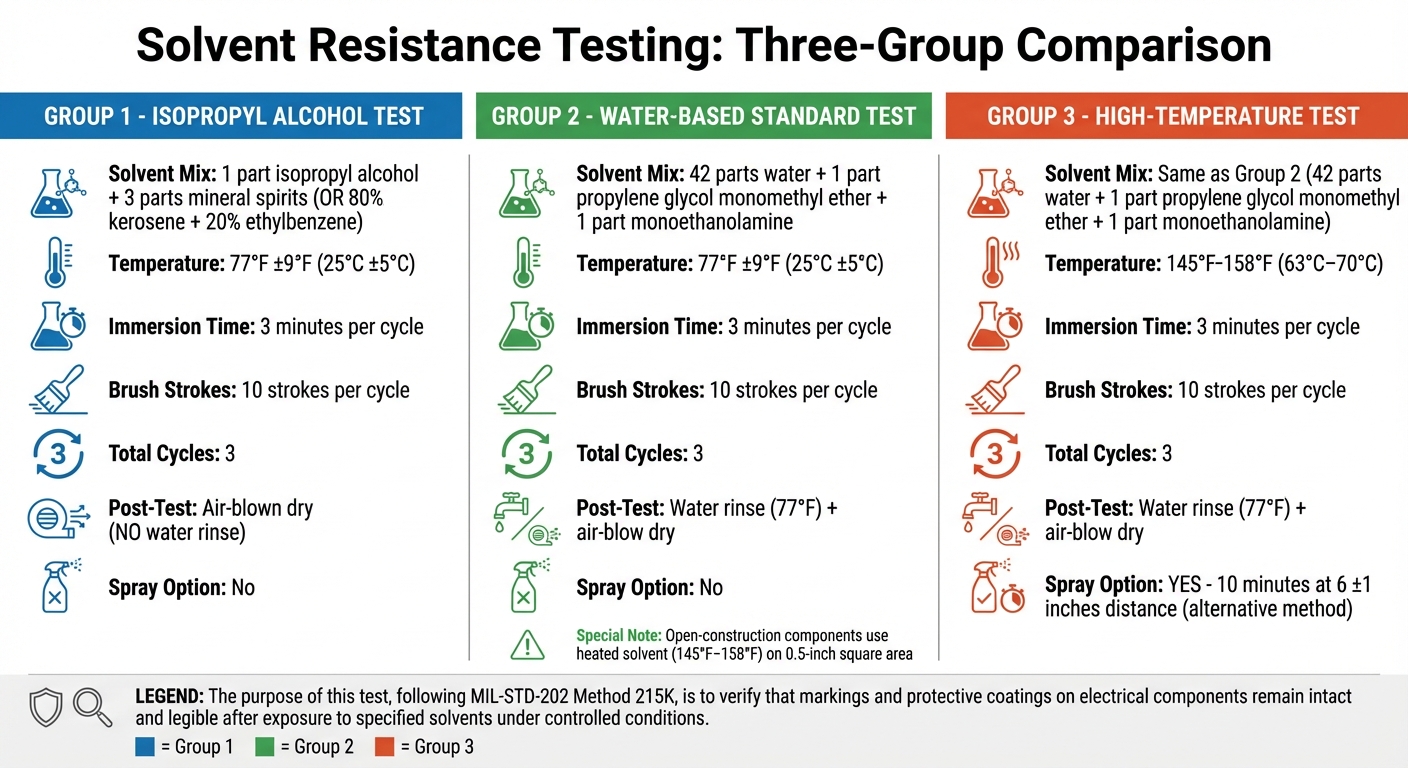
Solvent Resistance Testing Parameters by Group - MIL-STD-202 Method 215K
Once your specimens are prepped and organized, it's time to carry out the solvent resistance test. The procedure varies depending on the solvent type and required temperature conditions.
Group 1: Isopropyl Alcohol Test
Start by mixing one part isopropyl alcohol with three parts mineral spirits. If mineral spirits aren't available, you can substitute them with a blend of 80% kerosene and 20% ethylbenzene. Keep the solution at 77°F ±9°F (25°C ±5°C) during the entire test.
- Immerse the specimen in the solution for 3 minutes.
- Use a 1 1/8-inch hard-bristled toothbrush to apply 10 brush strokes.
- Repeat this process for a total of three cycles.
- After completing the cycles, dry the specimen using an air blower and wait 5 minutes before inspecting it.
If the toothbrush bristles show signs of softening, bending, or breaking, replace the brush to maintain consistent mechanical stress. Always review the manufacturer's Material Safety Data Sheet (MSDS) before handling these solvents to ensure safety.
Group 2: Water-Propylene Glycol-Monoethanolamine Test
To prepare the solution, mix:
- 42 parts water
- 1 part propylene glycol monomethyl ether
- 1 part monoethanolamine
Maintain the solution at 77°F ±9°F (25°C ±5°C) for standard components.
- Immerse the specimen for 3 minutes.
- Apply 10 brush strokes and repeat for three cycles.
- After the cycles, rinse the specimen with 77°F water and then air-blow dry.
For open-construction components, use a heated version of the solvent (145°F–158°F) and apply 10 brush strokes over a 0.5-inch square area.
Group 3: High-Temperature Solvent Mix Test
This test uses the same water-propylene glycol-monoethanolamine solution from Group 2 but at a higher temperature of 145°F–158°F (63°C–70°C).
- Immerse the specimen in the heated solution for 3 minutes, applying 10 brush strokes and repeating for three cycles.
- Alternatively, expose the specimen to a heated solvent spray from a distance of 6 ±1 inches for 10 minutes.
- Afterward, rinse with 77°F water and air-blow dry.
Quick Comparison of Test Parameters
| Test Parameter | Group 1 (Isopropyl) | Group 2 (Standard) | Group 3 (High-Temp) |
|---|---|---|---|
| Temperature | 77°F ±9°F | 77°F ±9°F | 145°F–158°F |
| Immersion Time | 3 minutes/cycle | 3 minutes/cycle | 3 minutes/cycle |
| Brush Strokes | 10 strokes/cycle | 10 strokes/cycle | 10 strokes/cycle |
| Total Cycles | 3 | 3 | 3 |
| Post-Test Rinse | Air-blown dry | Water rinse + air-blow dry | Water rinse + air-blow dry |
| Spray Option | No | No | Yes (10 minutes) |
This table highlights the key differences and similarities across the three testing procedures, making it easier to follow the specific steps for each group.
Inspecting and Evaluating Test Results
Post-Test Rinsing and Drying
Follow the rinsing and drying procedure specific to your test group. For Group 1 (using isopropyl alcohol and mineral spirits), skip the water rinse entirely and move straight to drying the component with compressed air. For Groups 2 and 3, rinse the specimen in water set to 77°F ±9°F (25°C ±5°C) immediately after the final cycle. This controlled water rinse helps eliminate residual solvents and avoids further reactions that could skew the results.
Once rinsed (if applicable), dry the specimen completely using compressed air or an air blower. Ensure no moisture remains, as leftover water could interact with protective coatings or markings, potentially leading to inaccurate evaluations. After drying, proceed with a detailed inspection to check for any fading, smearing, or damage to coatings.
Inspection Criteria
Focus your inspection on three main failure modes: fading, smearing, and blurred markings. Keystone Compliance explains that this test "verifies that markings or color coding will not become illegible or discolored when exposed to solvents". Check that critical identifiers like part numbers, voltage ratings, and other essential markings remain clearly legible.
Next, assess the integrity of protective coatings by looking for cracks, peeling, or any deterioration in the encapsulant materials. Keystone Compliance also notes, "It tests the mechanical and electrical durability of component protective coatings and encapsulant materials when exposed to solvents". For components with protective sleeves, pay special attention to the area directly above the markings, as this spot is particularly susceptible to damage from brushing. The overall physical state of the specimen will reveal whether the solvents or mechanical stress have compromised its durability.
Conclusion
To achieve precise and repeatable solvent testing, it’s essential to follow MIL-STD-202 Method 215K. According to D.L.S. Electronic Systems, this standard "outlines the suitable conditions obtainable in the laboratory that give test results equivalent to the actual service conditions existing in the field, and to obtain reproducibility of the results of tests". By adhering to this method, you can align your testing with established procedures, ensuring consistent and reliable outcomes.
Accurate testing depends on both high-quality equipment and strict adherence to protocols. Using non-reactive vessels, brushes with three or four rows of hard bristles (1 1/8 ±1/8 inches in length), and maintaining controlled temperature conditions are all critical factors that directly affect the test's reliability.
Organizing specimens by solvent type is another key step. For example, isopropyl alcohol mixtures are tested at 77°F ±9°F, while water-based solutions require higher temperatures, ranging from 145°F to 158°F. This method ensures a thorough evaluation of the solvents commonly used in printed wiring assembly processes, verifying that components can withstand these cleaning agents without damaging crucial markings or protective coatings.
FAQs
Why is it important to test the solvent resistance of electrical components?
Testing how well electrical components resist solvents is a crucial step to guarantee that markings, coatings, and materials stay intact and readable when exposed to cleaning agents or solvents during handling. This ensures the components can hold up their mechanical, chemical, and electrical properties under practical conditions.
By verifying that components can endure solvent exposure without breaking down or degrading, this testing minimizes the chance of failures, ensures reliability over time, and helps meet industry standards. This is particularly important in applications where both durability and performance are absolute necessities.
How does temperature impact solvent resistance testing for electrical components?
Temperature is a key factor in solvent resistance testing because it directly impacts how materials interact with solvents and the reliability of the results. Higher temperatures can accelerate chemical reactions, enhance solvent penetration, or even lead to material breakdown. That’s why controlling the testing environment is so important.
For example, certain tests require materials to be exposed to elevated temperatures, like 185°F or 212°F, to replicate conditions they might face in real applications. Temperature also affects critical aspects such as solvent evaporation and material swelling, both of which are essential for assessing resistance. By maintaining strict temperature control, you can ensure consistent and dependable results throughout the testing process.
What steps should I take if a component fails the solvent resistance test?
If a component doesn't pass the solvent resistance test, the first step is to examine the damage. Look for signs like blurred, smeared, or missing markings - these are telltale signs of failure. Next, determine whether the problem is due to the material reacting poorly with the solvent or if there's a flaw in the component itself.
Fixing the issue could involve several approaches. You might need to use a different solvent, improve the protective coatings, or even redesign the component to better withstand exposure. For detailed guidance, consult industry standards such as MIL-STD-202 or ASTM D115. If the component plays a key role, don't forget to retest after making changes to ensure it meets compliance requirements.