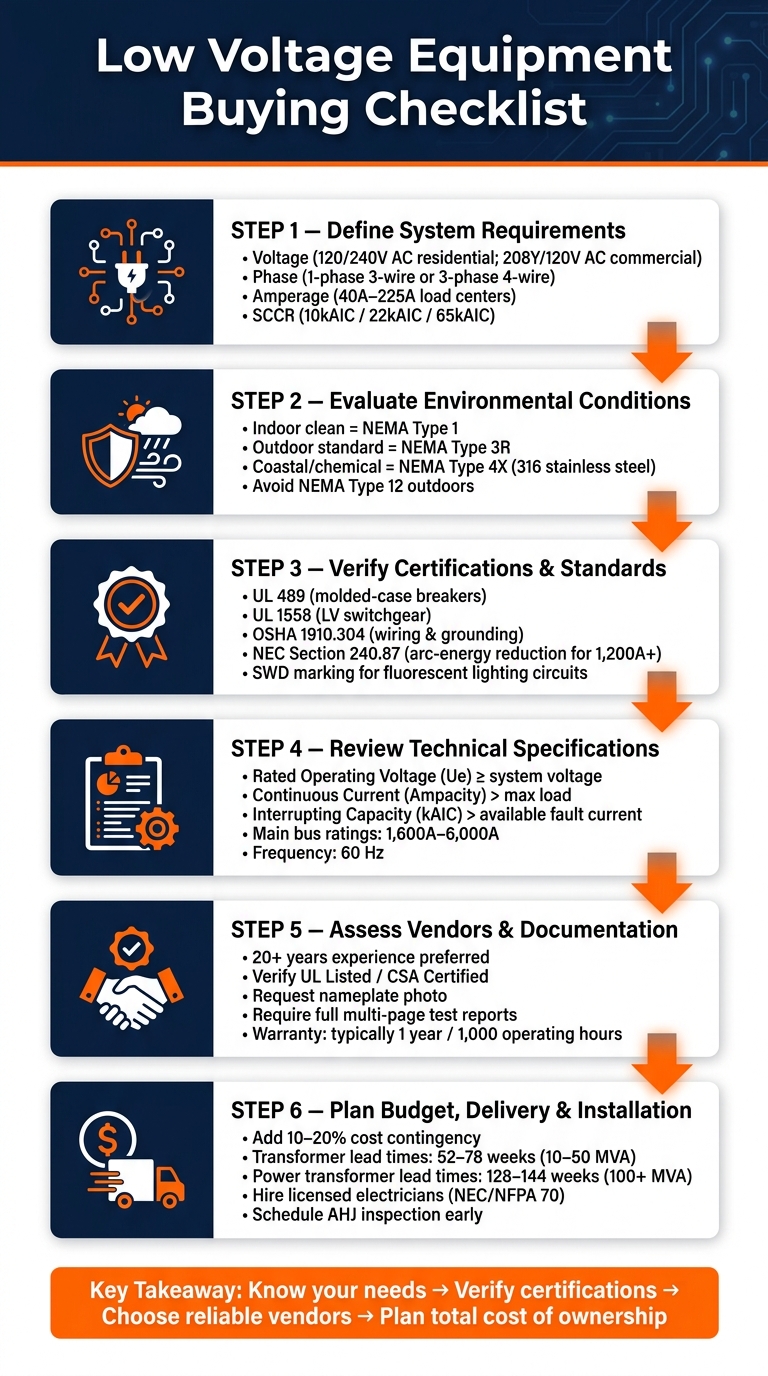
Checklist for Buying Low Voltage Equipment
When purchasing low voltage equipment, having a clear checklist is essential to avoid costly mistakes. Here’s what you need to focus on:
- Define your system requirements: Identify voltage, phase, amperage, and fault current needs. Ensure compatibility with your system setup.
- Check certifications: Verify UL, OSHA, and NEC compliance for safety and legal standards.
- Understand environmental needs: Choose enclosures based on installation conditions (indoor/outdoor, exposure to liquids, or corrosive elements).
- Evaluate vendors: Look for experienced sellers with clear documentation, warranties, and reliable support.
- Review technical specs: Confirm voltage ratings, interrupting capacity, and safety features like arc-energy reduction.
- Plan for costs and logistics: Account for total ownership costs, delivery timelines, and proper storage.
Key takeaway: Know your system’s needs, verify certifications, and choose reliable vendors to make an informed purchase. Missing these steps can lead to safety risks, compliance issues, or expensive upgrades.
Low Voltage Equipment Buying Checklist: Step-by-Step Guide
Low Voltage Switchgear | 5 Important Parameters | TheElectricalGuy
sbb-itb-501186b
Pre-Purchase Requirements to Define Before You Buy
Before diving into product options, it's critical to understand the specific needs of your electrical system. Skipping this step might leave you with equipment that works but doesn’t meet your application’s demands.
Verifying Voltage, Load, and System Requirements
Start by checking your system’s voltage, phase, and amperage. In the U.S., standard system voltages include 120/240V AC for residential and light commercial setups, and 208Y/120V AC for three-phase commercial systems. Make sure your phase configuration - whether it's 1-phase 3-wire or 3-phase 4-wire - matches what your utility provides.
Next, determine your amperage requirements. Load centers typically range from 40A to 225A for main lug configurations and 100A to 225A for main breaker setups. You’ll also need to verify the Short Circuit Current Rating (SCCR), which is often specified as 10kAIC, 22kAIC, or 65kAIC. This rating indicates the equipment’s ability to safely handle fault currents. Using equipment with an insufficient interrupt rating can pose serious safety risks. If the installation serves as the service entrance, a main breaker configuration is recommended for its primary disconnect function. For downstream sub-panels where a disconnect is already in place, a main lug-only configuration works well.
Once you’ve nailed down these electrical parameters, it’s time to consider the installation environment.
Evaluating Installation and Environmental Conditions
The environment where the equipment will be installed is just as important as the electrical specs. To choose the right enclosure, answer these questions:
- Will it be installed indoors or outdoors?
- Will it be exposed to liquids (e.g., splashes, hose-directed water, or submersion)?
- Is there a risk of corrosion from salt air, chemicals, or cleaning agents?
- Does the area have a hazardous classification?
For outdoor setups, a NEMA Type 3R enclosure is usually sufficient, but coastal or chemical-heavy environments may require a NEMA Type 4X enclosure made from corrosion-resistant 316 stainless steel. This is because 304 stainless steel can start pitting within just 2 to 3 years in chloride-rich atmospheres. For clean indoor environments, a basic NEMA Type 1 enclosure typically does the job.
"Specifying the wrong NEMA rating is one of the more expensive mistakes a control panel designer can make." - chengxiaoxin, Author, Itrustbot
It’s also important to avoid using a NEMA Type 12 enclosure outdoors, even under a covered area. These enclosures are not designed to withstand wind-driven rain or ice, and improper use could void their UL listing.
With the environmental factors addressed, you can move on to identifying the specific equipment and features you’ll need.
Identifying Required Equipment and Features
Using your system and environmental requirements as a guide, create a list of the equipment you’ll need, such as panelboards, circuit breakers, motor control centers, transformers, and disconnect switches.
Here are some key considerations:
- Busbar Material: Tin-plated aluminum is more affordable, but copper offers better conductivity and superior corrosion resistance.
- Neutral Bar Configuration: Split neutral bars can simplify wiring for complex circuits.
- Service Equipment Labeling: If the equipment will serve as the primary building disconnect, make sure it’s labeled "Suitable for Use as Service Equipment" (SUSE).
- Additional Features: Determine if you need metering, protective relays, or automation interfaces like Modbus or BACnet for integration with building management systems.
It’s also smart to think ahead. Selecting a panelboard with more circuit spaces - such as 42 or 60 instead of 24 - can save you from costly upgrades down the line as your load requirements grow.
Technical Specifications to Check Before Purchasing
Once you've outlined your system needs and environment, it's essential to ensure your chosen equipment not only aligns with those requirements but also meets stringent technical criteria. These checks are crucial for compliance, safety, and a confident purchasing decision.
U.S. Standards and Certifications to Verify
When dealing with low voltage equipment, two key UL standards come into play. UL 489 governs molded-case circuit breakers, switches, and enclosures. Meanwhile, UL 1558 applies to metal-enclosed low-voltage power circuit breaker switchgear. It's important to verify which standard applies, as UL 1558 and UL 891 have different construction and testing requirements.
In addition to UL standards, equipment must adhere to OSHA 1910.304, which outlines federal regulations for wiring design, grounding, and overcurrent protection. A small but critical detail to watch for: circuit breakers used with 120V or 277V fluorescent lighting circuits must be marked "SWD" (Switching Duty), while those for high-intensity discharge lighting require an "HID" marking. Also, double-check the voltage rating. A straight rating (e.g., 480V) differs from a slash rating (e.g., 120/240V). Slash-rated breakers are only suitable where the voltage to ground does not exceed the lower value.
After confirming standards and certifications, move on to reviewing the component ratings for compatibility with your system.
Component Ratings and Features to Review
| Rating | What to Check |
|---|---|
| Rated Operating Voltage (Ue) | Ensure it matches or exceeds your system voltage (e.g., 240V or 480V). |
| Continuous Current (Ampacity) | Must be greater than your maximum calculated load current. |
| Interrupting Capacity (kAIC) | Should exceed the available fault current at the installation point. |
| Short-Time Withstand Current (Icw) | Confirms the buswork can handle fault conditions for 0.5 or 1.0 seconds. |
| Rated Impulse Withstand Voltage (Uimp) | Ensures resistance to transient surges, such as those caused by lightning or switching events. |
For low voltage switchgear, main bus ratings typically range from 1,600A to 6,000A. Additionally, confirm the equipment operates at 60 Hz, the standard frequency in the U.S. A mismatch in frequency can lead to overheating or protection failures.
Safety and Protection Features to Look For
If you're using adjustable-trip circuit breakers rated at 1,200A or higher, arc-energy reduction is mandatory under NEC Section 240.87. This requires methods such as differential relaying to minimize fault-clearing times and reduce arc flash risks. Performance testing, like primary current injection, must be conducted during the initial installation by qualified professionals.
Ground fault protection is another critical feature. It prevents damage caused by unintended connections between a phase conductor and grounded metal parts, which could otherwise lead to fires or equipment failure. On the physical side, ensure all overcurrent protective devices (OCPDs) are easily accessible. NEC regulations limit the handle grip height to 6 feet 7 inches above the floor or working platform. Installing equipment beyond this height creates immediate safety and compliance issues.
How to Assess Vendors and Review Documentation
Once you've nailed down the technical specs of the equipment you need, the next step is figuring out if the vendor you're considering is actually worth your time - and money.
Vendor Qualifications and Support
Start by checking the vendor's track record. Vendors with 20+ years of industry experience are often better equipped to provide technical support, field service, and testing when needed. Transparency is another key indicator of reliability. Trustworthy vendors will clearly label their equipment as New, Used, Refurbished, or Parts/Not Working, so you know exactly what you're getting before committing.
Another hurdle in B2B sourcing is verifying supplier compliance credentials. Fake or expired certifications are more common than you'd think. If you're buying in the U.S., make sure the equipment meets standards like UL Listed, CSA Certified, or complies with NEMA, IEEE, and ANSI. To avoid surprises, always request a high-resolution photo of the equipment's nameplate. This lets you cross-check details like the manufacturer, model number, and ratings against the vendor's description. Platforms such as Electrical Trader simplify this process by including fields for product condition, manufacturer details, and certification info right in their listings.
"Quality factories will confidently provide the full [test] report for your review." - Simon Kong, Founder, UYEE丨LZZS Electric
Once you've confirmed the vendor is reliable, the next step is to request and review key documentation to ensure the equipment matches your requirements.
Product Documentation to Request
Before finalizing a purchase, make sure you get the following documents:
| Document Type | What to Verify |
|---|---|
| Data Sheets | Voltage, amperage/KVA, phase, frequency (60 Hz for U.S.), cooling method |
| Test Reports | Results for insulation resistance (Megger), turns ratio, and oil analysis for transformers |
| Certifications | Proof of UL, CSA, NEMA, IEEE, or ANSI compliance |
| Nameplate Photo | Serial number, model number, manufacturer, and date of manufacture |
| Refurbishment Log | Details of replaced parts, upgrades, and final testing results |
Avoid accepting single-page certificates - they're often incomplete. Instead, ask for the full multi-page test report, which should include teardown photos, temperature rise data, and mechanical fatigue charts. For refurbished equipment, a detailed log of repairs, replacements, and tests is essential to confirm the unit's condition.
Once the documentation checks out, it's time to evaluate warranty terms and lifecycle support.
Warranty Terms and Product Lifecycle
Most standard warranties cover 1 year or 1,000 operating hours, but they typically exclude damage caused by human error and consumable parts like filters, belts, and batteries. For refurbished equipment, double-check the vendor's specific warranty terms. Also, ask about long-term parts availability and end-of-life support. Can they still source replacement parts down the line? Do they provide technical documentation for older models? Vendors who can confidently answer these questions are usually a safer bet.
Completing the Purchase: Budget, Delivery, and Installation
Once you've nailed down the technical specs and confirmed vendor qualifications, it's time to focus on the final steps: budget, delivery, and installation.
Calculating Total Cost of Ownership
The sticker price is just the beginning. When planning your budget for low voltage equipment, you need to account for several additional factors: installation labor, testing, commissioning, ongoing maintenance, and even the cost of potential downtime if something goes wrong.
Take transformers as an example. A small distribution transformer that cost $3,730 in 2020 is projected to climb to $7,879 by 2026 - that’s a 111% jump. Overall, transformer prices have increased by 77% since 2019. Adding a 10–20% contingency to your budget is wise, as purchase order prices often escalate before delivery.
"The price you locked at PO is no longer the price you pay at delivery." - DistroForge Research
If you're importing equipment, keep in mind that Section 232 tariffs are applied at the date of entry. These tariffs now cover the full customs value of the equipment, not just the metal content, which can significantly impact your landed costs, especially for items with long lead times. Experts suggest using a weighted evaluation system where the total cost of ownership makes up about 25% of your vendor scoring criteria.
Once you've accounted for these costs, it's time to lock down delivery and storage logistics to keep everything on track.
Confirming Delivery and Storage Requirements
Make sure you have written delivery terms. Proforma invoices should clearly state Incoterms (like FOB or CIF) to avoid unexpected freight or customs surprises. It's also smart to include liquidated damages clauses for late deliveries and request weekly production updates from the manufacturer. For reference, distribution-class transformers (10–50 MVA) typically have lead times of 52–78 weeks, while larger power transformers (100+ MVA) can take 128–144 weeks. When your equipment arrives, inspect it immediately for any shipping damage. Remember, final acceptance should depend on successful commissioning and load testing, not just physical delivery.
Storage is another key consideration. Dry-type transformers need to be stored indoors in a clean, dry environment, while oil-immersed units can be stored outdoors as long as they’re on a stable, level surface and protected from flooding or debris. Additionally, state commissions now require maintaining a 15–25% safety stock for critical equipment like switchgear and pad-mount transformers.
Once delivery and storage are squared away, you can move on to installation and testing to get your equipment up and running.
Planning for Installation and Testing
For installation, always hire licensed electricians or certified technicians who are familiar with NEC and NFPA 70 standards.
Before energizing your equipment, complete a thorough pre-commissioning checklist. This includes verifying the torque on all connections, confirming proper grounding and bonding, and ensuring that protective relay settings align with your system design. For transformers, specific tests - like turns ratio checks, insulation resistance measurements (using a Megger), and dielectric tests - should be performed before applying load.
Don’t overlook inspections. Schedule your Authority Having Jurisdiction (AHJ) inspection early and coordinate the timeline with your installation contractor. Integrating this into your project schedule from the start can prevent energization delays. Following these steps ensures your equipment is ready to perform and meets all compliance standards.
Key Takeaways for Buying Low Voltage Equipment
When it comes to purchasing low voltage equipment, the golden rule is simple: know your needs before you start shopping. Start by defining critical factors like system voltage, load requirements, fault current, and environmental conditions. Taking this step upfront helps you avoid compatibility headaches later on.
Another must? Check certifications and documentation thoroughly. Confirm that the equipment has the proper U.S. certifications and UL listings for the specific model you’re considering - not just the product line. Also, ensure you have complete documentation, including datasheets, wiring diagrams, and warranty terms. If a vendor can’t provide these, it’s a red flag.
"Finding the right electrical equipment for your needs can be challenging and time-consuming." - Electrical Trader
Don’t just focus on the initial price tag. Look at the total cost of ownership, which includes shipping, installation, maintenance, testing, and the equipment’s service life. Sometimes, a lower upfront cost can lead to much higher expenses down the line.
For a streamlined buying experience, Electrical Trader offers a centralized platform featuring new and used low voltage components like LV switchgear, motor control centers, distribution panels, and circuit breakers. Their listings are organized by voltage class and equipment type, making it easier to find what you need, especially for rare or surplus items. With these tips in mind, you’ll be better equipped to make confident purchasing decisions.
"Our expertise will help you make informed purchasing decisions with confidence." - Electrical Trader
FAQs
How do I find the available fault current for my site?
To figure out the available fault current at your location, you can either reach out to your utility provider for the value at your service entrance or calculate it yourself using transformer details and your system’s setup. Here’s the formula you’ll need:
Fault Current = (Transformer kVA × 1000) ÷ (Line-to-Line Voltage × Transformer Impedance)
When calculating, don’t forget to factor in elements like conductor impedance. If precise data isn’t available, use conservative estimates to ensure compliance with safety standards.
Do I need a main breaker or a main lugs-only panel?
A main breaker panel is necessary when you need a single disconnect point for the entire electrical system. This is often required for safety or to comply with NEC (National Electrical Code) standards. On the other hand, a main lugs-only panel is suitable if there's already an accessible upstream disconnect that complies with code requirements. Your choice should align with your system's configuration and local regulations.
What documents should I request before purchasing used equipment?
Before purchasing used equipment, it's essential to ask for documentation that confirms its safety, compliance, and overall condition. Here are some critical documents to review:
- Certifications: Look for certifications such as UL or ISO, which indicate the equipment meets established safety standards.
- Testing and Inspection Reports: These reports can verify the equipment's functionality and highlight any existing damage or wear.
- Warranty Information: Check for warranty details to understand what is covered and any limitations that may apply.
Additionally, take the time to inspect the equipment's specifications, physical condition, and storage history to ensure it is both reliable and safe to use.