




Calibration Schedule for Electrical Test Tools
A bad meter reading can put someone in front of live power by mistake. To avoid that, I keep the calibration schedule simple: list every test tool, set a due date, rank risk, label the tool, and trigger reminders before the date hits.
Here’s the whole process in plain terms:
- I put every safety- or compliance-related test tool in one register.
- I assign a calibration interval based on maker guidance, use conditions, and risk.
- I set the next due date from the last calibration date.
- I label each tool with status, dates, and asset ID.
- I pull and quarantine any tool that is overdue, damaged, failed, or missing a label.
- I use alerts at 30, 14, and 7 days before the due date.
- I review due tools each month and check status again before each job.
A few numbers shape the schedule right away:
- Portable field meters often start at 6–12 months
- Shop or lab instruments often start at 12–24 months
- NETA rules call for calibration within 12 months of the test date
- If out-of-tolerance results go above 5%, I shorten the interval
- If the tool stays below 2% out of tolerance over time, I may extend the interval with records to back it up
The main point is simple: if the reading affects a safety decision or a compliance result, the tool belongs on the schedule. From there, I make the status visible on both the register and the tool so no one has to guess in the field.
This article lays out that workflow in a way I can use again and again across the shop, trucks, and job sites.
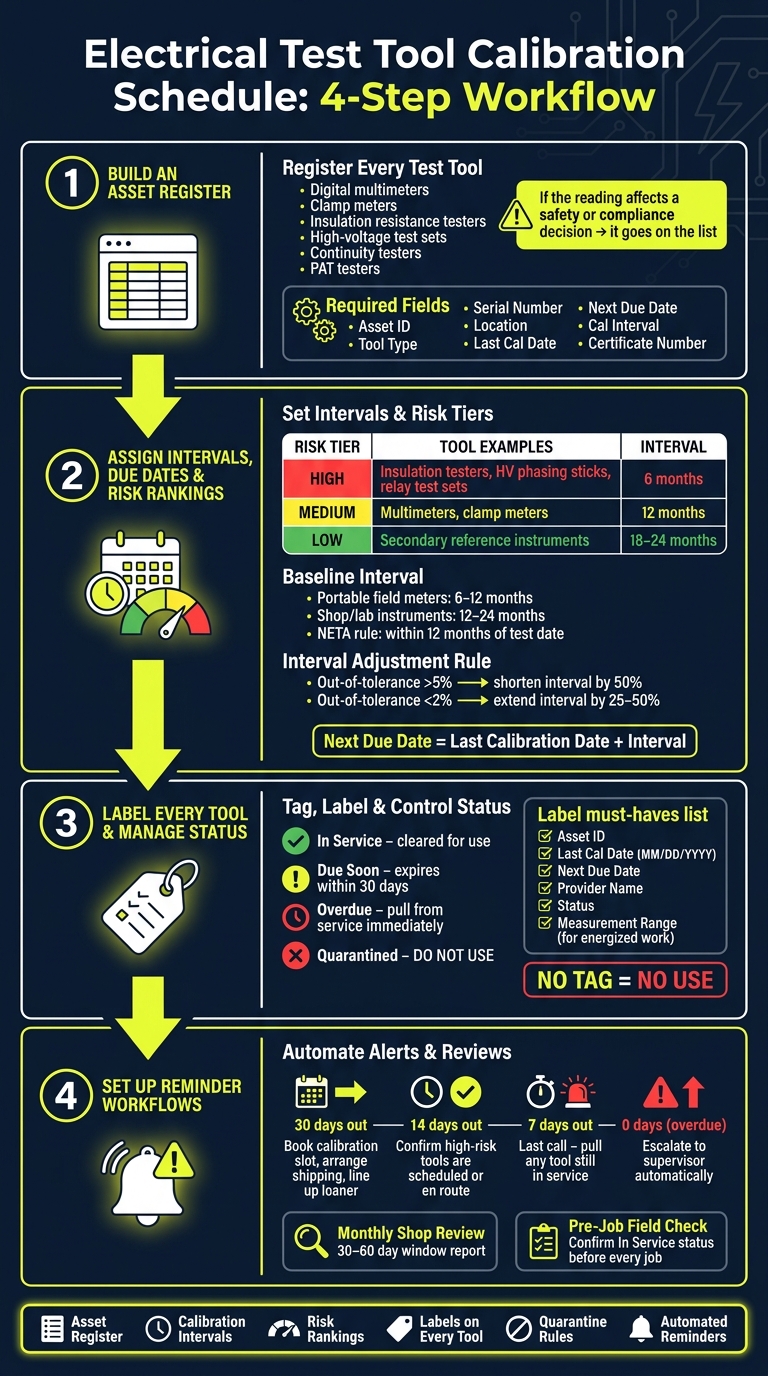
Electrical Test Tool Calibration Schedule: 4-Step Workflow
Can You Calibrate Your Own Electrical Test Equipment Safely? - Electrical Engineering Essentials
sbb-itb-501186b
1. Build an Asset Register for Every Test Tool
Create one master register for every test tool that affects safety or compliance. Skip this step, and tools slip through the cracks. Then they end up in the field with expired calibration or no clear calibration record at all.
Tools That Belong on the Schedule
At a minimum, the register should include digital multimeters, clamp meters, insulation resistance testers (megohmmeters), continuity testers, portable appliance testers, high-voltage test sets, and any panel test equipment used for commissioning, maintenance, or troubleshooting.
Here’s the plain rule: if a tool’s reading affects a safety call or a compliance result, it goes on the list.
Include specialty tools only when their readings affect safety or compliance. And treat every incoming used or refurbished tool as unverified until calibration is confirmed. Add it to the register as soon as it arrives.
Required Fields for Each Register Entry
Each entry should use the same fields for scheduling, audits, and incident review. That consistency saves time later, especially when someone needs answers fast.
| Field | Example |
|---|---|
| Asset ID | DMM-007 |
| Tool type | Digital Multimeter |
| Make and model | Example model |
| Serial number | 9876543 |
| Location | Truck 12 / Main Shop – Denver |
| Responsible crew or owner | Service Crew A Lead |
| Current status | In Service |
| Last calibration date | 08/14/2026 |
| Next due date | 08/14/2027 |
| Calibration interval | 12 months |
| Calibration provider | ISO/IEC 17025-accredited lab |
| Certificate number | CAL-2026-04471 |
| Traceability notes | Traceable to NIST |
Store calibration certificates under the Asset ID, not by supplier or date. That keeps the full history for each instrument in one place, which makes audits and measurement reviews much less messy. These fields also feed the interval and due-date step.
Status Rules for In-Service and Quarantined Tools
Use one status vocabulary across the office, shop, and field. If one team says “inactive,” another says “hold,” and a third says “bad meter,” people get confused fast.
Use these statuses:
- In Service: Calibration is current, and the tool is cleared for use.
- Due Soon: Calibration expires within 30 days, so recalibration should be scheduled now.
- Overdue: The due date has passed, and the tool must be pulled from service until recalibrated.
- Out of Service: The tool has been removed from use - retired or waiting for repair - no matter what the calibration date says.
- Quarantined: The tool is suspected or confirmed inaccurate, damaged, or failed calibration. It must be physically separated, clearly labeled DO NOT USE, and blocked from deployment until disposition is decided.
Log every status change in the register with the date in MM/DD/YYYY format and the name of the person who made the change. That record matters when a measurement gets questioned on a job. Once every tool is in the register, you can use it to assign intervals and next due dates.
2. Assign Calibration Intervals, Due Dates, and Risk Rankings
Start with Baseline Intervals and Manufacturer Guidance
Once the register is done, the next step is to assign calibration intervals, due dates, and risk rankings.
Start with the manufacturer manual. That should be your first reference point. For portable field meters, a 6–12 month interval is a solid starting range. For instruments kept in a controlled shop or lab, 12–24 months often makes sense. If the manual doesn't list an interval, begin with 6–12 months and then adjust based on calibration history.
NETA ATS/MTS documents add one more rule: test instruments must be calibrated within 12 months of the date of test, and they must have visible dated labels.
Usage matters too. A clamp meter that gets used every day in the field - and gets bumped around in dust, vibration, and temperature swings - may need a 6-month cycle. The exact same model, if it stays in a climate-controlled lab and only comes out once in a while, can reasonably stay on a 12-month cycle.
That baseline gives you a place to start. From there, tighten or extend the interval based on risk and service history.
Rank Each Tool by Measurement Risk and Job Impact
Not every tool carries the same level of risk. Assign each one a High, Medium, or Low ranking based on shock risk, system voltage, and whether the reading is used for commissioning or safety records.
| Risk Tier | Typical Tools | Suggested Interval |
|---|---|---|
| High | Insulation resistance testers, high-voltage phasing sticks, relay test sets | 6 months |
| Medium | General-purpose multimeters, clamp meters for routine maintenance | 12 months |
| Low | Secondary reference instruments, non-critical checks | 18–24 months |
Past calibration results matter just as much as the tool type. Under ANSI/NCSL Z540, if the out-of-tolerance rate goes above 5%, the interval should be shortened, often by 50%. If the out-of-tolerance rate stays below 2%, extending the interval - usually by 25% to 50% - can be justified.
Set the Next Due Date and Record the Reason
The next due date is simple:
Next due date = last calibration date + interval
Record both dates in MM/DD/YYYY format in the register.
Each entry should also include a short note that explains the logic. For example: High risk: used for arc-flash incident energy measurements on 480 V switchgear; 6-month interval because readings are safety-critical; daily outdoor field use. That short note saves time later. It helps during audits, keeps future reviewers from making guesses, and makes it easier to use the same logic when new tools are added.
Those due dates and risk rankings feed directly into the label and status checks in the next step.
3. Manage Service Tags, Labels, and Calibration Status
Once your register includes due dates and risk rankings, that status needs to live on the tool too. A tag or label links the register to the field, so technicians can check in seconds whether a tool is cleared for use.
What Every Calibration Label Should Show
At a minimum, every calibration label should include the unique asset ID, the last calibration date in MM/DD/YYYY format, the next due date, the calibration provider's name and contact information, and a status that matches the register: In Service, Due Soon, Overdue, or Quarantined.
Color coding helps crews spot status fast. A simple standard works well:
- Green for in service
- Yellow for due soon
- Red for overdue or quarantined
For tools used in energized work, include the measurement range covered by the calibration right on the label, such as Voltage to 600 V AC only. Put the label where people can see it, but where normal wear won't destroy it. If you can, add a QR code that opens the calibration certificate.
Labels matter only if crews check them before every job.
How Shop and Field Crews Should Check Tags Before Use
A tag check should be part of every pre-use routine before any measurement task. Match the asset ID on the label to the work order or job plan, check the status color and wording to make sure the tool is in service, and verify that the next due date has not passed. Also confirm that the provider is approved.
If the tag is missing, hard to read, damaged, or shows a date that doesn't match the register, stop right there. Treat the tool as out of service and send it back to the shop before work begins. No tag, no use.
If the tag fails any part of the check, pull the tool at once and quarantine it.
What to Do with Overdue or Failed Instruments
When a tool is overdue or fails calibration, the response needs to be immediate and the same every time. Remove it from the work area, attach a red Out of Service – Do Not Use tag, and update the register status to QUARANTINED with the date, location, and name of the person who flagged it. Then move it to a separate quarantine area away from in-service tools, so no one grabs it by mistake.
After that, the shop lead decides what happens next: send it to an ISO/IEC 17025-accredited lab for recalibration, repair it in-house, or retire it. Once that decision is made, log it in the register. The tool should go back into use only after the register is updated and the right status tag is attached.
With labels and status control in place, the next step is making sure crews stay ahead of due dates.
4. Set Up Reminder Workflows for Shops and Field Crews
A calibration schedule only works if due dates lead to action. If reminders live in someone's head, tools will slip past due. The fix is simple: use alerts, not memory.
Build a Reminder Timeline Before Each Due Date
Once labels and status rules are in place, the register should run the reminder process. Put every calibration due date into one central system and set alerts for 30, 14, and 7 days before the due date.
Each alert has a job to do:
- 30 days out: gives the shop time to book a calibration slot, arrange shipping, and line up a loaner if needed.
- 14 days out: confirms that high-risk tools, like high-voltage test sets and protective relay testers, are already scheduled or on the way.
- 7 days out: acts as the last call. If a tool is still in service, pull it.
If a tool hits its due date and nothing has happened, the system should escalate the issue to a supervisor. Also, tie each alert to a specific role - the tool custodian, the shop coordinator, and the department manager - so the right person acts at the right time.
Run a Monthly Shop Review and a Pre-Job Field Check
After the alerts are live, use a monthly review to clean up the next 30 to 60 days. The shop coordinator should pull a report of every tool due in that window, sort the list by risk ranking and job criticality, and schedule recalibration for each item.
When instruments come back from the lab, the coordinator should verify the calibration certificate, confirm that the tool passed, update the asset register with the new certificate number and next due date, and attach a new label before sending the tool back into service. Any failed or heavily adjusted instruments should be quarantined and reviewed before they go back out.
Field crews need their own check before leaving for a job. The crew lead should confirm that every test instrument on the equipment list shows a current status of In Service in the asset register. If a tool shows Quarantined, Out of Service, or Overdue, pull it before work starts.
Add New Tools to the Schedule on Day One
Use the same control from day one for every new tool. Every new instrument - whether purchased, ordered directly from a manufacturer, or sourced through Electrical Trader - must enter the calibration process before use.
That means:
- assign a unique asset ID
- set the calibration interval based on manufacturer guidance and your internal risk ranking
- calculate the first due date from the purchase date, the in-service date, or the date on the supplier's calibration certificate, whichever applies.
Then load the due date into the reminder system. Only issue the tool after the label is attached and the register entry is complete.
If a used instrument arrives without a current calibration certificate, send it to an accredited lab before it enters service.
Conclusion: Keep the Schedule Simple, Visible, and Repeatable
Once the register, intervals, labels, and reminders are in place, the schedule becomes something your team can repeat without much friction. Six core parts handle the basics: a complete asset register, set calibration intervals and next due dates, a clear risk ranking, a label on every tool, quarantine rules for overdue or failed instruments, and automated reminders for shop and field teams. The rule is simple: check the label, confirm the register, and pull any tool that is not marked In Service.
The biggest weak spot is usually the process, not the tool itself. When calibration status lives in someone’s head instead of the register, due dates get missed. That’s when hidden safety and quality risks start to build. Current labels and on-time reminders aren’t optional.
Keep intervals simple. If one group keeps coming back out of tolerance, shorten that interval.
After the schedule is set, make it easy to see during normal shop and field work. Post status reports in the shop, include label checks in pre-job toolbox talks, and make due-date reports simple for supervisors to pull. When crews treat calibration status like a normal step in the day, compliance becomes part of the workflow.
That habit turns the schedule into a working control.
FAQs
How do I choose the right calibration interval for each tool?
Use a risk-based approach, not a fixed timeline.
Start with the manufacturer’s guidelines. Then look at how often the tool is used, where it’s used, and how much your work depends on its measurements.
Drift history matters too. If a tool keeps drifting or has failed before, shorten the calibration interval. If it stays stable and the risk is lower, you can extend it.
Also, recalibrate after any event that could throw the tool off, such as:
- drops
- heavy vibration
- electrical overloads
- repairs
What should I do if a tool is missing its calibration label?
Treat the tool as a nonconformance and take it out of service right away. Do not use it again until you:
- verify its status in your records
- apply a new label
- log the corrective action
You should also look into why the label is missing and review any measurements taken since the last valid certification to see whether there was any impact before the tool goes back into service.
Who should own the calibration schedule in a shop or field team?
The calibration schedule should be owned by the person in charge of instrument control and audit-ready records. In most shops and field teams, that’s the calibration custodian or the metrology/quality coordinator.
That person keeps the central equipment register up to date, tracks due dates and service status, and ties records to technician authorization and safety files. They also update the schedule after corrective actions, so overdue or out-of-tolerance tools are caught and controlled before they go back into service.





