




Calibration Documentation Checklist for Audits
If your asset ID, label, certificate, interval record, and approval trail do not match, your audit can fail fast. This article boils audit prep down to one job: make every calibration-required tool easy to trace from the master list to final approval.
I’d sum it up like this:
- Keep one master asset list with fixed IDs
- Make sure labels and certificates match the record
- Keep interval history and work orders that explain timing
- Log out-of-tolerance events before return to service
- Lock down review, approval, and edit history in your system
One stat stands out: a Texas Department of Transportation internal audit found 13 of 17 calibration failures were entered wrong or lacked support, and 79 of 174 in-house worksheets were never entered into the system. That points to a record problem, not just a calibration problem.
The article also makes a clear scope point: if a tool’s reading or torque could affect safety, code compliance, or a test report, it should be in scope. That often includes meters, test sets, insulation testers, analyzers, and many torque tools.
Here’s the short version of what auditors want to see:
- Proof the calibration happened
- Traceability to reference standards
- A clear trail from asset to review and release
- Consistent record formatting, such as 08/11/2026 for dates
- Edit history that shows who changed what and when
If I were preparing for an audit, I’d treat this article as a simple record-control guide: define scope first, standardize the format, then check every record against the same asset ID.
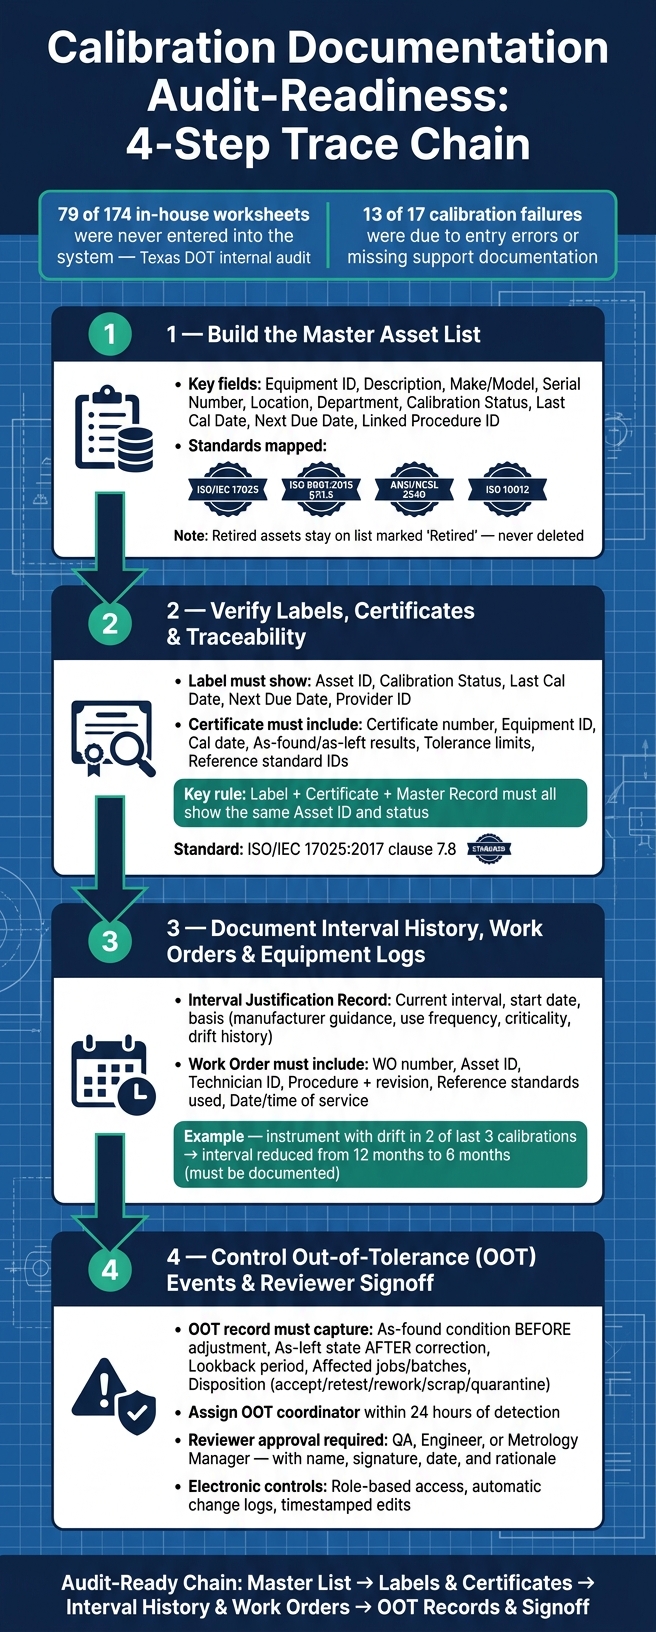
Calibration Documentation Audit-Readiness Checklist: 4-Step Trace Chain
ISO 17025 Technical Records Requirements: What Labs Must Document
sbb-itb-501186b
Checklist 1: Build a Complete Calibration Master List
The master list is the control record for every in-scope asset. It shows what needs calibration, where it sits, and whether it’s current. Every record should use the same stable asset ID across labels, certificates, and logs. Once scope and formatting are set, this is usually the first record auditors sample.
Required Fields for Every Asset
Each asset entry must include: equipment ID, description, make, model, serial number, location, department, custodian, calibration status, last calibration date, next due date, service status, and linked procedure ID.
Standards and Record Coverage Map
Each field ties back to a control point that auditors check. Build a coverage map that lists each field, the clause it supports, and a short control note. ISO/IEC 17025, ANSI/NCSL Z540, ISO 9001:2015 §7.1.5.2, and ISO 10012 all require identification, status marking, and records that show traceability. Map every master-list field to the clause it meets, and keep that map in the audit file.
Table: Master List Fields and Applicable Standards
| Required Data Fields | Applicable Standard(s) |
|---|---|
| Equipment ID, description, make, model, serial number, location, department, custodian, calibration status, last calibration date, next due date, service status, linked procedure ID | ISO/IEC 17025; ISO 9001:2015 §7.1.5; ANSI/NCSL Z540; ISO 10012 |
Keep retired assets on the list and mark them "Retired" instead of deleting them. Then match each asset ID to its label and certificate.
Checklist 2: Verify Labels, Certificates, and Traceability
After the master list, auditors usually look at the instrument label first. That label is the front-line check, but the master list is the control record for every label and certificate review.
Label Content That Must Match the Record
Check that every in-service instrument label matches the master record for asset ID, status, and dates. Each label must show:
- asset ID
- calibration status
- last calibration date
- next due date
- calibration provider or in-house lab ID
Use only clear status terms such as Calibrated, Due, Expired, or Out of Service. Dates should use the same MM/DD/YYYY format as the master record.
If a label is missing, damaged, or hard to read, treat it as a nonconformance. Pull the instrument from service until the records confirm its status, a new label is applied, and the corrective action is logged.
Certificate Fields Auditors Check First
Auditors use the certificate to confirm identity, timing, method, and acceptance. Under ISO/IEC 17025:2017 clause 7.8, a complete certificate must include the certificate number, equipment identification, calibration date, next due date where applicable, method or procedure used, as-found results, as-left results, tolerance or acceptance limits, uncertainty where applicable, relevant environmental conditions, and the reference standards used.
A generic “NIST-traceable” stamp is not enough. Traceability needs support from the actual reference standards, their identifiers or certificate numbers, and the procedure used.
Table: Certificate Fields and Audit Questions
| Audit Question | Certificate Field That Answers It |
|---|---|
| Is this the correct device? | Equipment ID, model, serial number, customer asset ID |
| Was it calibrated on time and by an approved method? | Calibration date, next due date, method or procedure reference |
| Did it meet acceptance criteria? | As-found/as-left results, tolerance or acceptance limits, pass/fail statement |
| Is the result traceable to a recognized standard? | Reference standard IDs, traceability statement, uncertainty with coverage factor |
| Were conditions controlled during calibration? | Relevant environmental conditions |
| Who released the instrument? | Authorized signatory name and signature or secure electronic equivalent |
The label, certificate, and master record all need to show the same asset ID and status. This is where small errors turn into audit findings fast. Common issues include asset-ID mismatches, expired certificates paired with active labels, and due dates that don’t line up.
A release check can stop a lot of this. Have a reviewer confirm the asset ID, calibration date, due date, and acceptance status across all three records before the instrument goes back into service.
Next, tie each asset to its interval history and work-order trail.
Checklist 3: Document Interval History, Work Orders, and Equipment Logs
Labels and certificates show what happened. Interval records and work orders show why it happened at that point in time. That difference matters in an audit.
Auditors use this history to check that a sticker reflects a supported interval, not just a date someone printed. So the first step is simple: document the interval history that explains the current label status.
Interval History and Justification Records
For each asset, keep an Interval Justification Record that shows the current interval, the start date, and the basis for that interval. Build that record from manufacturer guidance, use frequency, criticality, environment, and drift history.
Intervals should be risk-based, not locked into a fixed 12-month cycle. In plain English, the interval should fit the instrument.
For example, say a breaker test instrument showed drift in two of its last three calibrations. Moving it from a 12-month interval to a 6-month interval makes sense if the trend data, review date, and approver are all documented. Without that trail, the change can look arbitrary.
For overdue periods, record the due date, the actual calibration date, the length of the delay, the impact assessment, and any continued-use approval. Auditors will follow that overdue status through the same record chain they used for labels and certificates, so it needs to tie back to the same asset ID.
Work Orders and Technician Records
Each calibration work order should be able to stand on its own during an audit. It should include the WO number, asset ID, manufacturer and model, location by site/building/room, date and time of service, technician ID or name, the procedure and revision used, and the reference standards applied.
Also record the technician ID or name in a way that links back to training and authorization records. If the work order is missing the technician ID, procedure revision, or reference standard, it is not ready for audit review.
Table: Interval Basis and Recent Calibration History
A simple template row can look like this:
| Asset ID | Current Interval | Interval Basis | Last 3 Calibration Dates | Repeated Drift or Failures |
|---|---|---|---|---|
| [Asset ID] | [Current interval] | [Manufacturer guidance, use frequency, criticality, environment, or drift history] | [Most recent 3 calibration dates] | [Recurring drift, failure, or none] |
If an asset shows repeated drift or failures, there should be a documented management review showing whether the organization investigated the cause, changed the interval, ordered a repair, retrained personnel, or retired the instrument. That review closes the loop from drift to corrective action. It also gives you the record needed to support any out-of-tolerance event and reviewer signoff.
Checklist 4: Control Out-of-Tolerance Events and Reviewer Signoff
If a calibration result falls outside tolerance, document the OOT event before the instrument goes back into service. Once a calibration drifts out of tolerance, switch at once to OOT containment and impact review.
Out-of-Tolerance Event Documentation
Assign an OOT coordinator within 24 hours of detection. Capture the as-found condition before any adjustment or repair, then record the as-left state after correction.
A complete OOT record should include:
- Asset ID and serial number
- Calibration due date
- Last valid calibration date
- Date discovered
- Technician's name
- Measured deviation and direction
- Affected range
- Tolerance limits
- Work order or nonconformance number
- Status label and quarantine location
Define the lookback period as the span from the last passing calibration to discovery. Then review every affected measurement, inspection, job, batch, or acceptance decision in that window. The record should plainly state whether the error could have affected product quality, compliance, or customer deliverables.
For each affected job or batch, document the disposition: accept as-is with technical rationale, retest, rework, scrap, or hold/quarantine. Tie that record to the root cause, the action taken on the instrument, and any preventive steps, such as interval changes or process updates.
Reviewer Approval and Electronic Record Controls
Before closure, require review and approval from QA, a responsible engineer, a metrology manager, or another designated authority. Record the reviewer's name, signature or initials, approval date, disposition, and rationale.
Electronic controls matter here. Use role-based access, automatic change logs, and timestamped edits. The audit trail should show who created, changed, reviewed, and approved each record, along with when each action happened. If someone can edit a record without keeping that history, you've got a data integrity gap.
Once the OOT file is approved, the audit trail is complete.
Conclusion: Calibration Documentation Audit-Readiness Summary
Audit-ready calibration documentation is one traceable chain: master list, labels, certificates, interval history, work orders, OOT records, and reviewer signoff. For incoming equipment from Electrical Trader, verify identity, calibration status, and master-list entry before first use.
FAQs
What tools should be included in calibration scope?
Prioritize high-risk equipment used for final release decisions, safety-critical functions, and regulated processes.
That usually includes measurement and test tools like:
- Multimeters
- Oscilloscopes
- Clamp meters
- Insulation testers
- Power analyzers
- Signal generators
- High-voltage test sets
When it fits your setup, include current and voltage transformers, Rogowski coils, and metering systems too.
The key is simple: match the scope to your application’s accuracy needs and calibration interval requirements.
What should I do if a calibration label and certificate do not match?
Treat it as a red flag and a documentation control failure. Immediately quarantine the equipment and label it Calibration Failed – Do Not Use.
Then find the cause of the discrepancy, review measurements taken since the last valid certification, assess any impact, and complete the needed corrective actions before returning the item to service.
How far back should an out-of-tolerance review go?
There’s no one fixed lookback period after an out-of-tolerance finding.
Instead, review the possible impact based on how the device was used and its performance history since the last successful calibration.
At a minimum, assess any measurements taken since the tool’s last valid certification.
In high-stakes settings, that can mean rechecking or redoing all work from that point forward until no errors are found.





