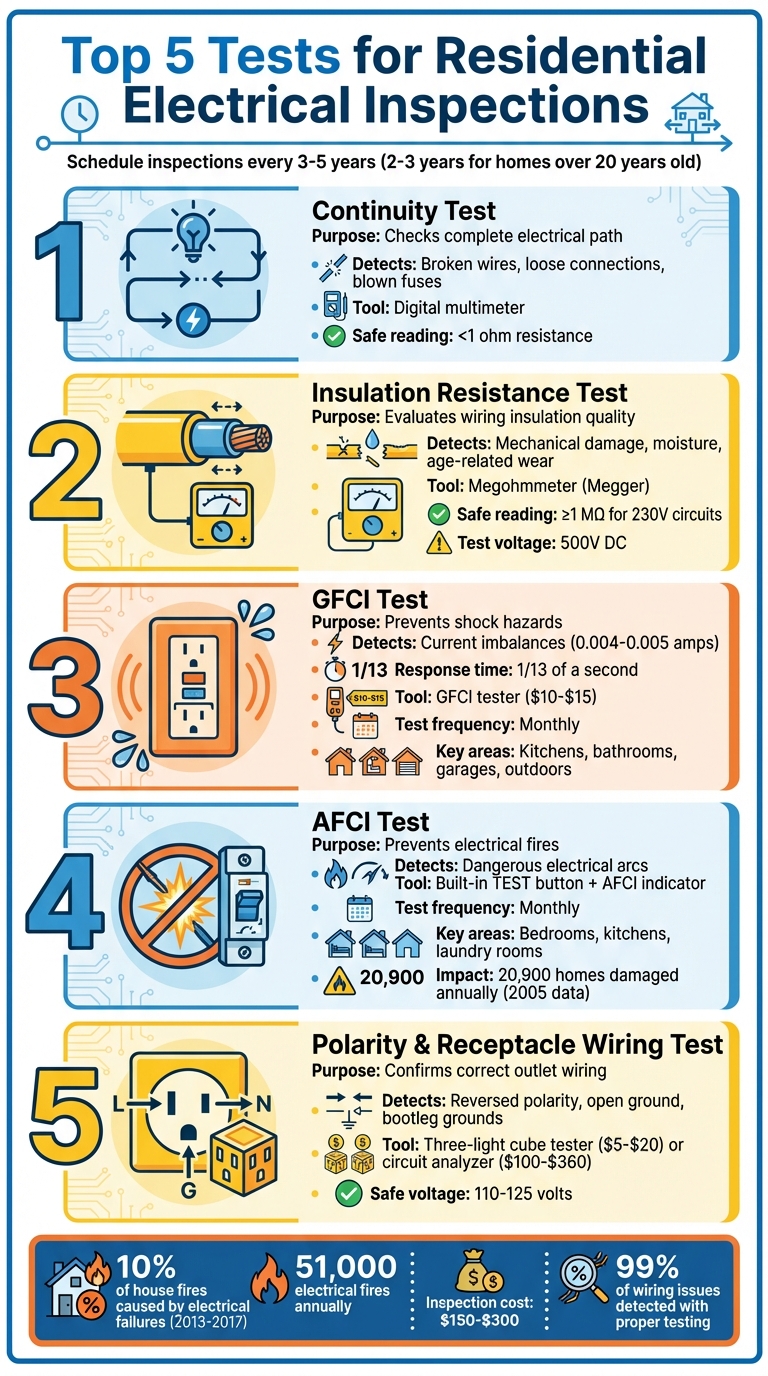
Top 5 Tests for Residential Electrical Inspections
Electrical inspections are a must to keep your home safe from hazards like fires and shocks. Faulty wiring or outdated systems can lead to serious risks, especially in older homes. Experts suggest scheduling inspections every 3–5 years - or every 2–3 years for homes over 20 years old. These inspections focus on five critical tests:
- Continuity Test: Checks if circuits have a complete path for electricity. Detects issues like broken wires and loose connections.
- Insulation Resistance Test: Measures the quality of wire insulation to prevent overheating, shocks, and fires.
- GFCI Test: Ensures Ground Fault Circuit Interrupters protect against shocks in moisture-prone areas like kitchens and bathrooms.
- AFCI Test: Verifies Arc Fault Circuit Interrupters can detect dangerous electrical arcs that could cause fires.
- Polarity and Receptacle Wiring Test: Confirms outlets are wired correctly to avoid shocks and ensure proper grounding.
These tests help identify hidden dangers, ensure compliance with safety codes, and protect your home and family. Regular checks and proper tools make all the difference in maintaining a safe electrical system.
5 Essential Electrical Inspection Tests for Home Safety
1. Continuity Test
Purpose of the Test
The continuity test is one of the first and most important steps in residential electrical inspections. Its purpose? To ensure the circuit's path is intact and functioning as it should. By measuring resistance, this test determines whether the circuit is complete. A low resistance reading (close to 0 ohms) indicates a closed, safe circuit, while a high or infinite reading points to a break in the path. This process checks that the Circuit Protective Conductor (CPC) and bonding conductors are properly connected to the earth, which is essential for maintaining safety.
"Continuity is the presence of a complete path for current flow. A circuit is complete when its switch is closed." – Carelabz
Tools and Equipment Required
To carry out a continuity test, you'll need a few key tools:
- A digital multimeter set to continuity or resistance (Ω) mode
- A non-contact voltage tester to confirm the circuit is de-energized
- Insulated screwdrivers for safely removing faceplates and disconnecting terminals
- Long test leads for reaching earthing conductors during the inspection
These tools are essential for both accuracy and safety during the testing process.
Key Issues Detected
Continuity tests help uncover several potential problems, including:
- Blown fuses
- Broken wires
- Faulty switches
- Loose connections
- Short circuits caused by insulation problems
Additionally, it confirms the grounding system's functionality, which is crucial for automatic disconnection in case of faults. For example, a properly functioning receptacle should typically show resistance below 1 ohm. On the other hand, issues like a blown fuse or a broken wire will result in an infinite resistance or "OL" (Open Loop) reading on the meter.
Importance for Residential Safety
Before starting the test, always double-check that the circuit is de-energized using a non-contact voltage tester - this step protects both the equipment and the person performing the test. Verify your multimeter's accuracy by touching its probes together to confirm a zero reading. Disconnect wires from devices to avoid false readings, and when testing lighting circuits, ensure all switches are turned to the appropriate positions to check every possible path for continuity.
This test not only identifies potential issues but also ensures that the grounding system is ready to handle faults effectively, keeping the home safe.
The next step in ensuring electrical safety involves testing insulation resistance.
sbb-itb-501186b
2. Insulation Resistance Test
Purpose of the Test
After completing the continuity test, the insulation resistance test takes safety a step further by evaluating the wiring insulation under load conditions. This test applies a high DC voltage - commonly 500V for 230V circuits - to identify any leakage through the insulation. Detecting such issues early helps prevent risks like electrical fires and shocks.
The goal is to ensure the wiring can handle heavy electrical loads without overheating. It’s crucial to perform this check before walls are plastered or floors are installed, as fixing problems at this stage is far more manageable and cost-effective. For a 230V circuit, a reading of at least 1 MΩ is considered acceptable, though new installations often show much higher values, sometimes exceeding 299 MΩ.
Tools and Equipment Required
To conduct this test, you’ll need a megohmmeter (commonly called a Megger) to apply high-voltage DC and measure resistance in megohms. Use test leads that comply with GS 38 safety standards, and always wear appropriate personal protective equipment, like insulated gloves and safety glasses, when handling high voltages.
Before testing, disconnect sensitive electronics such as dimmer switches, PIR sensors, LED drivers, and surge protectors to avoid damage from the applied voltage. Confirm your tester is functioning correctly by briefly touching the leads together (which should show 0.00Ω) and then separating them (which should display an "over range" reading).
Key Issues Detected
This test is designed to uncover problems like mechanical damage (e.g., crushed or punctured cables, frayed insulation) and age-related wear, such as brittle rubber insulation found in older homes. Moisture is another common issue, particularly in new builds where wet plaster can lead to lower resistance readings at outlets and switches.
It can also identify short circuits and earth faults, where live conductors come into contact with each other or grounded metal objects like pipes, creating serious shock hazards.
"Insulation failure is the root cause of many electrical conductors and equipment failures. When insulation fails, not only can equipment be damaged, but fire and shock can also result." – EC&M
Importance for Residential Safety
Always de-energize the system before testing, and ensure it’s fully discharged afterward. Wait at least four to five times the test duration before proceeding.
Keep in mind that insulation resistance can decrease over longer cable runs, so slightly lower readings may be normal for extended distances. While readings between 1 MΩ and 2 MΩ are generally acceptable, they should prompt closer scrutiny to rule out potential problems. By identifying insulation issues early, you can prevent electrical fires and reduce the risk of shock hazards, ensuring a safer environment for your home. This test also sets the stage for further safety evaluations in subsequent checks.
3. Ground Fault Circuit Interrupter (GFCI) Test
Purpose of the Test
After ensuring circuit integrity, testing Ground Fault Circuit Interrupters (GFCIs) plays a crucial role in preventing shock hazards. GFCIs are designed to detect even the smallest current imbalances between the hot and neutral wires, which could indicate electricity escaping to the ground. When an imbalance as tiny as 0.004 to 0.005 amps occurs, the GFCI can cut power in just 1/13 of a second. This rapid response is vital because even minor imbalances can pose serious risks.
This test is also essential for uncovering wiring errors, such as LINE/LOAD reversal - when supply wires are incorrectly connected. In such cases, the GFCI may appear to work, but downstream outlets remain unprotected. Inspectors focus on high-risk areas like kitchens, bathrooms, garages, and outdoor spaces, where the likelihood of shock is higher due to moisture.
Next, let’s look at the tools you’ll need to carry out this test effectively.
Tools and Equipment Required
Start with the built-in TEST and RESET buttons found on most GFCI outlets and breakers. Use a simple device like a lamp or radio to confirm whether the power cuts off as expected. For a more detailed check, a plug-in GFCI tester is highly recommended. These testers, which typically cost $10 to $15, can help identify problems like reversed polarity or an open ground.
Before testing, unplug sensitive electronics to avoid any potential damage. Professionals often rely on advanced tools like leakage current clamp meters (capable of detecting currents below 5 mA) and multimeters to measure voltage and continuity for a more thorough evaluation.
Key Issues Detected
Testing GFCIs can uncover critical wiring issues, such as LINE/LOAD reversal, reversed polarity, or open ground conditions, all of which compromise the device’s ability to protect against shocks. For instance, if pressing the reset button doesn’t cut power, it’s likely due to a LINE/LOAD reversal, meaning the GFCI isn’t providing proper protection.
Mechanical failures are another common problem, especially in GFCIs nearing the end of their 15- to 20-year lifespan. Additionally, external factors like voltage surges from lightning or utility switching can damage the internal components of these devices.
Addressing these issues promptly is essential for maintaining a safe electrical system.
Importance for Residential Safety
Since GFCI outlets were introduced in the 1970s, electrocution rates in the United States have significantly decreased. Unlike standard circuit breakers, which are designed to handle large electrical faults that could cause fires, GFCIs are specifically engineered to protect against small current leaks that can be deadly.
"Malfunctioning GFCIs do not provide shock protection. Have a licensed, qualified electrician check the GFCI and correct the problem if your GFCI is not working." – Missoula Electric Cooperative
To ensure GFCIs continue to provide protection, test them monthly using the TEST button. When testing, always confirm that downstream outlets wired to the GFCI’s LOAD side lose power as expected. If a GFCI doesn’t trip during testing, it must be replaced immediately to restore proper safety measures.
4. Arc Fault Circuit Interrupter (AFCI) Test
Purpose of the Test
After completing GFCI inspections, it's important to turn attention to devices designed to prevent fire hazards. AFCI tests are specifically aimed at identifying arc faults, a risk that standard circuit breakers cannot address. While GFCIs protect against electrical shocks, AFCIs focus on preventing house fires caused by electrical arcs. These arcs occur when electricity jumps across gaps in damaged wires, loose connections, or punctured insulation - issues that traditional breakers fail to detect. To put this into perspective, in 2005 alone, electrical fires caused by undetected arcs damaged 20,900 homes, caused 500 fatalities, and led to $862 million in property damage.
The goal of AFCI testing is to ensure the device can distinguish between harmless operational sparks and dangerous arcs, such as those from frayed wires or damaged connections. It also verifies that the protection covers the entire branch circuit, not just the breaker panel.
Tools and Equipment Required
To test an AFCI, start with the built-in TEST button on the breaker or receptacle. Pressing this button simulates an arc fault, causing the device to trip if it’s functioning correctly.
For more detailed inspections, professionals often use portable AFCI indicators. These tools generate 8 to 12 high-amp pulses in rapid succession to mimic the characteristics of arcing. If the results are unclear, it's always a good idea to double-check using the built-in TEST button.
"AFCIs recognize characteristics unique to arcing, and AFCI indicators produce characteristics that mimic some forms of arcing. Because of this, the indicator may give a false indication that the AFCI is not functioning properly." – Underwriters Laboratories [34,35]
Key Issues Detected
Testing AFCIs can uncover hidden dangers like brittle insulation, pinched cords, or wiring damaged during renovations. It can also reveal nuisance tripping caused by shared neutral wires or errors in junction boxes. If an AFCI fails to trip during testing, it’s not providing the necessary fire protection and should be replaced immediately by a licensed electrician. For AFCIs that pass the test, resetting is simple: switch it fully OFF and then back ON.
These tests highlight why regular AFCI checks are essential for maintaining a safe home environment.
Importance for Residential Safety
Unlike standard breakers, which only respond to overloads and short circuits, AFCIs monitor electrical waveforms continuously to detect low-level arcing that could ignite nearby materials. Monthly tests are especially important in high-risk areas like bedrooms, kitchens, and laundry rooms.
"Arc fault circuit interrupters (AFCIs) provide advanced protection against electrical fires, but only if they are working properly." – Electrical Safety Foundation International (ESFI)
To ensure consistent safety, make sure AFCIs are installed in locations that are easy to access for routine testing. Regular maintenance can make all the difference in preventing electrical fires.
5. Polarity and Receptacle Wiring Test
Purpose of the Test
After completing the AFCI test, the next step in ensuring electrical safety is the Polarity and Receptacle Wiring Test. This test checks if outlets are wired correctly, focusing on proper hot/neutral orientation, effective grounding, and safe voltage levels. As Faggella, P.E., explains, this process confirms critical aspects like proper polarity, a functional equipment grounding conductor, and safe voltage under load conditions.
Incorrect polarity can lead to serious hazards. For instance, reversed polarity might energize appliances even when they’re turned off, increasing the risk of electrical shock. Similarly, a hot/ground reversal could energize the metal casing of tools or appliances, posing an immediate danger. Faggella emphasizes:
"Deficiencies in a structure's wiring can lead to erroneous operation of equipment, damage to equipment, a shock hazard to residents, and even a potential for a fire".
Tools and Equipment Required
For a quick and affordable check, a three-light cube tester is a reliable option. Priced between $5 and $20, it can instantly indicate whether an outlet is "Correct", has an "Open Ground", or shows "Reversed Polarity". However, cube testers have limitations - they can’t detect bootleg grounds, where a jumper wire falsely connects the neutral and ground screws to mimic proper grounding.
For a deeper analysis, professionals often turn to advanced tools like circuit analyzers. Examples include the Ideal SureTest 61-164 (about $360) and the Mastech MS5908A (around $100). These devices provide detailed insights, such as detecting bootleg grounds, measuring voltage drops under load, and testing GFCI trip times. They typically take 10–15 seconds per outlet. Another option is a digital multimeter, costing between $15 and $50. While these offer precise voltage readings, they require manual probing and may struggle to identify the hot slot on ungrounded circuits.
With these tools, you can pinpoint wiring issues that might otherwise go unnoticed, ensuring a safer electrical system.
Key Issues Detected
This test can uncover a range of wiring problems, including:
- Reversed Polarity: When the hot and neutral wires are swapped.
- Open Ground: A missing or ineffective safety ground.
- Hot/Ground Reversal: A dangerous condition where appliance casings can become energized.
- Bootleg Grounds: A deceptive setup using jumper wires to simulate proper grounding, which fails to provide real protection.
Bootleg grounds are especially common in older homes. Mike Morgan, owner of Morgan Inspection Services, cautions:
"a bootleg ground does not properly ground the receptacle, and it actually creates a dangerous situation".
If cube testers indicate that outlets are "grounded" but the main panel lacks sufficient ground wires, it’s wise to remove outlet cover plates and check for jumper wires.
When paired with other tests, this step offers a thorough evaluation of your home’s electrical safety.
Importance for Residential Safety
Correctly wired outlets play a vital role in preventing electrocution, safeguarding electronics, and reducing the risk of electrical fires. Standard residential outlets typically measure between 110 and 125 volts. Testing under a 15-amp or 20-amp load can highlight excessive voltage drops, often caused by poor connections that may lead to overheating. While cube testers can identify about 99% of common wiring issues, investing in a circuit analyzer ensures a more complete safety assessment for modern homes.
How to Perform Residential Electrical Inspections
Why These Tests Matter
The five electrical tests discussed earlier create a layered approach to safety, ensuring compliance with the National Electrical Code (NEC). Each test serves a specific purpose: continuity and insulation tests check for secure wiring and proper insulation, while polarity and receptacle tests confirm correct wire connections, reducing the risk of problems like energized appliance casings. Meanwhile, GFCI and AFCI tests ensure these devices will perform as needed in critical moments. Together, these tests address immediate safety concerns and help maintain the long-term reliability of your electrical system.
The stakes are high. Between 2013 and 2017, electrical distribution and lighting system failures were responsible for 10% of house fires and 19% of related civilian deaths. As highlighted by Meteor Electrical:
"Electrical testing helps identify potential issues in electrical systems before they become major problems. Regular testing can prevent electrical fires, equipment failures, and other hazards".
While basic testers can catch many common wiring issues, combining all five tests offers a more thorough way to identify and address faults.
Beyond safety, these tests also ensure your home remains up to code with the NEC. This is essential for maintaining your home’s value and avoiding complications with insurance. A residential inspection typically costs between $150 and $300, a small price to pay compared to the potential financial and emotional toll of electrical fires or injuries caused by faulty systems.
For those looking to perform these tests, Electrical Trader provides essential tools such as multimeters, circuit analyzers, and advanced insulation resistance testers. They also offer replacement components like GFCIs, AFCIs, and breakers to fix any issues uncovered during inspections. Using reliable equipment ensures accurate results and compliance with NEC standards, whether for routine maintenance or pre-purchase evaluations.
Experts recommend scheduling professional inspections every 3–5 years, with more frequent checks for homes older than 30 years. Between these visits, you can take simple steps to enhance safety by testing your GFCI and AFCI devices monthly using their test buttons. It only takes seconds and could make a life-saving difference.
Conclusion
Carrying out these tests during routine maintenance or before selling a home is a key step in protecting both your property and your family. While visual inspections can catch obvious problems like missing cover plates, they often miss hidden dangers such as bootleg grounds or reversed polarity, which can lead to serious shock hazards. These tests fill the gap between what you can see and what a professional evaluation might uncover, ensuring that hidden defects don’t jeopardize safety.
Experts warn that wiring issues don’t just threaten your appliances - they can also cause shock hazards and fires. Each year, home electrical fires are responsible for an estimated 51,000 incidents. This makes precise testing an essential part of fire prevention and overall safety.
The tools you use for testing are just as important as the tests themselves. While basic three-light testers are great for quick, straightforward checks, professional-grade circuit analyzers offer more detailed insights. These include features like voltage drop analysis and bootleg ground detection, which are critical for maintaining electrical safety and meeting NEC standards.
FAQs
How often should I have my home's electrical system inspected?
For most homes, scheduling an electrical inspection every 3 to 5 years is a smart move. However, if your home is over 25 years old or you’re noticing warning signs - like flickering lights, frequent breaker trips, or outdated wiring - you might need inspections more often.
These inspections are crucial for keeping your home’s electrical system safe, up-to-date, and in line with current codes. If you’re not sure when your home was last inspected, it’s safer to play it cautious and reach out to a licensed electrician for advice.
What basic tools do I need for an electrical safety test at home?
To carry out a basic electrical safety test at home, you'll need a few key tools:
- Non-contact voltage tester: This handy gadget lets you check for live wires without touching them, keeping you safe while you work.
- Circuit tester: Also known as a plug-in tester, it verifies whether outlets are properly wired and receiving power.
- Continuity tester: This tool helps you determine if a circuit is complete and free of damage, making it easier to spot potential problems.
You can grab all these tools for under $20, making them an affordable option for quick and simple safety checks around your house.
Why is it necessary to regularly test GFCI and AFCI devices in your home?
Testing GFCI (Ground Fault Circuit Interrupter) and AFCI (Arc Fault Circuit Interrupter) devices is a crucial step in keeping your home safe from electrical dangers like shocks and fires. These devices act as a shield, but over time, they can wear out or develop faults, potentially leaving you exposed to risks.
To stay protected, you should test these devices regularly - ideally once a month. This simple habit ensures they’re working as they should and gives you the chance to fix any problems early. Beyond safety, regular testing also helps you meet residential electrical standards, giving you peace of mind.