Why Persistent Short Circuits Happen and How to Fix Them
Persistent short circuits occur when electricity flows through unintended, low-resistance paths, often causing repeated breaker trips. These faults are dangerous, generating extreme heat that can damage wiring or even start fires. Common causes include damaged insulation, loose connections, moisture, or physical wear. To fix them:
- Identify Symptoms: Look for tripped breakers, scorch marks, burning smells, or buzzing sounds.
- Diagnose Safely: Use tools like multimeters and megohmmeters to locate faults.
- Fix the Issue: Replace damaged wiring, tighten connections, and address environmental factors like moisture.
- Upgrade Protection: Install AFCI or GFCI breakers for added safety.
- Maintain Regularly: Inspect wiring every few years, especially in older systems.
Constant Short Circuits at Home? ⚠️ Here’s What To Do! #electricalengineering #electrical
sbb-itb-501186b
Symptoms of Persistent Short Circuits
Electrical Fault Types: Short Circuit vs Overload vs Ground Fault vs Arcing
Common Warning Signs
When a persistent short circuit occurs, it usually triggers an immediate breaker trip. This happens because the magnetic element in the breaker reacts to a sudden spike in current.
Beyond the sudden trip, physical signs often point to trouble. Look for scorch marks, melted plastic, or charred insulation in outlets or panels. Even if there’s no visible damage, a distinct burning smell can indicate failing insulation or arcing somewhere in the circuit.
There are also more subtle signs to watch for. Flickering lights, buzzing noises from outlets or panels, and warm outlets or breakers can hint at an ongoing issue. Intermittent shorts, often caused by rodent damage or mechanical wear, may only show up under certain conditions like vibrations or temperature changes.
These symptoms are key to identifying short circuits and distinguishing them from other electrical problems.
How to Tell a Short Circuit Apart from Other Electrical Issues
The timing of a breaker trip can help differentiate short circuits from other faults. Short circuits cause an immediate trip due to a sudden current surge. In contrast, an overload leads to a delayed trip as the breaker's thermal element gradually heats up. If a breaker trips after several minutes, it’s more likely an overload than a short circuit.
"A tripped breaker means the overcurrent device responded to an elevated current condition. The fault that caused the trip - damaged insulation, a failed appliance, a loose connection - remains present until identified and corrected." - Expert Electrical Repair
Ground faults, while similar to short circuits, involve current leaking to a grounding path instead of flowing directly between hot and neutral conductors. These faults can also cause immediate trips but are often intermittent, especially in damp environments, and pose a significant shock risk.
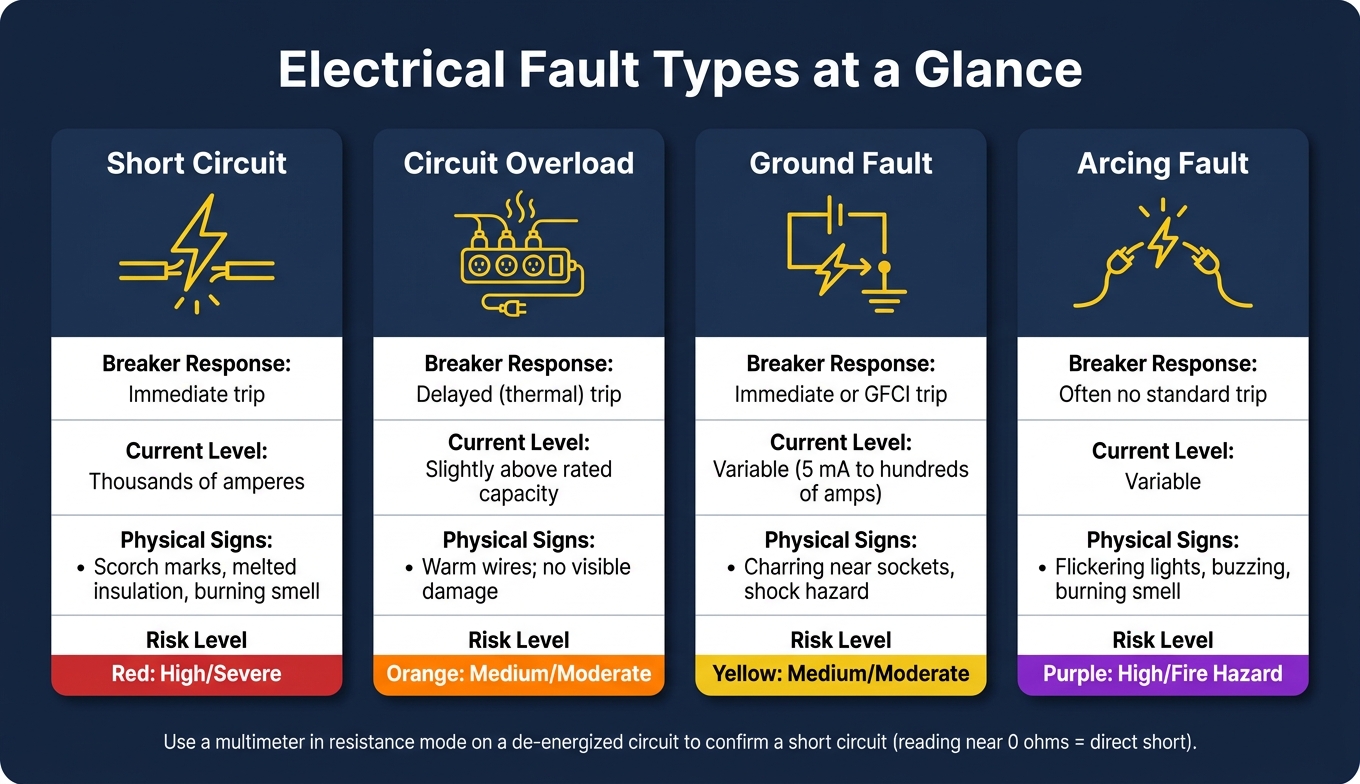
Here’s a quick comparison of common electrical faults:
| Fault Type | Breaker Response | Current Level | Physical Signs |
|---|---|---|---|
| Short Circuit | Immediate trip | Thousands of amperes | Scorch marks, melted insulation, burning smell |
| Circuit Overload | Delayed (thermal) trip | Slightly above rated capacity | Warm wires; no visible damage |
| Ground Fault | Immediate or GFCI trip | Variable (5 mA to hundreds of amps) | Charring near sockets, shock hazard |
| Arcing Fault | Often no standard trip | Variable | Flickering lights, buzzing, burning smell |
To confirm a short circuit, use a multimeter in resistance or continuity mode on a de-energized circuit. A reading close to zero ohms between hot and neutral conductors signals a direct short. If insulation damage is suspected, a megohmmeter is more effective - readings below 1 megohm indicate potential for recurring problems. Always de-energize and lock out the circuit before testing.
In some cases, high inrush currents from motors can mimic a short circuit by tripping breakers instantly. Motors can draw six to eight times their normal running current during startup. If trips only happen when a specific appliance powers on, check for inrush current before assuming a wiring fault.
Understanding these differences is crucial before diagnosing and addressing electrical faults.
Root Causes of Persistent Short Circuits
Once you've spotted the symptoms, the next step is figuring out why the problem keeps happening. Short circuits don’t just appear out of nowhere - they’re often the result of issues that have been building up over time.
"Short circuits do not usually appear without warning. They often grow out of conditions that have been developing for months or years." - R.W. Hurst, Editor, Electricity Forum
Damaged Conductors and Insulation
Insulation plays a critical role in preventing short circuits, but it doesn’t last forever. Over time, factors like heat cycling, UV exposure, chemical contact, and natural aging can cause insulation to crack and weaken. For example, thermoplastic insulation, such as that used in NM-B cables, typically lasts 25–40 years. However, harsh conditions can reduce this lifespan significantly.
Mechanical damage is another frequent cause. Things like nails, screws, or pinched wiring can puncture insulation, exposing the conductors underneath. Rodents are also a surprisingly common issue - they chew through cable coverings, leaving bare wires exposed and increasing the risk of faults.
Overloading circuits is equally problematic. Excessive heat from continuous overloads can melt thermoplastic insulation. Once two conductors touch, a short circuit forms. Electrical arcs, which can reach temperatures of 35,000°F, can even vaporize copper, leaving behind permanent damage. One particularly dangerous effect of repeated arcing is carbon tracking. This happens when plastic insulation becomes carbonized, creating a conductive path that sustains the fault even after the original contact point is gone.
Loose Connections and Mechanical Stress
A loose terminal screw might not seem like a big deal, but it can create a high-resistance connection. This generates heat, which eventually burns nearby insulation, leading to a growing fault.
"Loose terminal screws allow wire movement and intermittent contact faults that are particularly difficult to locate." - Electric Repair Authority
What makes these faults so tricky is that the resistance from the arc can keep the current low enough to avoid tripping a standard breaker. This means the circuit stays live, the damage continues to worsen, and the fault isn’t addressed until it becomes severe. In environments with heavy machinery or motors, vibration can make things worse. Constant movement can loosen screws or cause wires to rub against sharp edges, wearing down insulation until the bare copper is exposed.
Moisture, Contamination, and Harsh Conditions
Moisture is another major contributor to short circuits. It lowers conductor resistance, creating unintended paths for current. Conductive dust and particles, such as metal filings or carbon dust, can also build up inside panels, leading to arcing or direct shorts. Over time, corrosive gases and salt air can damage metallic components and protective coatings, making breakers and conductors less reliable.
"High humidity can lead to moisture ingress into electronic systems, which can cause corrosion and create conductive pathways that lead to short circuits." - Magnalytix
To combat these issues, it’s essential to use the right type of enclosure. Equipment in wet, dusty, or corrosive environments needs to meet specific NEMA or UL standards for such conditions. For instance, a standard indoor enclosure won’t cut it in a coastal industrial facility or a food processing plant. Choosing an enclosure designed for the actual environment is one of the simplest ways to prevent recurring faults caused by environmental exposure.
How to Diagnose a Short Circuit Step by Step
Knowing what causes a short circuit is just the beginning - you also need to locate the issue safely and systematically. Following the right steps ensures you avoid worsening the problem or creating new risks.
Safety Checks and Preparation
Before diving into diagnostics, make sure the circuit is completely de-energized and locked out. Follow OSHA 29 CFR 1910.147 LOTO procedures, which include notifying personnel, shutting down and isolating the circuit, locking/tagging energy sources, and verifying zero voltage. Wear the proper NFPA 70E–approved protective gear, such as arc-rated clothing, insulated gloves, and a face shield.
Take a moment to review your system diagrams to familiarize yourself with the circuit layout. Pay attention to how the breaker tripped - this can provide valuable clues about the type of fault. Once safety is addressed, isolate the suspect circuit to begin narrowing down the problem.
Isolating the Faulted Circuit
The first step is to unplug all devices and loads connected to the affected circuit. This includes appliances, lamps, and any other equipment. Then, reset the breaker. If it stays on, the fault is likely in one of the disconnected devices. Reconnect each device one by one until the breaker trips again, revealing the faulty item.
If the breaker trips even when all loads are unplugged, the issue is probably in the fixed wiring. Use a methodical approach called segment testing. Disconnect the hot conductors at a midpoint junction box, then test each section of the wiring separately. If disconnecting one side resolves the short, the problem lies in the other section. Keep narrowing down the segments until you locate the faulty cable run. While inspecting junction boxes, look for signs of damage like scorched terminals, melted insulation, rodent activity, or loose connections. Gently pull on wires to check for hidden issues.
Testing and Inspection Methods
Once you’ve identified the problematic segment, use the right tools to confirm and analyze the fault. A multimeter is great for detecting hard shorts, which show as near-zero resistance between hot and ground. For insulation issues, a megohmmeter is essential - readings below 1 megohm indicate insulation problems. According to IEEE Std 43-2013, a properly repaired residential circuit should ideally measure above 100 megohms.
If the fault is hidden behind walls or inside assemblies, a thermal imaging camera can help. It identifies heat from intermittent arcing without requiring you to open up walls or panels.
Here’s a quick guide to the tools you’ll need:
| Tool | What It Measures | Best Used For |
|---|---|---|
| Multimeter | Continuity / Resistance | Identifying hard shorts at the device level |
| Megohmmeter | Insulation Resistance (MΩ) | Checking for insulation breakdown in wiring |
| Clamp Meter | Leakage Current (mA) | Detecting ground faults without disconnecting wires |
| Thermal Camera | Surface Temperature | Spotting heat from arcing faults behind walls |
| AFCI Tester | Simulated Arc Signal | Testing AFCI breakers for proper response to arcing faults |
After completing repairs, always re-measure insulation resistance to ensure the issue is resolved before re-energizing the circuit.
How to Fix and Prevent Recurring Short Circuits
Once you've identified the fault through diagnostics, the next step is addressing the issue and ensuring it doesn't happen again. By focusing on targeted repairs and preventive measures, you can achieve a more reliable electrical system.
Replacing Damaged Parts and Upgrading Protective Devices
If diagnostics show damaged insulation or a faulty conductor, it's best to replace the entire affected section rather than just the visibly damaged part. For conduit systems, replacing individual conductors may be more practical than pulling a completely new cable. Always ensure wire splices are made in accessible junction boxes - splicing wires inside walls without enclosures violates NEC 300.15 and can lead to future problems.
After replacing conductors, assess whether your protective devices are still adequate. Standard thermal-magnetic breakers work well for handling bolted shorts and overloads but may not detect low-level arcing. Upgrading to AFCI breakers, as required by NEC 210.12 for most 15- and 20-amp circuits in living areas, can help detect hazardous arcing and reduce fire risks. For wet areas like kitchens and bathrooms, GFCI protection is essential to prevent electrocution, as it trips at 4–6 mA. In commercial or industrial settings with high fault currents, ensure that breakers meet or exceed the available short circuit current, complying with NEC 110.9.
Here’s a comparison of common breaker types:
| Breaker Type | Primary Application | Pros | Cons |
|---|---|---|---|
| Standard Thermal-Magnetic | General branch circuits, high-load appliances | Handles bolted shorts and overloads effectively; affordable | Cannot detect low-level arcing or ground faults |
| AFCI (Arc-Fault) | Bedrooms, living areas (NEC 210.12) | Detects arcing before fires start | May trip unnecessarily with older wiring or motors |
| GFCI (Ground-Fault) | Wet areas - kitchens, bathrooms, outdoors | Prevents electrocution by detecting small leaks (4–6 mA) | Does not protect against phase-to-neutral shorts |
| High-Interrupting (AIC) | Commercial/industrial panels with high fault currents | Safely handles high fault currents | Higher cost |
After repairs, use a megohmmeter to re-test insulation resistance, aiming for readings above 100 megohms on residential branch circuits.
Beyond repairs, improving installation methods can further strengthen your system.
Better Installation and Environmental Controls
Recurring short circuits often result from insufficient physical protection rather than faulty components. Seal cable entry points in enclosures and use enclosures rated for the environment - especially in wet or outdoor areas - to protect against moisture, pests, and debris. In agricultural settings, follow NEC Article 547 for proper enclosure guidelines.
Proper cable routing is also essential. Secure cables to prevent movement and abrasion, and use nail plates to protect cables passing through studs or joists near edges. This can prevent accidental damage from screws or nails during renovations. Reducing mechanical stress on conductors can significantly extend their lifespan and minimize future faults.
Setting Up a Regular Maintenance Schedule
While fixing the immediate issue is critical, regular maintenance is key to preventing future problems. Scheduled inspections can catch deteriorating insulation before it fails. For most homes, a professional electrical inspection every 3–5 years works well. However, for homes over 25 years old - where thermoplastic NM-B cable insulation may be nearing the end of its 25–40 year lifespan - inspections every 2–3 years are recommended.
"Homeowners should steer clear of DIY electrical repairs or installations, as the risk of injury is shockingly high!" - Kaitlyn Pacheco, Content Editor, Angi
During inspections, look for scorched terminals, check conductor insulation, and update system diagrams to reflect any changes to circuit layouts or protective device settings. Accurate diagrams not only improve safety but also make future troubleshooting faster. For hard-to-find replacement parts, Electrical Trader offers a range of new and used electrical components, which can be especially helpful for older systems.
Conclusion: Keeping Your Power Distribution System Reliable
Short circuits don’t fix themselves. Resetting a breaker without addressing the underlying issue only delays inevitable failures. To truly resolve the problem, pinpoint the cause - whether it’s deteriorating insulation, a loose connection, moisture, or physical damage - and make a proper repair. After repairs, use a megohmmeter to confirm the work. Insulation resistance should measure above 100 megohms; anything below 1 megohm indicates compromised wiring. Consistently high readings (over 100 megohms) confirm that your repairs have been effective. Keep in mind that thermoplastic insulation typically lasts 25–40 years, so regular testing becomes more critical as your system ages.
Once repairs are verified, take safety a step further by upgrading protective devices. Consider installing AFCI and GFCI devices to guard against arcing and ground faults. Regular inspections and proper documentation are also key to preventing future issues. By addressing the root causes of faults, modernizing your protection systems, and sticking to a schedule of inspections, you can maintain a reliable power distribution system for years to come.
Routine maintenance is your best defense against long-term problems. Managing environmental factors like moisture and wear can help catch potential issues early. When it’s time to replace components - whether it’s breakers, conductors, or enclosures - Electrical Trader offers a wide range of new and used electrical equipment to keep your system running smoothly and reliably.
FAQs
When should I call an electrician instead of troubleshooting a short myself?
If you notice frequent breaker trips, overheating, burn marks, buzzing sounds, or strange smells near outlets or switches, it's time to call an electrician. You should also bring in a professional if devices or circuits shut down unexpectedly or if you're unsure what's causing the issue. Problems like internal wiring faults or circuit overloads require the right expertise and tools, making it much safer to rely on a licensed electrician.
What insulation resistance reading is “bad” on a megohmmeter for home wiring?
A reading below 1 megaohm (MΩ) on a megohmmeter for home wiring is considered poor. This indicates weak insulation, which could lead to electrical problems such as short circuits or damage to equipment. It’s a sign that the wiring might need attention to ensure safety and functionality.
Will replacing a breaker fix repeated trips, or is the wiring usually the problem?
Frequent breaker trips might not always be resolved by simply replacing the breaker. The real issue often lies deeper, such as circuit overloads, short circuits, or wiring problems. While a defective breaker could occasionally be the problem, repeated tripping usually signals something more serious within the wiring. Addressing these underlying issues is crucial because swapping out the breaker without fixing the root cause won’t solve the problem - and it could even create safety hazards. Proper diagnosis is key to ensuring both functionality and safety.