Off-Grid Load Analysis Guide
When designing an off-grid solar system, understanding and calculating your power needs is step one. A "load" refers to the power used by every device in your system. Misjudging this can lead to power outages or damage to batteries. Here’s what you need to know:
- List Every Device: Include all appliances, even small ones like clocks or chargers. Don’t forget “phantom loads” (devices that draw power even when off).
- Calculate Energy Use: Multiply each device’s wattage by the hours it runs daily. Adjust for seasonal changes, like longer lighting hours in winter.
- Battery Sizing: Factor in daily energy needs, days of autonomy (2–3 days is common), and battery type (e.g., lithium or lead-acid). Include a buffer for inefficiencies and aging.
- Account for Losses: Inverters, converters, and wiring reduce efficiency. Plan for these losses to avoid falling short.
- Manage Loads: Prioritize critical devices and use tools like smart panels or relays to prevent overloading.
Planning carefully ensures your system runs year-round without interruptions. Keep reading for detailed steps and tools to simplify the process.
4-Step Off-Grid Solar Load Analysis Process
Off Grid Solar System Design: 4 Easy Steps + Diagram (load analysis)
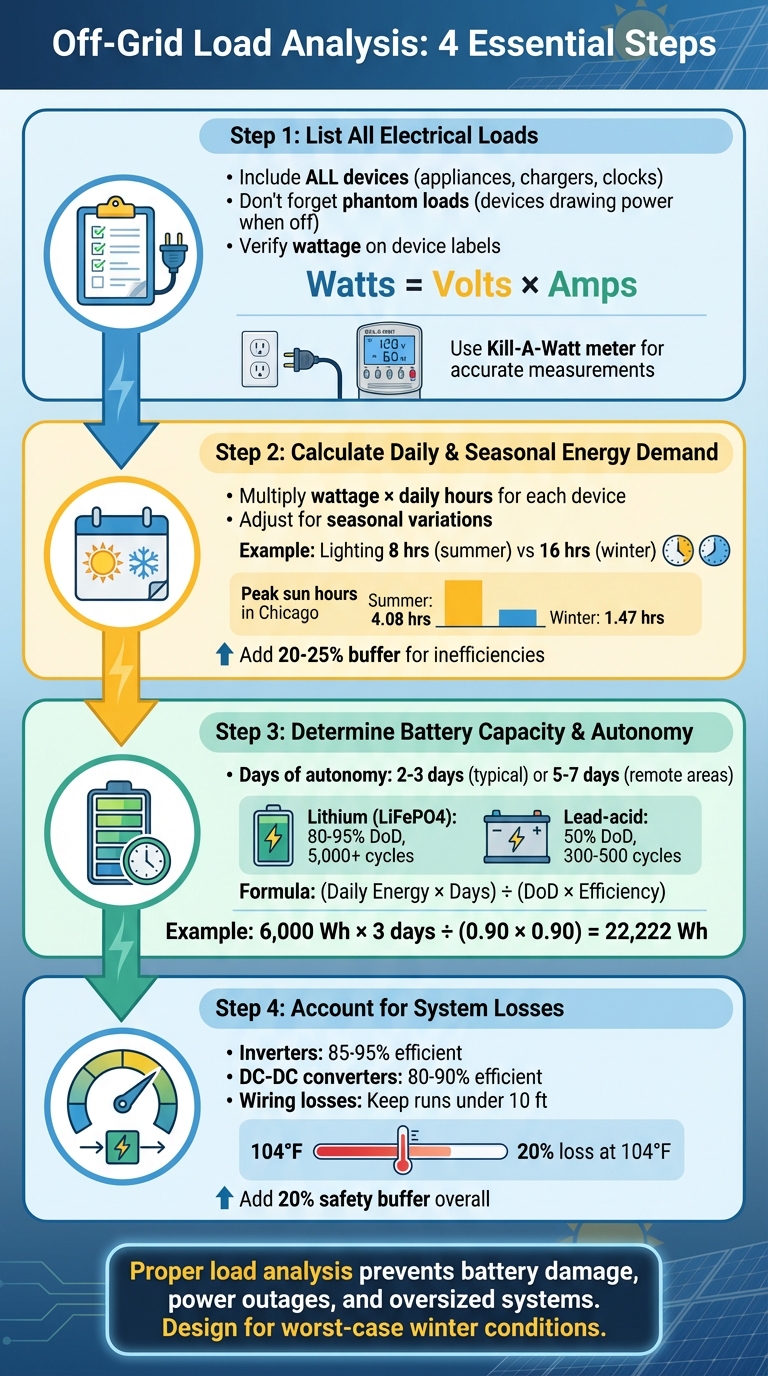
Step 1: List All Electrical Loads
Designing an off-grid system starts with creating a detailed list of all electrical loads. This isn't just about jotting down the big appliances; every single device that draws power needs to be accounted for. Think about everything from LED bulbs and phone chargers to the digital clocks on microwaves and even rarely used devices like garbage disposals. This step is critical because an accurate list ensures your system is designed to handle your actual power needs.
A common oversight is ignoring phantom loads - devices like TVs, computers, or microwave clocks that consume energy even when turned off. As Northern Arizona Wind & Sun puts it:
"If a device is drawing energy, no matter how small, it will have an impact on your solar system. The more accurately you fill in the calculator, the better your system design will be."
Once you've listed all your devices, verify their wattage. You can usually find this information on the device label. For light bulbs, the wattage is often printed on the base. If the label only shows amps and volts, you can calculate the wattage using this formula: Watts = Volts × Amps. For variable loads like refrigerators or ovens, a plug-in Kill-A-Watt meter can provide a more precise measurement of 24-hour energy consumption.
Keep in mind the difference between power and energy. Power, measured in watts (W), is the instantaneous energy use. Energy, measured in watt-hours (Wh), reflects total consumption over time. For instance, a refrigerator might draw 150W while running but typically cycles on for only 8 hours a day. This means its daily energy consumption is closer to 1,200–1,411 Wh, not the full 3,600 Wh it would consume if it ran continuously.
Creating an Appliance Load Inventory Table
To organize this information, use an appliance load inventory table. This table helps you calculate both the peak power demand (important for sizing your inverter) and the total daily energy use (essential for determining battery and solar array requirements).
| Appliance Name | Quantity | Wattage (W) | Daily Hours | Total Watt-hours (Wh) |
|---|---|---|---|---|
| LED Lights (60W equiv.) | 5 | 13 | 5 | 325 |
| Refrigerator (20 cu. ft.) | 1 | 150 | 8 | 1,200 |
| Laptop | 1 | 100 | 4 | 400 |
| Microwave | 1 | 1,000 | 0.17 (10 mins) | 170 |
| Coffee Maker | 1 | 1,000 | 0.17 (10 mins) | 170 |
| Ceiling Fan | 2 | 120 | 8 | 1,920 |
Be thorough - include everything from outdoor lights and power tools to rarely used gadgets. Missing even one load could lead to unexpected battery drain when multiple devices are used at once. Taking the time to create a complete inventory now will save you from headaches and expenses later.
Step 2: Calculate Daily and Seasonal Energy Demand
To figure out your daily energy needs, multiply the wattage of each appliance by the hours it runs daily, then add up the totals. For example, this might come out to 4,185 Wh (or 4.2 kWh). However, energy consumption isn't static - it changes with the seasons. A system that works perfectly in July might struggle in December. Why? Because lighting might need to operate for 16 hours instead of 8, and solar irradiance in places like Chicago, IL, can drop from around 4.08 to just 1.47 peak sun hours. It's crucial to design your system with winter conditions in mind, as shorter days, increased heating demands, and reduced solar generation all come into play. Adjusting for these seasonal variations ensures your system stays reliable throughout the year.
Accounting for Seasonal Energy Variations
Once you've calculated daily energy use, it's time to factor in how the seasons affect both energy demand and solar production. Winter, for instance, brings shorter days and fewer peak sun hours, which lower solar output. At the same time, energy needs often rise. Lighting, for example, might run 5 hours in summer but up to 16 hours in winter. If you rely on electric heating, those loads will only add to your winter energy demand.
Solar panels also face seasonal challenges. During summer, high temperatures can reduce their efficiency to about 75% of their rated capacity. On the flip side, colder weather can boost efficiency, but the trade-off is fewer sun hours. For instance, in Fairbanks, AK, peak sun hours drop from 5.87 in summer to just 2.12 in winter. This is why off-grid systems need to be designed based on the lowest daily sun hour average for your location to ensure they can handle year-round demands.
To build in reliability, add a 20–25% buffer to account for inefficiencies and unexpected loads. For example, if your winter energy consumption is 6,000 Wh per day, plan for a system that can handle 7,200 to 7,500 Wh. Creating separate load tables for summer and winter can make these differences clear, helping you size your battery bank and solar array to meet the demands of the most challenging season.
Step 3: Determine Battery Capacity and Autonomy
Once you’ve figured out your daily energy needs, the next step is calculating how much battery storage you’ll require. This isn’t just about covering a single day’s usage - it’s also about having enough backup to keep your system running during stretches of low solar production. Two key factors come into play: days of autonomy (how many days your batteries can power your home without solar input) and depth of discharge (DoD), which indicates how much of the battery’s capacity can be used without risking damage.
For most off-grid homes in the U.S., 2–3 days of autonomy is common. However, if you live in a remote area with frequent bad weather or limited sunlight during winter, you might need 5–7 days of backup. The more critical your energy needs - like medical devices or a home office - the more capacity you’ll want. As Bob Wu, a solar engineer at Anern, puts it:
"Sizing this component correctly is the single most critical step in designing a reliable system. An undersized bank leads to frustrating power outages, while an oversized one is a significant waste of your investment".
Why Depth of Discharge Matters
Depth of discharge (DoD) is just as important as autonomy. With Lithium Iron Phosphate (LiFePO4) batteries, you can safely use 80–95% of the battery’s capacity. On the other hand, lead-acid batteries should generally be discharged to only 50% to ensure a longer lifespan. This means a lead-acid system requires nearly double the rated capacity to provide the same usable energy as a lithium system. Additionally, lithium batteries last much longer, often exceeding 5,000 cycles, compared to just 300–500 cycles for lead-acid batteries.
Calculating Battery Capacity
To figure out how much battery storage you need in watt-hours (Wh), use this formula:
(Daily Energy Usage in Wh × Days of Autonomy) ÷ (DoD Percentage × Inverter Efficiency)
For example, let’s say your winter daily load is 6,000 Wh, you want 3 days of autonomy, you’re using lithium batteries with a 90% DoD, and your inverter is 90% efficient. The calculation would look like this:
(6,000 × 3) ÷ (0.90 × 0.90) ≈ 22,222 Wh (or about 22.2 kWh).
It’s smart to add a 20% safety buffer to account for battery degradation over time, as most batteries lose around 20% of their capacity after 10 years. Also, always plan your battery storage based on winter conditions, when solar production typically drops to its lowest levels.
Using a Battery Sizing Table
A battery sizing table can help you compare different scenarios and see how your choices impact the total capacity required. Here’s an example for a 5 kWh daily load on a 48V system:
| Autonomy Days | Battery Type | DoD Factor | Efficiency Factor | Required Capacity (Ah) |
|---|---|---|---|---|
| 1 Day | Lithium | 0.90 | 0.90 | ~129 Ah |
| 2 Days | Lithium | 0.90 | 0.90 | ~257 Ah |
| 3 Days | Lithium | 0.90 | 0.90 | ~386 Ah |
| 2 Days | Lead-Acid | 0.50 | 0.85 | ~490 Ah |
Notice how lead-acid batteries require nearly double the amp-hour capacity compared to lithium for the same autonomy. This difference also affects cost: lithium systems typically range from $300–$500 per kWh, while lead-acid systems cost around $150–$250 per kWh.
You can create your own table by plugging in your actual winter daily load and adjusting for the number of autonomy days that match your location and energy needs. This allows you to test different scenarios and make an informed decision.
sbb-itb-501186b
Step 4: Account for System Losses and Efficiency
Once you've determined the battery capacity, it's time to factor in system losses to ensure your design can handle real-world conditions. No component operates at full efficiency - energy loss occurs at every stage of power conversion. Ignoring these losses could leave your system falling short when it matters most. This step builds on your battery sizing to confirm your system can reliably deliver the required power.
Take inverters, for example. They convert DC to AC power with an efficiency range of 85–95%. To provide 100 watts of AC power to your appliances, the inverter might draw anywhere from 105 to 118 watts from the battery. Similarly, DC-DC converters, which regulate voltage for specific loads, typically operate at 80–90% efficiency. To adjust for these losses, divide the intended load by the device's efficiency. For instance, powering an 8-watt load through a 90% efficient inverter would actually pull about 8.89 watts from the battery (8 ÷ 0.90).
Wiring losses also play a role, particularly on the DC side, where voltage drops as electricity flows through cables. The longer the cable, the more energy is lost due to resistance. To mitigate this, keep wiring runs under 10 feet whenever possible. If longer runs are unavoidable, use thicker cables to minimize losses. For example, a 2,000-watt inverter running on a 12V system would need at least 1/0 AWG cable to prevent overheating and reduce energy loss. Higher voltage systems, like 48V setups, can also help by requiring less current for the same power output, thereby cutting down on cable losses.
Don't forget to account for phantom loads and idle draws from inverters and devices in standby mode. To cover these hidden losses and environmental factors, add a 20% buffer to your calculations. This is especially important in high-temperature environments, as inverter output can drop by 20% or more when temperatures climb from 77°F (25°C) to 104°F (40°C).
| Component | Typical Efficiency Range | Primary Loss Cause |
|---|---|---|
| Inverters | 85% – 95% | DC to AC conversion, idle draw |
| DC-DC Converters | 80% – 90% | Voltage regulation/stepping |
| Wiring (under 10 ft) | Minimal loss | Manageable resistance |
| Wiring (over 10 ft) | Variable | Increased voltage drop with longer distances |
Off-Grid Load Management Challenges
Once you've sized your system and calculated losses, the next hurdle is figuring out how to manage loads under real-world conditions. The tricky part isn’t the hardware - it’s understanding how your loads behave day-to-day. While accurate load calculations are a good start, managing loads in dynamic conditions is just as important.
One common issue is load miscalculation. People often mix up continuous loads, like refrigeration or security systems, with intermittent ones, such as water pumps or power tools. This confusion can lead to undersized battery banks. Adding to the complexity, seasonal changes can double energy consumption during times when solar production is at its lowest.
Another challenge is voltage swings. Off-grid battery systems typically experience voltage fluctuations, which can range from –10% to +20% of their nominal value. For a 24V system, this means a range of roughly 21.6V to 28.8V. Sensitive electronics that require stable voltage levels can be damaged under these conditions. To address this, you might need to install a DC-to-DC converter or an AC inverter to stabilize power output. These voltage variations highlight how critical load management strategies are for system reliability.
Circuit management is equally vital. Circuit overloading can lead to serious problems. Following the 80% rule is a good safety measure - this means keeping the total amperage draw below 80% of a circuit breaker’s rating. For example, a 15-amp circuit should handle no more than 12 amps. Exceeding this limit can cause nuisance tripping, arcing, or even fire hazards. To avoid these risks, it’s helpful to organize your loads into three tiers:
- Priority 1: Critical systems like HVAC, networking, and refrigeration.
- Priority 2: Essential items such as kitchen outlets and bedroom lighting.
- Priority 3: Non-critical loads like washers, dryers, and pool pumps.
Smart electrical panels can make this process easier by automating load shedding. They monitor your battery’s state-of-charge and disconnect circuits based on your preset priorities. If you prefer manual control, relay drivers like the Morningstar RD-1 are a good option. This device offers four channels to manage separate circuits, each with its own Low Voltage Disconnect (LVD) threshold. For example, you could set critical loads to disconnect at 12.7V (for LiFePO4 batteries) while non-critical loads disconnect earlier to conserve battery capacity.
As Douglas Grubbs, Applications Engineer at Morningstar Corporation, puts it:
"By disconnecting the non-critical loads first, the critical loads can continue to operate longer without interruption".
Tools and Resources for Load Profiling
Once you understand the hurdles of load management, the next step is finding practical tools to bring the theory into action. The good news? You don’t need to be an expert - there are plenty of online tools and worksheets that handle the heavy lifting for you.
Tools like online calculators and Excel spreadsheets make it easy to estimate your total daily energy needs and peak loads. These resources rely on standard wattage estimates to simplify the math. Excel-based worksheets even go a step further by automatically calculating daily watt-hours and peak loads for you.
For a more precise analysis, you can use measurement devices like a Kill-A-Watt meter. These tools measure actual energy consumption, which is especially useful for appliances with fluctuating power demands, such as refrigerators or power tools. As NAZ Solar Electric explains:
"If a device is drawing energy, no matter how small, it will have an impact on your solar system. The more accurately you fill in the calculator, the better your system design will be".
Some advanced calculators take it up a notch by incorporating geographic data. For instance, BigBattery’s sizing tool factors in your zip code to account for average peak sun hours and seasonal changes. This ensures your system is prepared for even the toughest winter conditions.
Once your load profile is complete, you’ll have the insights needed to select the right equipment. From inverters and charge controllers to batteries, everything must align with your energy needs. A great resource for sourcing these components is Electrical Trader (https://electricaltrader.com), a one-stop shop for both new and used electrical equipment, including tools for power generation and distribution.
Conclusion
Getting your off-grid load analysis right is the backbone of a dependable solar system. Start by listing every device, calculating their energy needs, sizing your battery bank, and factoring in system efficiency losses, which typically range from 65% to 85%. Skipping any of these steps could lead to battery damage, unexpected outages, or spending too much on an oversized system.
As Solar-Electric cautions:
"If you are not storing enough energy, you will decrease the life of your batteries, possibly ruin your batteries and most importantly, your power will eventually go out".
Thoughtful planning safeguards your investment. For instance, lead-acid batteries, when used at 50% depth of discharge (DoD), last for about 300–500 cycles, whereas LiFePO4 batteries, with an 80%–100% DoD, can deliver between 2,000 and over 5,000 cycles.
Once you’ve nailed down your load analysis, the next step is sourcing the right components to match your design. Look for inverters, charge controllers, and batteries that align with your calculated requirements. Platforms like Electrical Trader (https://electricaltrader.com) provide a broad selection of new and used electrical equipment, including inverters, transformers, breakers, and other power essentials. Whether you’re setting up a small cabin system or a larger homestead, access to reliable and competitively priced components is key to turning your design into a fully operational off-grid setup.
FAQs
How can I calculate my daily energy needs for an off-grid solar system?
To figure out your daily energy needs for an off-grid solar system, start by creating a list of all the electrical devices you plan to use. For each device, note its wattage and estimate how many hours you’ll use it each day. Then, multiply the wattage by the number of daily usage hours to calculate the energy consumption in watt-hours (Wh) for each device. Once you’ve done this for all your devices, add up their energy usage to find your total daily energy requirement in Wh.
To express this total in kilowatt-hours (kWh), simply divide the total watt-hours by 1,000. This gives you your daily energy demand, which is essential for determining the size of your solar panels, batteries, and inverter. By carefully calculating your energy needs, you can design an off-grid system that works seamlessly with your lifestyle.
How do I size my battery storage for winter months?
When planning your battery storage for winter, it's important to account for the challenges posed by reduced sunlight and colder temperatures, both of which can affect your system's performance. Shorter days and cloudy skies naturally result in less solar energy production, so it's wise to size your battery bank to handle these seasonal changes. Including a buffer in your calculations ensures you'll have enough stored energy to meet your needs, even during prolonged periods of limited sunlight.
Cold weather is another factor to consider, as it can decrease battery efficiency and capacity by around 10-15%. To offset these losses, opt for a battery size that accommodates this reduction and explore thermal management solutions to help maintain optimal performance. Don't forget to account for the extra energy demands that winter often brings, like increased heating and lighting, to keep your system dependable throughout the season.
How do I manage and prioritize electrical loads to avoid overloading my off-grid solar system?
To avoid overloading your off-grid solar system, start by figuring out how much power your devices use. Check the power requirements for each device, measured in watts or amps, and consider how often and for how long you use them. This gives you a clear picture of your system's total energy demand and helps you stay within the limits of your batteries, inverter, and wiring.
Once you know your energy needs, focus on prioritizing essential devices like refrigerators or communication equipment. Less critical devices can be scheduled for use during times of higher energy availability. Using tools like timers, smart controllers, or load-shedding devices can simplify this process by ensuring that critical devices get power first. Keep an eye on your system's performance regularly, and adjust priorities as needed - especially during seasonal changes in sunlight or fluctuations in battery charge levels.
By managing and prioritizing your power usage effectively, you can keep your off-grid solar system running smoothly and avoid overloading it.