




IEC 61386 Compliance: Inspection Checklist
If the conduit type, IEC code, markings, and paperwork do not match the jobsite conditions, I would mark the run as a fail. That is the core of this checklist.
Here’s the short version of what I would check before signing off on any installed conduit system:
- System type: rigid, pliable, or flexible
- IEC part: 61386-21, -22, or -23, with IEC 61386-1 as the base rule set
- Classification code: especially compression, impact, temperature, bending type, IP, fire, and continuity
- Markings: readable product ID, maker name, size, standard reference, and code
- Documents: datasheet, Declaration of Conformity, test summary, and fitting compatibility proof
- Field condition: cracks, crushing, over-bending, bad seals, loose fittings, heat damage, and continuity issues
A few numbers matter right away:
- Markings should appear every 3.3 to 9.8 ft (1 to 3 m)
- In heavy-risk areas, a compression class of 4 = 1,250 N
- If conduit and fittings have different IP ratings, the lower rating controls
- Marking durability is checked with 15 seconds of water rubbing and 15 seconds with petroleum spirit
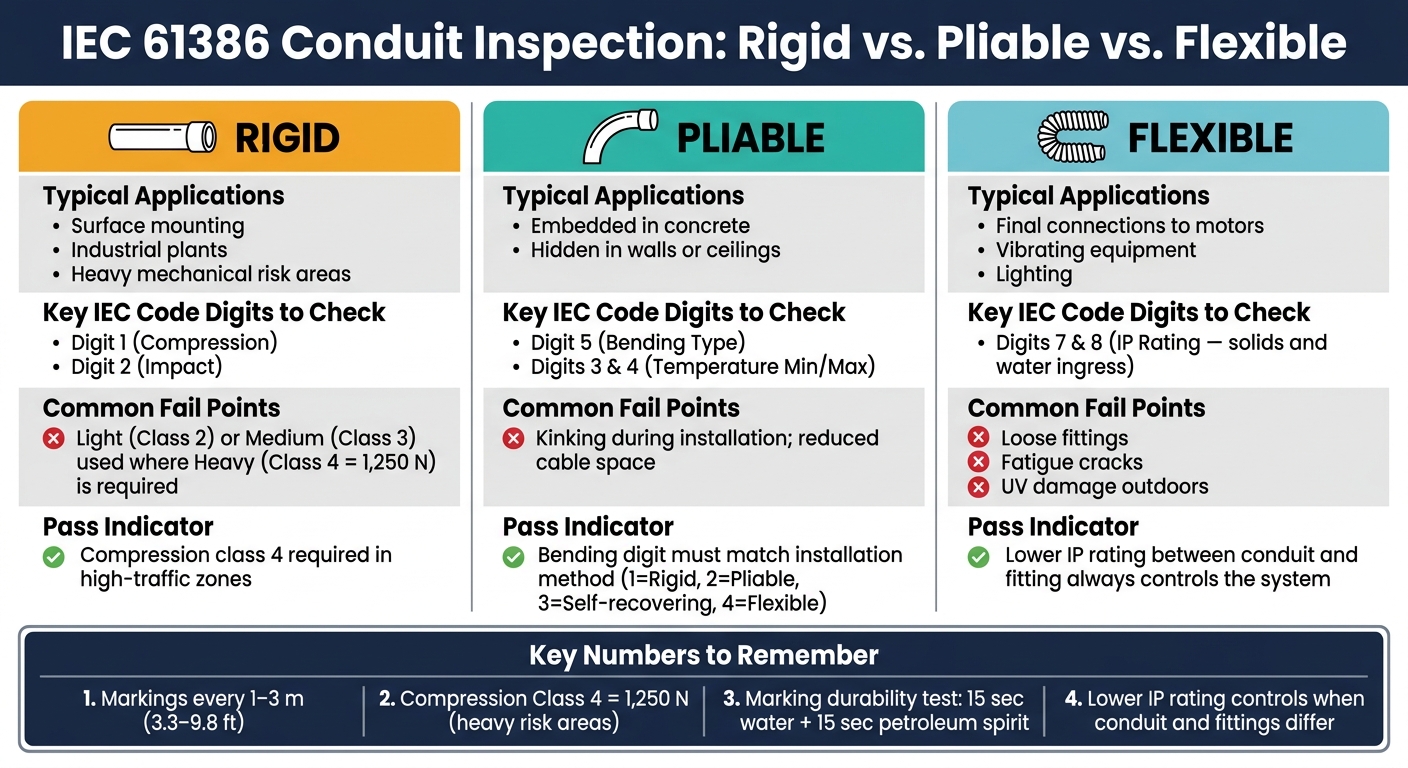
IEC 61386 Conduit Types: Inspection Comparison Guide
Compression Strength Test according to IEC EN 61386 and PMA DO 9.21-4320
sbb-itb-501186b
Quick comparison
| Conduit type | Best fit | Main check points | Common fail points |
|---|---|---|---|
| Rigid | Fixed runs, higher abuse areas | Compression and impact | Low class used where heavy class is needed |
| Pliable | Hidden runs, concrete, walls, ceilings | Bending type and temperature | Kinks and reduced cable space |
| Flexible | Motors, lighting, vibration points | IP rating and bend fatigue | Loose fittings, cracks, UV damage |
My takeaway: this is a pass/fail site tool, not a theory guide. I would use it to match the installed conduit to the code on the product, the maker’s documents, and the actual conditions on site - then record each finding with photos, location, and follow-up notes.
Checklist 1: Identify the Conduit System and Verify Its Classification
Before you check ratings, confirm the conduit type that’s actually installed. That matters because the system type - rigid, pliable, or flexible - tells you which classification digits deserve the closest look and which failure points tend to show up first.
Confirm Type, Material, and Intended Environment
Start by identifying whether each run is rigid, pliable, or flexible. Then note the material: metallic, non-metallic, or composite.
From there, compare the material to the exposure conditions on site. Corrosive areas need corrosion-resistant material. Outdoor runs need UV-resistant material. Wet or high-temperature areas need conduit rated for those conditions.
Mark each run Pass when the material and system type fit the site conditions, including:
- indoor or outdoor exposure
- wet locations
- corrosive atmosphere
- vibration
- temperature extremes
Mark it Fail when there’s any mismatch, and flag it for immediate follow-up.
Verify IEC Classification Codes Against Actual Conditions
Use the IEC 61386 12-digit code to check whether the conduit ratings match the site conditions. Start with the first five digits, because they usually tell you the most, fastest.
- Digit 1 = compression resistance, rated 1–5
- Digit 2 = impact resistance, rated 1–5
- Digits 3 and 4 = minimum and maximum operating temperatures
- Digit 5 = bending type:
- 1 for Rigid
- 2 for Pliable
- 3 for self-recovering pliable
- 4 for Flexible
Digits 7 and 8 cover ingress protection for solids and water.
Look for the required IEC 61386 marking, including the manufacturer's name or logo and the classification code, printed on the conduit at intervals of 3.3 to 9.8 ft (1 to 3 m). Use that code to confirm the installed conduit fits the actual environment and the level of mechanical risk.
A compression rating of "4" (Heavy, 1,250 N) is required in high-traffic or heavy-mechanical-risk areas. If the installed conduit is marked "2" (Light) or "3" (Medium), mark it Fail.
Also check conduit and fitting IP ratings together. If they don’t match, the lower rating controls the system. That still counts as a non-conformity, even when the conduit itself is correct.
If the classification code is missing or you can’t read it, don’t guess. Record the item as Non-compliant: missing or illegible marking, photograph the location, and note the conduit's outer diameter and material.
Use this classification check to decide whether the run passes the physical suitability review before moving on to marking verification.
Comparison Table: Rigid vs. Pliable vs. Flexible Inspection Points
| Conduit Type | Typical Applications | Key Classification Items to Verify | Common Non-Conformities |
|---|---|---|---|
| Rigid | Surface mounting, industrial plants, heavy mechanical risk areas | Compression (Digit 1) and Impact (Digit 2) | Light (2) or Medium (3) used where Heavy (4) is specified. |
| Pliable | Embedded in concrete, hidden in walls or ceilings | Bending (Digit 5) and Temperature (Digits 3 & 4) | Kinking during installation; reduced cable space. |
| Flexible | Final connections to motors, vibrating equipment, or lighting | Ingress Protection (Digits 7 & 8) and fatigue/bending radius | Loose fittings, fatigue cracks, or UV damage outdoors. |
Verify that fittings are certified for the same conduit system. Mixing fittings from different manufacturers without proof of compatibility is a Fail, especially when IP ratings and electrical continuity are at stake.
Next, check that markings, datasheets, and test records match the installed system.
Checklist 2: Check Markings, Documentation, and Traceability
Next, confirm that every installed conduit and fitting can be traced back to the maker's records. If a conduit can't be tied to maker paperwork, it's still a compliance issue. This check makes sure the installed system links back to the original maker and the IEC 61386 test evidence.
Inspect Product Markings on Conduit and Fittings
Conduits and fittings should have clear, durable markings that show the manufacturer's name or trademark, the nominal size, the IEC 61386 standard reference, and the classification code.
Walk each run and check that the markings are still readable. If a conduit was cut during installation, make sure at least one marking is still visible on each remaining piece. For fittings that are too small to carry full markings, inspect the smallest packaged unit before the fittings are taken out of the packaging. That's where the required details should appear.
If a marking looks faint or worn, do a simple durability test. Rub the marking with a cloth dampened with water for 15 seconds, then with a cloth dampened with petroleum spirit for 15 seconds. If the marking can't be read after that, it fails the compliance check.
Match Installed Products to Datasheets and Test Records
A readable marking only helps if it lines up with the paperwork. Pull the maker's technical datasheet for each conduit type on site and compare the classification code printed on the conduit with the code listed in the datasheet. If the marking code doesn't match the project specification, treat it as noncompliant.
Also check that the datasheet covers the needed temperature limits and fitting compatibility. If the installed fittings come from a different maker than the conduit, you need written proof that the combination was tested or declared compatible. Without that proof, treat the installation as noncompliant.
Request the Declaration of Conformity (DoC) and any available Type Test Summary for each product. If the supplier can't provide them when asked, treat the product as unverified until the paperwork is received.
Documentation Table: Requirement, Proof, and Record Entry
| Requirement | Proof to Review | Record Entry |
|---|---|---|
| Manufacturer identification | Name/trademark on conduit or fitting | Manufacturer name; Location ID |
| Standard reference | "IEC 61386" marking on product or packaging | Standard part number confirmed (e.g., IEC 61386-21) |
| Classification code | Code on conduit vs. project specification | Code found; Match or discrepancy noted |
| Nominal size | Marking on conduit or fitting packaging | Size confirmed |
| Marking durability | Rub test result (water + petroleum spirit) | Pass/Fail; Location ID; Photo attached |
| Type test records | Type Test Summary from manufacturer | Document received; Follow-up status if pending |
| Declaration of Conformity | DoC from manufacturer or supplier | DoC on file |
| Fitting compatibility | Manufacturer's written compatibility statement or combined test data | Compatible: Yes/No; Source document noted |
| Missing or illegible markings | Batch/lot number from original packaging | Photo attached; Batch ID; NCR issued if unresolved |
If markings are missing and the packaging isn't available, issue an NCR, record the location and quantity, and quarantine the material.
With traceability confirmed, move to mechanical, thermal, fire, and continuity checks.
Checklist 3: Verify Mechanical, Thermal, Fire, and Installation Compliance
Use the actual site conditions to confirm that the installed system still lines up with its IEC rating. The classification code and product datasheet should be your benchmark for every field check.
Mechanical and Thermal Condition Checks
Start with the conduit itself. Check for cracks, crushing, deformation, and over-bending against the IEC class you already verified. If you spot any of these, that's a strong sign the installed conduit doesn't fit the conditions on site.
Also confirm that the bend radius meets the manufacturer's minimum stated radius for that conduit type. If the bend is too tight, the conduit may still look fine at a glance but fail under use.
Support spacing matters too. Compare it against the manufacturer's requirement, especially in areas where heat can soften non-metallic conduit.
For thermal condition, look for discoloration, brittleness, or softening. A non-metallic conduit that shows discoloration or cracking may be operating outside its rated temperature range. Inspect every fitting connection and make sure it is fully seated. A partly seated push-fit or threaded fitting can weaken the IP rating and continuity.
Fire, Ingress, Bonding, and Electrical Continuity Checks
Once you've checked for damage and support issues, move to fire, sealing, and continuity.
Do not perform flame tests on site. Instead, check the 10th digit of the 12-digit IEC 61386 classification code and compare it with the fire performance documents. Look for charring at fittings or on the conduit itself, and confirm that the installed material matches the fire safety rules for that area. If non-flame-propagating marking is required, verify it in the product documents or on the conduit.
For ingress protection, inspect every termination point, gasket, and seal. A gasket that is pinched, missing, or compressed unevenly can break the seal, even if the datasheet says the product meets the rating.
For metallic or composite systems, test bonding and continuity across joints with a low-resistance ohmmeter. If any joint reads above the project continuity limit, record it as noncompliant.
Comparison Table: Requirement vs. Evidence to Check
| Requirement | Marking (IEC Code) | Evidence to Check | Visual Check |
|---|---|---|---|
| Compression Class | 1st digit (1–5) | Verify kN load capacity | Check for crushing or ovalization |
| Impact Class | 2nd digit (1–5) | Verify joule rating | Check for cracks or impact shattering |
| Temperature Rating | 3rd & 4th digits | Verify min/max °C range | Check for sagging, brittleness, or discoloration |
| IP Rating | 7th & 8th digits | Verify IP6x / x7 / x8 status | Inspect gaskets, seals, and thread tightness |
| Fire Performance | 10th digit (1–2) | Flame propagation status | Check for charring or incorrect material use in fire zone |
| Continuity / Bonding | 11th digit (1–3) | Low-resistance continuity across joints | Ohmmeter test; verify reading is within project limit |
Use this table as a field log. Record the marking, the supporting document, the field evidence, and the pass/fail result for each item. Log every result with the location ID and the matching IEC code.
Conclusion: Record Findings and Maintain IEC 61386 Compliance
A finished inspection only helps if the findings are written down in a clear, consistent way. For each conduit run, record the IEC code, manufacturer, product ID, IP rating, and corrosion class. Those details sit at the center of an auditable compliance record and give you a clean reference for any later reinspection.
That record also helps you close findings, track corrective actions, and confirm reinspection. If something changes in the field, you need a paper trail that shows what was there before and what was checked after.
Reinspect after any modification, extension, repair, or environmental change. Check that any new components carry a classification code equal to or higher than the original installation. Use scheduled visual checks and periodic full audits to keep the system compliant.
For later reviews, use the same IEC code, product data, and site conditions as your reference point.
Key Points to Carry Into Future Inspections
Start each inspection by confirming the correct IEC 61386 part. From there, the method stays simple: match the product, the documents, and the site conditions. Document every finding with the matching IEC code, and line up your field checks with the actual conditions on site.
In U.S. facilities, record any grounding and bonding requirements that affect the run. The IEC classification tells you what the product is rated for. Your job in the field is to confirm that the installation still matches those ratings after years of use, modification, or exposure to the surrounding conditions.
FAQs
How do I read the IEC 61386 code?
IEC 61386 uses a four-digit classification code to show how a conduit system performs. Each digit points to a different property: mechanical resistance, thermal properties, electrical and electromagnetic characteristics, and resistance to external influences.
In most cases, a higher number means a higher level of protection. But don’t go by the code alone. Check the manufacturer’s data sheet against your installation environment to make sure the conduit matches the classification you need.
What documents prove IEC 61386 compliance?
IEC 61386 compliance is usually shown in the manufacturer’s documentation and product data sheets. The key thing to check is the four-digit classification code. That code tells you whether the conduit’s mechanical, thermal, electromagnetic, and electrical properties fit the job at hand.
It’s also smart to keep clear installation records, including conduit sizes and cable quantities, as part of the certification paperwork. Those records help confirm safe fill limits and show that the installation meets compliance rules.
What should I do if conduit markings are missing?
If conduit markings are missing or hard to read, replace them right away. Clear identification is required for electrical safety and code compliance.
During inspection, check that all required markings are in place, easy to read, and up to date. If labels are faded, peeling, or missing, document the issue and install new, accurate markings.





