How to Build a Soundproof Generator Box
A soundproof generator box reduces noise from portable generators while ensuring safe operation. It uses materials like MDF, mass-loaded vinyl (MLV), and acoustic foam to block and absorb sound. Proper ventilation is essential to prevent overheating and allow exhaust fumes to escape. Here's a quick overview:
- Materials: MDF for structure, MLV for sound blocking, and acoustic foam for absorption.
- Ventilation: Use baffles and offset vents to manage airflow and reduce noise leakage.
- Safety: Ensure adequate spacing for cooling and direct exhaust away from living spaces.
- Tools: Tape measure, saw, drill, and acoustic caulk for sealing gaps.
Build A $30 Generator Silencing Box That Actually Works!
sbb-itb-501186b
Planning and Designing the Soundproof Box
Good preparation can save you from expensive mistakes. Before you start buying materials or cutting wood, focus on three essential factors: where the box will be located, how large it needs to be, and how you’ll manage airflow. Below, we’ll cover generator placement, box dimensions, and designing proper ventilation.
Choosing the Generator Location
Position your generator at least 20 feet away from doors, windows, and nearby structures. This distance can reduce noise by about 6 dB - doubling the distance achieves the same reduction. The type of surface the generator sits on matters too. Soft surfaces like grass or dirt absorb vibrations, while hard surfaces like concrete or asphalt amplify sound by reflecting it. If a hard surface is unavoidable, rubber anti-vibration mounts (priced between $20.90 and $52.90) can help minimize noise by isolating the generator from the ground.
Make sure the exhaust is directed away from living spaces or vented upward to allow fumes and sound to dissipate. Use heavy-duty extension cords to keep the generator as far from your house as possible without compromising its ability to power your equipment.
Measuring and Sizing the Box
Start by measuring your generator’s height, width, and length. Add extra space on all sides to account for the thickness of soundproofing materials - such as mass loaded vinyl (MLV) and foam mats - and to ensure there’s enough air volume for cooling. If you don’t leave enough clearance, heat can build up quickly, causing potential damage.
When planning ventilation, offset the intake and exhaust holes. For example, place one vent slightly off-center on the top panel and the other on the opposite side wall. This diagonal arrangement improves airflow and helps remove heat efficiently. To avoid warranty issues, check with your generator’s manufacturer for the minimum air clearance required around the unit.
Planning Ventilation and Airflow
Ventilation is critical, yet it’s often overlooked in DIY soundproof boxes. Open vents alone won’t work - they let sound escape. Instead, use baffles to reduce noise. These structures force sound waves to turn sharp corners and lose energy as they reflect off sound-absorbing materials.
"Sound doesn't like to make 90 degree turns. You are forcing it to reflect off of very absorbent foam before it leaves the box, greatly reducing the energy the sound waves carry." - David Watkinson, Acoustical Sales Consultant
To build a baffle, cut a 6″×6″ vent and mount a 9″×9″ foam-lined board 3–4 inches in front of it using standoffs. For smaller enclosures, you can route exhaust through a heat-resistant pipe, like copper, to direct fumes and heat outside.
Install a box fan and use a digital thermometer to monitor airflow and maintain safe temperatures. Pay close attention to sealing. Even a tiny gap - just 1% of the enclosure - can let through up to 50% of the sound. Seal all openings, including wire entries and fuel line gaps, with acoustic caulk (about $10.99 per tube) or foil tape. This ensures sound stays contained while maintaining proper ventilation.
Materials and Tools for Construction
Once you've finalized your design and ventilation plans, the next step is gathering the materials and tools to build your soundproof generator box. The right materials not only ensure a sturdy structure but also play a key role in minimizing noise. This section highlights the essentials you'll need to bridge the gap between planning and building.
Core Materials for the Enclosure
For the enclosure's main structure, medium-density fiberboard (MDF) is a top choice. Unlike plywood or other cheaper wood panels, MDF is specifically designed to reduce sound transmission. Acoustics expert Barry Index emphasizes its importance:
"Medium-density fiberboard and mass-loaded vinyl are specifically made for sound-dampening. Substituting cheaper materials will diminish the sound-dampening effect."
To build the frame, use 2x4 wooden studs for a solid foundation that can handle the added weight of soundproofing layers. Secure the MDF panels with screws and seal all joints using acoustic caulk to ensure a tight, noise-resistant seal.
Acoustic Materials for Noise Reduction
The interior lining is where most of the soundproofing magic happens. A two-layer system is highly effective:
- Mass-loaded vinyl (MLV): Apply this directly to the MDF panels to add mass and block sound transmission.
- Acoustic foam mats: Place these over the MLV to absorb vibrations and further dampen noise.
For access panels or doors, use weatherstripping to seal any gaps, as even small openings can compromise your soundproofing. When bonding MLV to MDF with acoustic caulk, allow at least eight hours for the adhesive to fully cure.
Tools and Cost Considerations
To tackle this project, you'll need a few basic tools:
- Tape measure, right-angle ruler, and pencil: For accurate measurements and markings.
- Circular or table saw: To cut MDF panels to size.
- Power drill and hammer: For assembly.
Material costs will vary depending on the size of your project and the materials you choose. For reference, a professionally built aluminum enclosure with integrated cooling features typically costs around $1,399.00. However, MDF, MLV, acoustic foam, and caulk are readily available at most home improvement stores, offering a more budget-friendly DIY option.
For any electrical components required - like power distribution equipment - check out Electrical Trader for a reliable source.
Step-by-Step Construction Process
How to Build a Soundproof Generator Box: Step-by-Step Guide
Now that your materials are ready, it’s time to assemble the soundproof generator enclosure. Every step counts - a shaky foundation or poorly sealed joint can compromise even the most effective soundproofing materials.
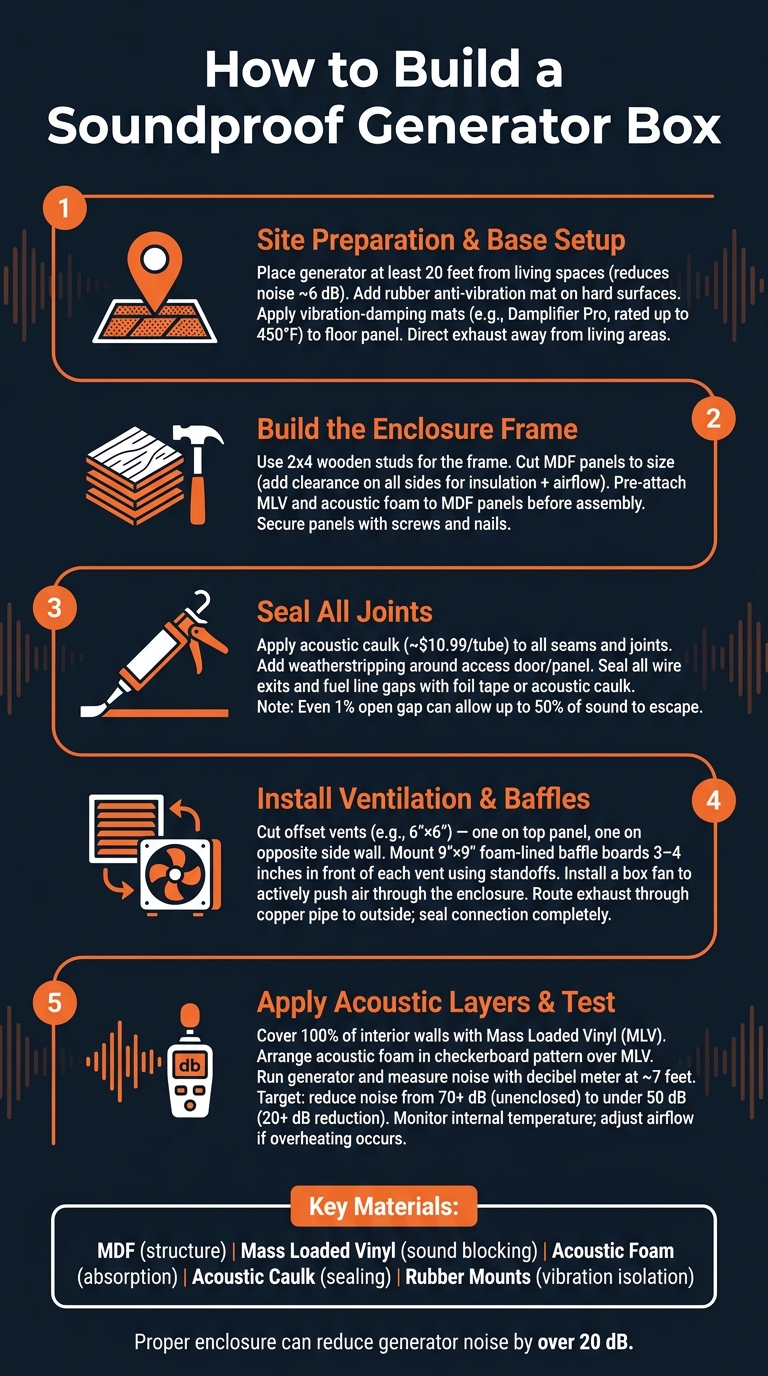
Site Preparation and Base Setup
Start by placing the generator at least 20 feet away from living spaces. This alone can reduce noise levels by about 6 dB. If the generator sits on a hard surface, add a rubber anti-vibration mat to minimize noise transmission. For metal-base enclosures, apply vibration-damping mats like Damplifier Pro (rated for temperatures up to 450°F) directly to the floor panel. This prevents the enclosure from amplifying vibrations like a speaker box.
"For generator safety, it's extremely important to account for exhaust ventilation and room for airflow." - Sturgeon Christie
Make sure the exhaust is directed away from living areas or vents upward to avoid safety hazards.
Building and Assembling the Enclosure
With your materials prepped and design finalized, the next step is assembling the soundproof box. Start by pre-treating the MDF panels: attach the MLV and acoustic foam to the panels before cutting and assembling. When constructing the box, leave extra room on all sides to accommodate insulation and ensure proper airflow. Use a combination of screws and nails to secure the panels tightly, creating a durable structure. Seal all joints with acoustic caulk to block any gaps where sound might escape. Add door hinges and weatherstrip the frame to ensure the door seals tightly when closed. Once the box is fully assembled and sealed, you’re ready to install the ventilation system.
Installing Ventilation and Acoustic Layers
After completing the enclosure, the focus shifts to ventilation. Proper airflow is critical for managing both heat and sound. As Second Skin Audio explains:
"Air gaps are the mortal enemy of soundproofing. Lack of airflow is the mortal enemy of generators."
The solution? Baffles - external sound traps positioned outside the vent openings. Baffles force air to navigate a maze-like path, allowing airflow while significantly reducing sound escape. To optimize this, stagger the vent locations - place one off-center on the top panel and another on the opposite wall. This design improves airflow while minimizing noise leakage. Inside the box, install a fan to actively push air through and prevent overheating.
For the exhaust, attach an extended copper pipe to the generator’s exhaust port and route it outside the enclosure. Be sure to seal the connection completely to prevent fumes from circulating back into the box. On the interior walls, cover 100% of the surface area with MLV for the best soundproofing results. Acoustic foam can be arranged in a checkerboard pattern, which still achieves near-complete sound absorption. Finally, seal all wire exits and seams with foil tape or acoustic caulk to eliminate any remaining gaps.
Testing, Optimization, and Maintenance
After building the enclosure, thorough testing is essential to ensure both safety and effective noise reduction.
Noise and Heat Testing
Start by running the generator and recording initial noise and temperature levels. Use a decibel meter positioned about 7 feet away. For reference, an unenclosed portable generator typically exceeds 70 dB, which is comparable to the sound of heavy traffic. A properly constructed enclosure can reduce this by over 20 dB.
Keep an eye on the internal temperature during these tests. Materials like MDF and foam, while excellent at soundproofing, can also trap heat. This makes your ventilation design crucial. If the generator's operating temperature exceeds the manufacturer's recommended range during testing, adjust the airflow system before putting the enclosure into regular use. This step ensures that noise reduction doesn't come at the cost of overheating.
Improving Noise Reduction Performance
If noise levels are still higher than expected, the issue is likely due to gaps or weak points in the enclosure. Inspect for any air gaps and apply additional sealant where needed.
For more advanced noise reduction, two upgrades can make a noticeable difference. First, ensure the generator is fully isolated from the enclosure floor using rubber mounts. These mounts prevent vibrations from turning the enclosure walls into sound amplifiers. Second, consider applying Green Glue Noiseproofing Compound between the existing MDF layer and an additional panel. This compound converts vibration energy into heat, significantly reducing sound transmission without requiring a complete rebuild. Adding foam or specialized acoustic panels can further reduce noise by an extra 5–7 dB.
These tweaks help fine-tune your enclosure for maximum noise reduction.
Maintenance Tips for Long-Term Use
To keep the enclosure performing well over time, conduct an annual inspection. Check the acoustic caulk along all seams, as it can crack or detach, creating new noise leaks. Clear any debris from the ventilation ducts, as blockages can lead to higher operating temperatures and increased noise. If the enclosure is kept outdoors, reapply a protective coating to the exterior panels each year to guard against moisture damage and rust on metal parts. Additionally, inspect the rubber mounts periodically and replace them if they show signs of wear to maintain effective vibration isolation.
Conclusion
Building a soundproof generator box takes careful planning, the right materials, and a smart design. To minimize noise effectively, use high-density MDF for the outer shell, Mass Loaded Vinyl to block airborne noise, and acoustic foam to absorb internal sound reflections. Adding rubber mounts helps isolate vibrations, while baffled vents ensure proper airflow without letting sound escape easily. Together, these elements create a quieter and safer operating environment.
The process - from planning and choosing materials to assembly and testing - requires attention to detail. Materials should be heat-resistant, and ventilation must be sufficient to protect your generator and surrounding property from overheating or damage.
If you're in need of electrical components like an Automatic Transfer Switch or power distribution hardware, check out Electrical Trader. They provide a wide selection of new and used generation equipment in one convenient place.
With a well-constructed enclosure, you can reduce generator noise by over 20 dB, turning a loud machine into a quieter and more efficient power source. By following these steps and keeping your enclosure in good condition, you'll enjoy a more peaceful and reliable generator setup for years to come.
FAQs
How much clearance does my generator need inside the box?
Your generator requires at least 3 feet of clearance on all sides to allow for proper airflow and safe operation. If the back of the unit is close to any combustible materials, increase that distance to 5 feet for added safety. Make sure the area is well-ventilated and always stick to safety guidelines to ensure the generator runs efficiently and meets recommended standards.
How do I vent the box without letting sound leak out?
To ventilate a soundproof box without letting noise escape, consider using ventilation systems equipped with noise-reducing components like baffles or mufflers. You can also opt for specialized options like attic vents or blast gates that are designed to limit sound transmission. To further reduce noise, seal and insulate the vents with materials such as fiberglass or mass loaded vinyl, which help block sound while allowing airflow. By creating well-planned acoustic pathways, you can maintain proper ventilation without sacrificing the box's soundproofing.
How can I tell if the generator is overheating in the enclosure?
Monitoring the generator's temperature is crucial, and a temperature gauge installed in the soundproof box makes this task easier. It lets you keep an eye on the operating temperature and spot any signs of overheating early. If the gauge displays unusually high readings, it could indicate that the generator is overheating. By routinely checking the gauge, you can ensure the generator operates within safe temperature limits, helping to avoid potential damage or breakdowns.