3D Printing vs. Traditional Manufacturing Costs
Looking to cut production costs? Here's the deal:
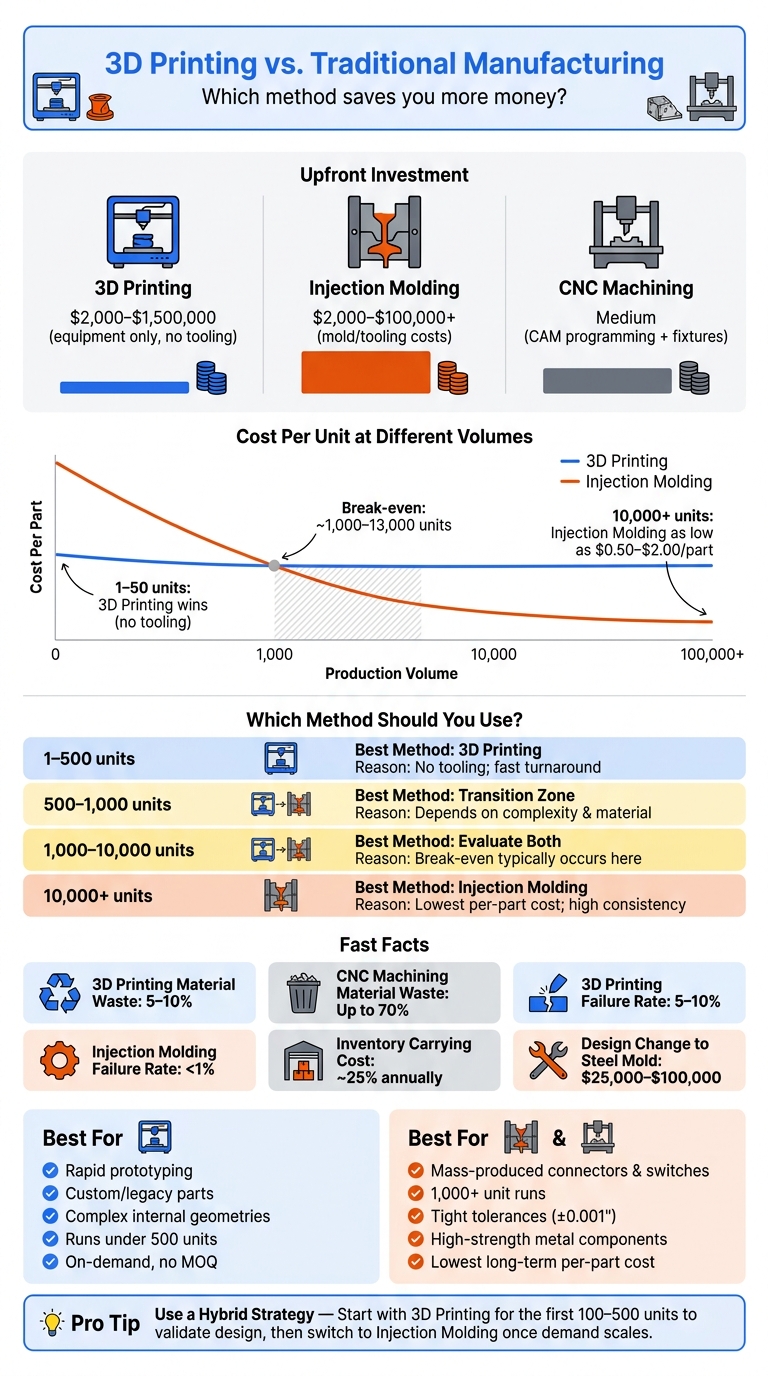
- 3D printing shines for low-volume production (1–500 units), rapid prototyping, and custom designs. It skips tooling costs and offers faster turnarounds. But, it can get pricey for large batches due to steady per-part costs.
- Traditional methods like injection molding dominate high-volume production (1,000+ units) with the lowest per-part costs - after covering steep upfront tooling expenses.
Quick Facts:
- 3D printing has no minimum order quantity (MOQ) and is ideal for design changes.
- Injection molding's upfront costs ($2,000–$50,000+) pay off with economies of scale, reducing per-part costs to as low as $0.50 for 10,000+ units.
- CNC machining wastes up to 70% of material but offers unmatched precision.
Bottom line: Start with 3D printing for flexibility and small runs, then switch to injection molding for high-volume savings. Keep reading for a detailed cost breakdown and production tips.
3D Printing vs. Traditional Manufacturing: Cost Comparison by Volume
Calculating the REAL Per Part Cost for Injection Molding vs 3D Printing
sbb-itb-501186b
Key Cost Factors for Each Method
When deciding between 3D printing and traditional manufacturing, understanding how costs break down can help you make the right choice. Both methods come with their own expenses, but the way those costs are structured varies a lot.
What Drives 3D Printing Costs
For 3D printing, the main cost factors are material selection and build time. Materials can range from about $20 per kilogram for standard PLA filament to over $100 per kilogram for specialized engineering plastics or aerospace-grade resins. This wide range matters because failed prints - common at a rate of 5–10% per unit - can waste expensive material.
Interestingly, complexity doesn't add extra cost with 3D printing. As JLCPCB explains:
"3D printing effectively 'flattens' the cost of complexity. Because the laser or nozzle builds the part layer by layer, it doesn't care if the interior is a solid block or a complex honeycomb."
However, post-processing tasks like support removal, UV curing, and surface finishing can introduce hidden labor costs that aren’t always quoted upfront. Additionally, longer build times for large or high-resolution parts can drive up expenses.
What Drives Traditional Manufacturing Costs
Traditional manufacturing, on the other hand, often involves high upfront costs. For instance, injection molds can cost anywhere from $2,000 to over $50,000, while high-cavity steel tools can exceed $100,000 before production even begins.
Setup fees are another major expense. As 3DEO notes:
"Setup fees reflect the time and labor it takes to mount the mold into a molding machine. This can be a significant additional cost for most short-run manufacturing operations."
Material waste also plays a big role in costs. CNC machining, for example, can result in up to 70% of the raw material being turned into swarf (metal chips). Although these chips can be recycled, they still represent a financial loss. Injection molding is more material-efficient, but its tooling and setup costs remain significant.
Another factor to consider is minimum order quantities (MOQs), which are often required in traditional manufacturing. MOQs may force you to produce more parts than you actually need. This surplus inventory can tie up capital and lead to holding costs, estimated to be around 25% annually by 2026.
Each of these cost factors - whether it's material waste, upfront investments, or inventory management - can influence which method is better suited for your production needs and budget.
Startup Costs: Upfront Investment for Each Method
When it comes to startup costs, the differences between 3D printing and traditional manufacturing are striking. For 3D printing, the main expense upfront is the printer itself. For instance, FDM printers typically range from $2,000 to $50,000, while SLA resin systems can cost between $5,000 and $100,000. If you're working with metal parts, the price tag for SLM/DMLS metal printers skyrockets, running anywhere from $500,000 to $1,500,000. Despite these high equipment costs, 3D printing offers a major advantage in terms of flexibility and cost-efficiency for design modifications.
On the other hand, traditional manufacturing involves not just the machinery - like CNC centers or injection molding machines - but also significant tooling costs. This includes expenses for injection molds and dies, which can add a hefty amount to the initial investment. These upfront costs are a key consideration for anyone planning projects in fields like the electrical component industry.
As Markforged explains:
"The price of a 3D printer you only need to pay once, while tooling and prototyping costs are required for every design."
Here’s where 3D printing shines: modifying a design is as simple as updating the digital file. This eliminates the need for additional tooling and the long lead times that come with traditional methods. In industries like electrical components, where rapid prototyping is essential, this can be a game-changer. For example, Joe Walters, a New Product Design Engineer, shared that using a Markforged 3D printer for prototyping saved his company about $400 per part and cut lead times from two and a half weeks to just one weekend. Even better, they recovered their full investment after printing only 15 prototype components.
Per-Part Costs at Different Production Volumes
Production volume plays a huge role in determining the overall per-part cost, shaping which manufacturing method makes the most sense financially. While 3D printing and traditional manufacturing each have their strengths, the choice ultimately depends on how many units are being produced.
Low-Volume Production
When you're producing smaller batches, 3D printing often comes out ahead. Why? It eliminates the need for costly tooling or molds, and there’s no minimum order quantity to worry about. In contrast, traditional injection molding requires molds that can cost anywhere from $2,000 to over $50,000, regardless of whether you’re making 10 parts or 10,000. For runs of 1 to 500 units, 3D printing is usually the more economical option. For example, a single 3D-printed housing for an electrical component might cost about $40, whereas machining the same part could cost three times as much due to setup and programming expenses.
"3D printing is a manufacturing process that grows parts from smaller base materials like resin, filaments, or powder... This gives 3D printing an advantage in making low volume, highly customizable components without the need of upfront setups and tooling." - Greg Paulsen, Director of Applications Engineering, Xometry
However, as production scales up, the cost advantage of 3D printing begins to fade.
High-Volume Production
For larger production runs, the balance shifts in favor of traditional manufacturing methods like injection molding. While the upfront tooling costs are steep, those costs get spread across thousands of units, dramatically reducing the per-part price. At production volumes of around 10,000 units, injection molding can bring the per-part cost down to as little as $0.50 to $2.00. On the other hand, 3D printing costs remain relatively steady since they’re driven by material usage and machine time rather than setup efficiencies.
"Injection molding typically becomes more economical once production reaches 1,000–10,000 units, depending on mold cost and part complexity." - JLC3DP
Here’s a quick overview of how costs compare across different production volumes:
| Production Volume | 3D Printing Cost | Traditional (Injection Molding/Casting) |
|---|---|---|
| 1–50 units | Lowest (no tooling needed) | Very high (tooling costs dominate) |
| 100–500 units | Moderate, stable | Decreasing as tooling costs are amortized |
| 500–1,000 units | Moderate, stable | Often comparable to or lower than 3D printing |
| 1,000+ units | Relatively high per unit | Lowest (pennies per part possible) |
For industries like electrical component manufacturing, 3D printing is often the go-to for prototypes, custom enclosures, or limited-run specialty parts. But once the design is finalized and demand grows, traditional methods like injection molding become far more cost-effective. Businesses, especially those using platforms like Electrical Trader, need to weigh these cost dynamics carefully to make the smartest production decisions.
Material Waste and Labor: How Each Method Compares
The way 3D printing and traditional manufacturing handle raw materials sets them apart significantly. 3D printing uses an additive process, building parts layer by layer and using only the material required. On the other hand, traditional methods like CNC machining are subtractive, carving parts from larger blocks of material. This approach can result in up to 70% of the original block being discarded as waste chips, also known as swarf. These differences in material usage play a big role in the overall cost efficiency of producing electrical components.
That said, 3D printing isn’t entirely waste-free. Support structures, which are often necessary during the printing process, add both material and labor costs since they need to be removed once the part is finished. Additionally, 3D printing has a higher failure rate - around 5–10% - compared to the less than 1% failure rate seen in well-tuned traditional manufacturing systems. This leads to wasted raw materials and machine time.
Traditional manufacturing also comes with its own inefficiencies, particularly around inventory. Techniques like metal injection molding (MIM) require high minimum order quantities to make tooling costs worthwhile. This often results in excess inventory, which can be expensive to maintain. For example, $10,000 worth of surplus parts can end up costing $12,500 annually when you factor in storage, insurance, and opportunity costs. In contrast, 3D printing’s on-demand production model eliminates the need for large inventories, reducing waste and associated costs entirely.
"With additive manufacturing and the ability to produce on-demand, the perfect solution to reduce inventory holding costs and associated wastage is now within reach." - 3DEO
Labor requirements also differ between the two methods. During the build phase, 3D printing is largely automated. Once the digital file is prepared and the machine is set up, it operates with minimal supervision. However, post-processing for 3D printed parts can be labor-intensive. Tasks like removing support structures, sanding, UV curing for resin-based parts, and polishing to smooth out visible layer lines are often necessary. Traditional manufacturing, by contrast, involves more labor upfront for setup and calibration but typically produces parts with a finished surface straight from the mold.
"3D printed parts usually have higher post-processing costs than injection molded parts. That's because 3D printing leaves visible layer lines that require sanding, polishing, or coating." - Steve Melito, Technical Writer, Fictiv
For electrical components where both appearance and precision are critical, these labor differences are a key factor to consider when evaluating overall production costs. Each method’s approach to labor and material use directly impacts the total cost of manufacturing.
Break-Even Point: At What Volume Does Traditional Manufacturing Win?
The big question here is: when does traditional manufacturing, with its high upfront costs, become the more cost-effective option? This tipping point, called the volume break-even, usually falls between 1,000 and 13,000 units for products like housings, brackets, and enclosures.
Here’s why: while 3D printing offers a consistent per-part price due to its minimal tooling requirements, injection molding benefits from economies of scale after the initial mold investment. That investment can range from $3,000 for a basic aluminum mold to over $100,000 for a complex steel mold. Once the tooling is paid for, the per-part cost drops significantly. As JLCPCB explains:
"At a certain volume, the efficiency of a mold or a die will always overtake the flexibility of a printer." - JLCPCB
The complexity of the part also plays a big role in determining the break-even point. For instance, a simple electrical bracket might hit the crossover at 75–100 units, while a more intricate design, like a housing with internal channels, could keep 3D printing competitive until 200–250 units. In one study, a small latch component reached its break-even at 13,050 units, where injection molding finally became cheaper than 3D printing. These theoretical break-even points are supported by real-world examples.
Take August 2024, for instance. A customer needed 4,800 sets of complex nylon components and considered Multi-Jet Fusion (MJF) 3D printing to sidestep tooling costs. However, Cameron Moore, General Manager at Fictiv, calculated the break-even point at just 130 sets. By switching to low-volume injection molding, the tooling costs paid off within the first 5% of production. Not only was this more cost-effective, but it also delivered better surface finishes and faster production times.
"It didn't make sense to do MJF from a cost standpoint. Injection molding would likely be faster, too, and the surface finish from the injection molded parts would be far nicer." - Cameron Moore, General Manager, China, Fictiv
Production Method Recommendations by Volume
The table below outlines the ideal manufacturing method based on production volume:
| Production Volume | Recommended Method | Primary Reason |
|---|---|---|
| 1–500 units | 3D Printing | No tooling costs; fast turnaround |
| 500–1,000 units | Transition Zone | Depends on part complexity and material |
| 1,000–10,000 units | Evaluate Both | Break-even typically occurs here |
| 10,000+ units | Traditional (IM/Casting) | Lowest per-part cost; high consistency |
To manage costs effectively during scaling, consider a bridge production strategy. Start with 3D printing for the initial 100–500 units to quickly validate designs and get to market. Once demand increases and the design is finalized, transition to injection molding to justify the tooling investment. This approach minimizes risk while keeping production flexible.
Best Uses for Each Method in Electrical Component Production
Choosing the right production method isn't just about cost - it also depends on factors like the design stage, production volume, and the level of customization needed. The type of part, how mature the design is, and whether flexibility is required all play a role in determining the best approach.
Where 3D Printing Works Best
3D printing shines when flexibility and speed are priorities. It's perfect for rapid prototyping, creating custom housings, or reproducing obsolete parts without the need for expensive molds or tooling. This is particularly useful for legacy and replacement components - those from older machines where the original molds are no longer available. Additive manufacturing eliminates the need for tooling altogether in these cases.
Another great use? Manufacturing fixtures. These are custom jigs and tools used during assembly or machining. Joe Walters, a New Product Design Engineer at Arow Global, shared his experience with 3D printing for injection-molded prototypes:
"We're able to take a part that would have cost $400, with two and a half week lead time of machining from one of our local vendors, we printed it over the weekend and the manufacturing floor likes it just as much, if not a little better." - Joe Walters, New Product Design Engineer, Arow Global
The additive nature of 3D printing also keeps costs low for intricate designs, such as cooling channels or lattice structures. It's particularly effective for part consolidation, where a single printed part can replace a multi-component assembly in industrial electronics.
However, when production requires high volumes of standardized parts, traditional methods become far more practical.
Where Traditional Manufacturing Works Best
Once a design is finalized and demand is steady, traditional manufacturing methods take the lead. Injection molding is the go-to choice for producing standardized electrical components like connectors, switches, and enclosures. It delivers exceptional consistency, with precise dimensional tolerances of ±0.001". For example, at a production volume of 10,000 units, a 0.1 kg plastic part can cost as little as $0.50–$2.00 using injection molding - a cost efficiency that 3D printing can't match.
For high-strength metal components, CNC machining remains the top choice. It offers unmatched tolerances and ensures a superior grain structure. Injection molding also provides isotropic strength - uniform strength in all directions - which is crucial for structural housings under mechanical stress. This is an area where 3D-printed parts, which can have directional weaknesses, fall short. For products with predictable, long-term demand, investing in a steel mold can significantly reduce per-unit costs over time.
| Scenario | Best Method | Key Reason |
|---|---|---|
| Custom housing during R&D | 3D Printing | No tooling; fast design iterations |
| Legacy/replacement parts | 3D Printing | No original mold required |
| Complex internal geometries | 3D Printing | Complexity doesn't increase cost |
| Mass-produced connectors/switches | Injection Molding | Lowest per-part cost at scale |
| High-strength metal components | CNC Machining | Superior tolerances and grain structure |
| Standard enclosures (10,000+ units) | Injection Molding | Consistent dimensions; isotropic strength |
Cost Comparison Table
This table highlights key cost factors - tooling, labor, waste, break-even points, and volume advantages - to help you weigh the pros and cons of various manufacturing methods based on your production needs.
| Cost Factor | 3D Printing | Injection Molding | CNC Machining |
|---|---|---|---|
| Setup / Tooling Cost | Very low (no tooling required) | Very high ($2,000–$50,000+) | Medium (CAM programming + fixtures) |
| Per-Unit Cost (Low Vol.) | Medium (from ~$0.30/unit) | Extremely high (tooling not yet amortized) | Medium (setup fees can comprise up to 80% of the total cost) |
| Per-Unit Cost (High Vol.) | Medium (costs remain steady) | Very low ($0.50–$2.00 for small plastic parts) | Medium–low |
| Material Waste | Low (5–10%) | Very low (5–10%) | High (30–70% of billet) |
| Lead Time | Hours to days | Weeks to months (tooling) | Days to weeks |
| Design Flexibility | High | Moderate | Moderate |
| Failure Rate | 5–10% | Below 1% (stabilized process) | Below 1% (stabilized process) |
| Inventory Risk | Low (on-demand production) | High (MOQ requirements) | Moderate |
| Best Volume Range | 1–500 units | 1,000+ units | Precision runs, any volume |
When considering these figures, keep in mind the hidden costs that can significantly impact your budget. For example, making a design change to a traditional steel mold could add between $25,000 and $100,000 to your project costs. Additionally, carrying excess inventory comes with its own expenses. With a typical inventory carrying rate of about 25%, holding $10,000 worth of surplus parts could cost you $12,500 annually in storage and insurance fees.
These costs often go unnoticed in simple per-unit price comparisons but can play a major role in your overall financial planning. This comparison underscores the importance of aligning your production method with your volume and component demand to make the most cost-effective choice.
Conclusion: Picking the Right Method for Your Needs
When it comes to manufacturing electrical components, choosing the right method depends on factors like production volume, timeline, and how refined your design is. Each approach has its strengths, and understanding when to use them can save both time and money.
For designs still in development or production runs under 500 units, 3D printing stands out. It avoids the high costs of upfront tooling and allows for quicker iterations. As JLCPCB explains:
"Comparing the cost of 3D printing vs traditional manufacturing is about how much capital you're willing to lock up before you even know if the design works."
However, once your design is finalized and production volumes grow, the game changes.
For production runs typically between 500 and 1,000 units or more, traditional manufacturing methods like injection molding or CNC machining become more economical. These methods are better suited for achieving tight tolerances and ensuring durability at scale.
A hybrid approach often works best. Start with 3D printing to refine your design quickly, then transition to traditional manufacturing when you're ready to scale. This way, you leverage the speed and flexibility of 3D printing early on, while reaping the cost benefits of traditional methods as production ramps up. For those who prefer to skip manufacturing altogether, platforms like Electrical Trader provide an alternative by offering ready-made electrical components, both new and used.
FAQs
How do I estimate the break-even volume for my part?
To determine the break-even volume, you need to compare the total costs of various manufacturing methods and identify the point where they are equal. Here's how to approach it:
- Calculate unit costs: Include expenses like materials, labor, and tooling for each method.
- Determine total costs: Multiply the unit cost by the production volume.
- Separate fixed and variable costs: Break down costs into those that remain constant (fixed) and those that change with production volume (variable).
Then, apply this formula:
Volume = (Fixed Cost_B - Fixed Cost_A) / (Variable Cost_A - Variable Cost_B)
This formula helps pinpoint the production volume at which both methods incur the same total cost.
What hidden costs can make 3D printing more expensive than expected?
Hidden costs in 3D printing often come down to material expenses and production time. For example, using specialized materials like aerospace-grade metals can drive up costs considerably. On top of that, complex or large parts that require longer print times can increase operational expenses, as they keep equipment and labor occupied for extended periods. While 3D printing eliminates tooling costs for small batches, scaling up production often leads to high per-unit costs due to the demands for raw materials and extended machine usage.
When should I switch from 3D printing to injection molding?
When your production volume climbs beyond the range of roughly 450 to 1,200 units, it might be time to shift from 3D printing to injection molding. While 3D printing works well for small-scale production or prototypes due to its lower initial costs, the per-unit cost stays relatively high. Injection molding, on the other hand, comes with a steeper upfront investment for tooling. However, once you reach higher production volumes, it can slash per-unit costs by as much as 80%, thanks to economies of scale. This makes it a more cost-effective choice for large-scale manufacturing.