RCD Testing Procedures: Step-by-Step Guide
Residual Current Devices (RCDs), also known as Ground Fault Circuit Interrupters (GFCIs) in the U.S., are critical for electrical safety. They protect against electrocution and reduce fire risks by cutting power when they detect leakage currents. Testing these devices regularly ensures they function correctly and remain reliable. Here's a quick breakdown:
- Why Test RCDs? They can deteriorate over time due to wear or environmental factors. Regular checks improve their reliability from 97% to near-perfect.
- Key Safety Steps: Disconnect all appliances, visually inspect for damage, and use calibrated testing equipment.
- Testing Process: Includes a push-button test, trip time test, ramp test, and proper reset procedures.
- Tools Needed: A calibrated RCD tester, test leads, and sometimes an isolation transformer.
- Maintenance Schedule: Push-button tests every 6 months for homes; professional tests every 1–2 years.
Accurate documentation of test results is essential for compliance and safety. Regular testing ensures these devices perform as intended, protecting lives and property.
Guide to completing an RCD test and how to complete the test sheet
sbb-itb-501186b
Safety Precautions Before Testing
When working with live electrical circuits during RCD testing, safety has to be your top priority. Before pressing the test button or connecting any equipment, take the time to prepare both yourself and the testing environment. Skipping these steps can lead to damaged equipment, unreliable results, or even personal injury. Here are the key precautions to ensure both safety and accuracy during your RCD testing.
Disconnect All Loads
Before starting, unplug all appliances and devices connected to the circuit. This step is crucial for two reasons: it protects sensitive electronics like computers, TVs, and gaming consoles from potential damage or data loss, and it ensures the test results are accurate. Connected devices, such as neon indicators or discharge lighting, can interfere with the readings, making them appear lower than they should.
"ENSURE ALL EQUIPMENT IS UNPLUGGED FROM THE CIRCUITS, these tests produce high voltages and will damage some equipment." - Claydons
Physically disconnect devices from outlets to avoid any risk of damage during high-voltage tests. Also, save any important work beforehand, as the RCD test will immediately cut power to all connected circuits.
Inspect the RCD Visually
Take a moment to visually inspect the RCD for any signs of physical damage. Look for cracks, discoloration, signs of overheating such as melting, moisture ingress, or loose wiring. If you spot any issues, stop testing right away. A damaged RCD could fail during the test, leading to further problems or even safety hazards. This quick check can save you from bigger issues down the line.
Use Calibrated Testing Equipment
Accurate RCD testing requires properly calibrated, professional-grade testers. Avoid makeshift tools or uncalibrated devices, as they can lead to false results - either overlooking real issues or flagging problems that don’t exist. These testers are designed to measure precise trip times (typically under 300 milliseconds) and current leakage with the accuracy required to meet safety standards.
Make sure your testing equipment is recalibrated annually and has up-to-date, traceable calibration certificates. For testing at main distribution panels, use equipment rated CAT III 300V or higher to handle voltage transients safely. Also, check your test leads and probes for wear and tear, as damaged accessories can compromise both safety and accuracy.
"Using an uncalibrated or non-compliant tester may invalidate inspection reports and expose you to liability." - Kari, Expert in home and lifestyle products, Alibaba
Since RCD testing involves live circuits, wear the appropriate Personal Protective Equipment (PPE). Notify everyone in the building before starting, as the power cut can be startling or disruptive. If the consumer unit is in a dimly lit area like a basement or garage, have a flashlight handy, as the test will cut power to all circuits, including lighting.
Tools and Equipment for RCD Testing
Performing accurate RCD testing requires the right tools designed to measure precise trip times and current responses. These tools work alongside safety measures to ensure compliance and protection. Choosing the right equipment is critical for effective and reliable testing.
RCD Tester
The RCD tester is your go-to device for simulating leakage currents and measuring how quickly an RCD disconnects power. It ensures that the RCD trips within the required 300 milliseconds and tests at half, full, and five times its rated current. Many professional-grade testers also include ramp testing, which gradually increases the current until the RCD trips. This feature is particularly useful for diagnosing nuisance tripping. For instance, a 30mA RCD should trip at approximately 75% of its rated current during a ramp test, while tripping at only 13mA could signal over-sensitivity or a fault.
Selecting the right RCD tester depends on the type of RCDs you're working with. Here’s a quick breakdown:
- Type AC testers: Ideal for standard sinusoidal currents, commonly found in residential circuits.
- Type A testers: Detect pulsating DC currents from devices like electronics.
- Type B testers: Handle smooth DC currents, such as those from EV chargers and solar inverters.
For main distribution panels, ensure your tester is rated CAT III 300V or higher to safely manage voltage transients.
"If measurement results matter, calibration matters." - Jeff Gust, Chief Corporate Metrologist, Fluke Corporation
Calibration is essential. Using uncalibrated equipment can invalidate inspection reports and leave you liable for any issues that arise.
Additional Tools
In addition to the RCD tester, a few other tools can enhance safety and testing accuracy:
- Test leads and probes: These are crucial for testing three-phase RCDs without a standard plug. Always check for insulation damage before use, and replace damaged probes rather than attempting repairs.
- Isolation transformer: Necessary when testing portable RCDs on circuits already protected by a fixed switchboard RCD. This prevents the fixed RCD from tripping during your test.
Some portable appliance testers include RCD testing capabilities, but these typically lack the advanced features of dedicated RCD testers.
RCD Testing Procedure
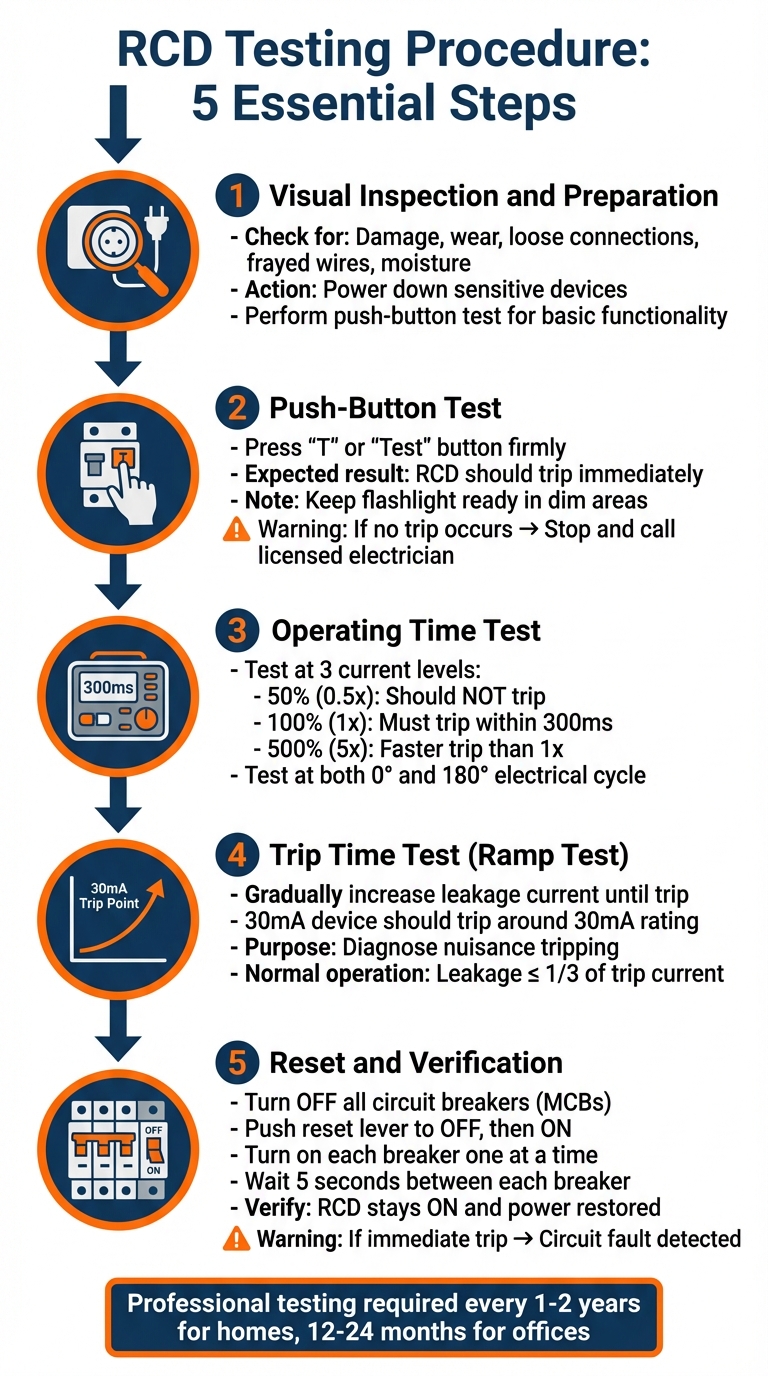
5-Step RCD Testing Procedure Guide
To ensure both functionality and compliance, follow these five steps using a calibrated tester and proper safety precautions. Each step builds on the previous one, offering a thorough assessment of the RCD's performance.
Step 1: Visual Inspection and Preparation
Start by inspecting the RCD for physical issues like damage, wear, or loose connections. Look for signs such as frayed wires, moisture, or unstable terminals that might impact its performance. Before proceeding with electrical testing, power down sensitive devices to avoid data loss or hardware issues during the power interruption. Then, perform a push-button test to check basic tripping functionality.
Step 2: Push-Button Test
Press the "T" or "Test" button firmly. A properly working RCD should trip immediately, cutting power to all protected circuits. If you're in a dimly lit area, like a basement, keep a flashlight handy since the test will turn off the lights. Notify any occupants beforehand to prevent alarm when the power cuts. If the RCD doesn’t trip, avoid trying to fix it yourself - stop using the circuit and call a licensed electrician.
Step 3: Operating Time Test
Once the RCD passes the push-button test, move on to the operating time assessment. Use your RCD tester on the load side of the device. Test at these three current levels:
- 50% (0.5x): The RCD should not trip.
- 100% (1x): It must trip within 300 milliseconds for a standard 30mA device.
- 500% (5x): Tripping should occur even faster than at 1x.
Professional testers also evaluate the RCD at both 0° and 180° of the electrical cycle to ensure consistent operation.
Step 4: Trip Time Test
This test, often called a ramp test, involves gradually increasing leakage current until the RCD trips. For a 30mA device, it should trip around its rated sensitivity of 30mA. This method is particularly helpful for diagnosing nuisance tripping. For example, a ramp test at an aged care facility in Footscray, Australia, revealed an RCD tripping below its 30mA rating. The device was recalibrated to correct its sensitivity. Keep in mind that during normal operation, leakage current should not exceed one-third of the RCD's tripping current.
Step 5: Reset and Verification
Before resetting the RCD, turn off all individual circuit breakers (MCBs). Some RCDs require pushing the reset lever fully into the "OFF" position before switching it back to "ON". Once reset, turn on each circuit breaker one at a time, waiting about 5 seconds between each. Confirm that the RCD stays in the "ON" position and that power is restored to all circuits. If the RCD trips immediately after resetting or when a specific breaker is engaged, this indicates a fault in that circuit that needs further investigation.
"To ensure maximum safety, first switch off the circuit breakers next to your RCD by moving them down into the off position. You can then push your RCD switch back up to reset it, and finally, switch your circuit breakers back on... counting a 5 second gap between each breaker."
– Pulse Electrical
How to Interpret Test Results
After completing physical and operational tests, use these guidelines to evaluate your results.
Standards and Compliance
In the U.S., Residual Current Devices (RCDs) are referred to as Ground Fault Circuit Interrupters (GFCIs) and must adhere to the National Electrical Code (NEC). These devices are engineered to disconnect circuits in less than 30 milliseconds, with typical trip times ranging between 25 and 40 milliseconds. High-performance models can trip even faster, within 10 to 20 milliseconds.
GFCIs in the U.S. are set to a 5 mA sensitivity level, which is much more sensitive than the 30 mA standard used in many other regions. This heightened sensitivity is crucial because alternating current at 60 Hz exceeding 20 mA can lead to cardiac arrest or severe injury. When reviewing your test results, ensure the device trips within the required timeframe and sensitivity range. Any deviations - such as slow tripping or excessive sensitivity causing frequent nuisance trips - indicate a malfunction. If this happens, proceed to troubleshoot as outlined below.
Troubleshooting Failed Tests
If your GFCI fails the push-button test (i.e., it doesn’t trip when you press the "Test" button), stop using the circuit immediately and replace the device. A non-tripping GFCI offers no protection and must not remain in use. If trip time tests show the device responding slower than 30 milliseconds, or if frequent tripping occurs without an obvious cause, investigate for issues like:
- Cumulative leakage from multiple connected devices
- Moisture in outdoor or damp-area fittings
- Internal damage to the GFCI
- Deteriorating insulation in the circuit wiring
If the GFCI trips even when all circuit breakers are off or appliances are unplugged, it may indicate a permanent wiring fault or a defective GFCI. In such cases, consult a licensed electrician. Never bypass a tripping GFCI or repeatedly reset it, as doing so compromises safety and could lead to further damage. Proper operation ensures the device continues to protect against hazardous leaks and maintains circuit safety.
One key limitation to note: GFCI test plugs won’t function on ungrounded circuits, which are common in older U.S. homes. These plugs rely on a ground wire that doesn’t exist in such setups. In these cases, only the device’s internal "Test" button will work. While these ungrounded GFCIs still provide shock protection by detecting imbalances between line and neutral, they must be labeled "No Equipment Ground" as required by the NEC.
Maintenance and Documentation
Testing Schedule
Regular testing is key to keeping RCDs functioning properly and avoiding unnoticed failures. For residential environments, use the push-button test every six months, and schedule a professional trip time test every two years. Offices and low-risk workplaces should follow the same six-month push-button testing routine, while instrument-based tests by a licensed electrician should occur every 12 to 24 months.
High-risk environments require stricter testing protocols. For example, factories should have annual trip time tests, while construction sites should perform daily push-button checks. Portable RCDs used in challenging conditions need daily testing, with professional trip time tests every three to six months, depending on how heavily they’re used.
"Regular RCD testing prevents electrical accidents, ensures compliance with AS/NZS 3760:2022, and gives peace of mind that your electrical safety systems are working as intended." - Electrical Powerhaus
Recording Test Results
Once your testing schedule is in place, make sure to document every test thoroughly. Accurate records not only meet legal requirements but also help identify and resolve recurring issues. Include details like the date, the tester’s name and qualifications, the location of the circuit or device, and the type of test conducted - whether it’s a push-button, trip time, or ramp test. For professional instrument tests, log specific data such as trip time in milliseconds, trip current in milliamps, and results from testing at 0° and 180° phase angles.
Also, note whether the test passed or failed, any corrective actions taken, and when the next test is scheduled. Attach compliance certificates from professional tests when applicable. This documentation creates an audit trail that can satisfy insurance requirements and highlight any gradual performance issues before they become critical. Many jurisdictions mandate keeping these records for at least five years, so set up a reliable filing system - whether it’s a physical logbook or a digital solution - to keep everything organized and easily accessible.
Conclusion
RCD testing plays a crucial role in protecting lives and reducing the risk of electrical fires. These devices serve as a critical safety measure, detecting current leaks and cutting off power before they can cause serious harm, whether through electric shocks or fire hazards.
Modern devices are designed to meet strict standards, ensuring they respond quickly and effectively when needed.
The guide outlines a three-step testing process - push-button, trip time, and ramp tests - to confirm that RCDs are functioning correctly. While monthly push-button tests are simple enough for users to perform, the more technical trip time and ramp tests require the expertise of a licensed electrician equipped with calibrated tools.
"Compliance isn't just about following the law - it's about protecting people from potential electrical hazards." - TIS Electrics Team
In addition to safety, conducting regular RCD tests provides legal and financial protection. Proper documentation - including test dates, results, and any corrective actions - creates a reliable audit trail. This not only demonstrates diligence but also ensures compliance with standards like AS/NZS 3760:2022.
FAQs
When should I replace an RCD/GFCI instead of testing it again?
You should replace an RCD/GFCI if it doesn't trip when you press the test button, trips unexpectedly and can't be reset, or has visible signs of wear or damage. Frequent nuisance tripping or incorrect responses during testing are also clear signs that it’s time for a replacement to ensure safety and proper operation.
What can cause nuisance tripping during a ramp or trip-time test?
Nuisance tripping during a ramp or trip-time test often happens because of cumulative earth leakage from several appliances, subpar wiring insulation, or external factors like moisture or dust. An RCD that's too sensitive or not calibrated correctly can also trip earlier than it should. Other common culprits include malfunctioning equipment, damaged cables, or wiring issues that cause unexpected trips during the testing process.
Can I test an RCD/GFCI on an ungrounded circuit safely?
Yes, it’s possible to safely test an RCD (Residual Current Device) or GFCI (Ground Fault Circuit Interrupter) on an ungrounded circuit. These devices work by detecting imbalances in current between the hot and neutral wires, meaning they don’t rely on a ground connection to function. To test them, use the built-in test button or proper testing tools designed for the job. Avoid makeshift methods, like connecting the ground and neutral wires, as these can create safety hazards. If you’re uncertain, it’s always best to consult a professional.