How to Measure Generator Noise Levels
If I want a generator noise reading I can trust, I need to use dBA, measure from 23 feet (7 meters), and keep the load, meter settings, and test spot the same every time.
That’s the short answer. A good noise check is not just about pointing a meter at a generator. I also need to warm the unit up, keep background noise at least 10 dB lower than the generator, note whether I used fast or slow response, and write down the surface type, load, and test position. If I change distance, load, or location, the number changes too.
Here’s the whole process in plain English:
- Use a sound-level meter, not a phone app
- Set it to A-weighting: dB(A)
- Measure at 23 ft. (7 m) if I want to match many maker specs
- Test after the generator reaches a steady speed
- Record the load: no load, typical load, or 50% load
- Keep background noise at least 10 dB lower
- Watch nearby concrete, walls, trailers, or enclosures that can reflect sound
- Take notes on distance, side tested, weather, RPM, and temperature
- If I test from another distance, remember that doubling distance can cut sound by about 6 dB(A) in open air
- Compare only readings taken under the same conditions
One more point: local noise limits can fall between 45 and 72 dB(A), and worker exposure may matter once sound gets past 80 dB(A). So this is not only about comparison. It can also help me check rules and jobsite safety.
Readings mean little without context. So when I report a generator’s sound level, I should always include the distance, load, and test position with the dBA number.
Tools and Test Conditions
Use the Right Meter and Settings
Once you've locked in the distance, keep the meter setup and test site the same for every reading.
Use a sound-level meter set to dB(A). Phone apps aren't consistent enough to give repeatable results.
Before each reading, double-check that the meter is set to dB(A).
If you're testing outdoors, put a windscreen on the microphone so wind doesn't skew the reading. Also record whether the meter is using fast or slow response, and log that setting every time.
Control Background Noise and Reflective Surfaces
Keep ambient noise at least 10 dB below the generator reading.
Surface type matters more than people think. Hard surfaces like concrete and asphalt bounce sound back, while grass and bare ground absorb more of it. If you can't avoid testing near a hard surface, wall, trailer, or enclosure, write down those site conditions so later comparisons make more sense.
Confirm the Generator Operating Condition
Once the meter and site are ready, let the generator settle before you measure.
Warm the generator until it reaches a steady operating speed.
Then use the load condition you need to report:
- No load
- Typical connected load
- 50% load
That part matters. Noise output changes with engine speed and electrical load, so the load you pick will change the number you record.
| Setting | What to Record |
|---|---|
| Weighting | A-weighting (dB(A)) |
| Response | Fast or Slow |
| Load | No load, typical load, or 50% load |
| RPM | Engine speed at time of reading |
| Temp | °F at time of test |
| Background noise | At least 10 dB below generator level |
sbb-itb-501186b
How Loud Is a Home Generator? | Sound Level and Decibel Scale Comparison.
Step-by-Step: How to Measure Generator Noise Levels
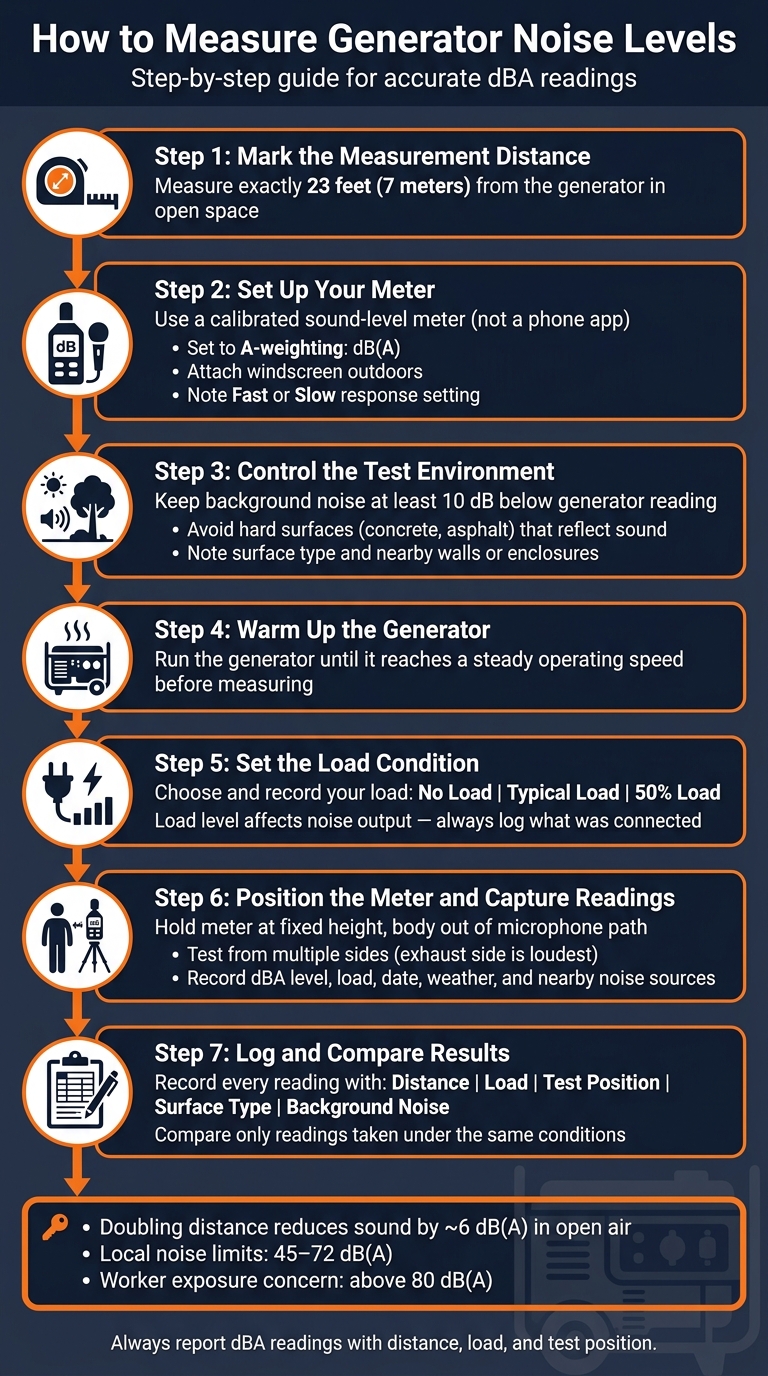
How to Measure Generator Noise Levels: Step-by-Step Guide
Use one fixed setup for every reading so your results are easy to compare. Once the site and meter are set, stick with the same layout each time.
Step 1: Mark the Measurement Distance
Use a tape measure to mark exactly 23 feet (7 meters) from the generator in open space.
Step 2: Position the Meter Correctly
Place the meter at the same height above the ground for each reading. Hold it steady, and keep your body out of the microphone’s path so you don’t affect the result.
The exhaust pipe direction matters more than most people think. Since exhaust noise travels more strongly in some directions, the number can change based on which side of the generator you test from. If you want a better picture of overall noise, take readings from more than one side of the unit.
Step 3: Run the Generator and Capture Readings
Start the generator, let it settle into a steady state, and then record the reading. Log the dBA level, load level, date, weather, and any nearby noise sources.
Keep those values together in one table so side-by-side comparisons are simple.
Record, Compare, and Interpret the Results
Log Readings in a Comparison Table
Once you’ve taken the readings, sort them by distance, load, and test position. Write each reading down right away. That makes it much easier to compare units and check whether a maker’s dBA claim holds up.
Use the same format for every test so the numbers line up cleanly:
| Test Position | Distance | Meter Type | Weighting | Load Condition | Measured dBA |
|---|---|---|---|---|---|
| Front (Exhaust Side) | 23 ft | Calibrated sound-level meter | A-weighted | 50% Load | |
| Right Side | 23 ft | Calibrated sound-level meter | A-weighted | 50% Load | |
| Rear | 23 ft | Calibrated sound-level meter | A-weighted | 50% Load |
If you’re comparing load levels on the same generator, use a second table to show how engine demand changes noise output. Be specific about what was connected. Skip vague labels when you can and record the exact load items instead.
| Load Condition | Items Powered | Measured dBA (at 23 ft) |
|---|---|---|
| No Load | ||
| Typical Load | ||
| High Load |
A standard log makes it easy to check maker claims without guesswork.
Avoid Common Interpretation Errors
Read the log carefully and compare only readings taken under the same conditions. If the distance changes, the numbers stop being apples to apples. The decibel scale is logarithmic, which means sound intensity falls off fast as distance increases.
When comparing units, use the loudest side reading. And every time you report a dBA result, include the distance, load, and test position with it.
Conclusion: Key Steps for Reliable Generator Noise Measurement
Reliable generator noise readings come down to one thing: keep the setup the same every time. That means using the same meter settings, the same distance, the same microphone height, the same load, and similar site conditions. Set the meter to A-weighting (dBA), measure from 23 feet (7 meters), keep the microphone at a fixed height above the ground, and test at the load you plan to use.
It also helps to write down the conditions around each test. Record the surface type and the background noise level with every reading. Hard surfaces can push readings up, while soft ground can cut reflections.
For each result, log the distance, load, meter position, surface type, and background noise. Those details make it much easier to compare generators on equal terms and check manufacturer claims.
FAQs
What if I can’t measure from 23 feet?
If you can’t measure from exactly 23 feet, you can estimate the sound level at that distance with the inverse square law:
Lp = Lw - 20(log₁₀(r)) + 2.34 dB
Here, r is the measurement distance in feet.
So if you took the reading from some other distance, this formula helps you estimate the noise level at 23 feet.
Should I test all sides of the generator?
Yes. To measure generator noise levels the right way, take readings from more than one side of the generator.
A common setup is at least four positions:
- Front
- Back
- Left
- Right
This matters because a generator often doesn’t sound the same from every angle. One side may be louder than another due to the exhaust, cooling system, or the way the unit is housed.
By checking multiple directions, you get a more accurate overall sound pressure level.
How accurate are phone app noise readings?
Phone app noise readings can be reasonably accurate. In controlled conditions, some apps can come within ±2 dBA.
That said, accuracy depends on three big things:
- The app
- The device
- The environment
And that’s where things can get messy.
Readings can be inconsistent, especially with impulse sounds or very loud noise. So if you just want a general estimate, a phone app can do the job.
But if you need precise measurements, it’s not a stand-in for a professional sound level meter.