Common Transformer Seal Failures and Fixes
Most transformer oil leaks start small, but they can turn into outage work fast. In many cases, the problem comes from seals and gaskets at covers, radiators, valves, bushings, breathers, or conservators. The fix usually comes down to three steps: find the exact leak point, decide if retorquing is enough or if the gasket needs replacement, and check for root causes like warped flanges, vibration, or pressure problems.
If I wanted the short version, it would be this:
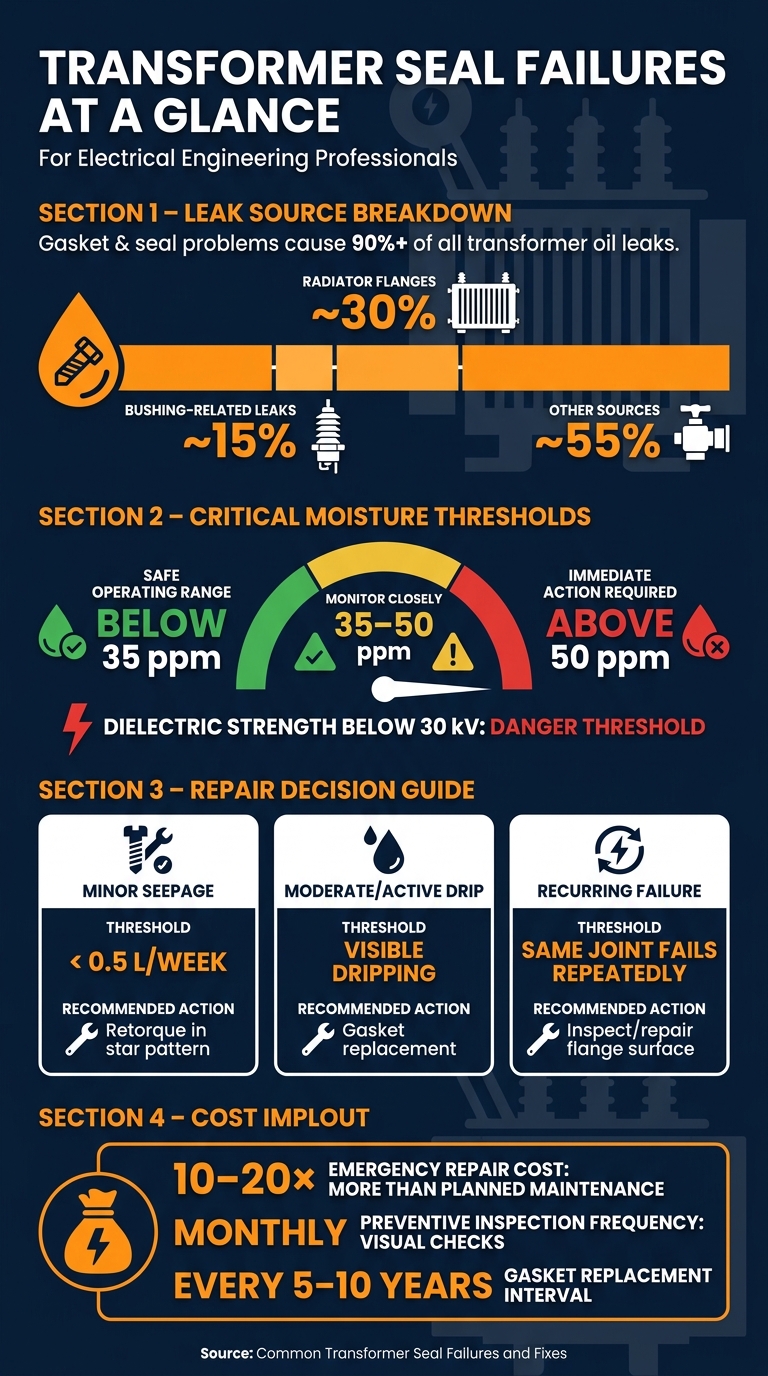
- Gasket and seal problems cause more than 90% of transformer oil leaks
- Radiator flanges account for about 30% of common leak points
- Bushing-related leaks make up about 15%
- Moisture in oil should stay below 35 ppm
- If moisture goes above 50 ppm, action is needed right away
- Minor seepage is less than 0.5 liters per week
- Emergency repair work can cost 10 to 20 times more than planned maintenance
Here’s what you need to watch for:
- Oil stains that start at the highest visible point
- Hardened, cracked, or pushed-out gaskets
- A pressure/vacuum gauge that stays at 0 psi
- Falling oil level on the MOG
- Breather silica gel changing color
- Oil in the breather or signs of moisture getting in
Here’s how the fixes usually break down:
| Leak condition | What I’d check first | Usual fix |
|---|---|---|
| Minor seepage | Bolt torque, gasket compression | Retorque in a criss-cross or star pattern |
| Aged or cracked gasket | Gasket condition, flange surface | Full gasket replacement |
| Same joint fails again | Flange flatness, corrosion, vibration | Repair joint surface before resealing |
| Moisture issue without a tank leak | Breather oil cup, silica gel, conservator bladder | Service breather or conservator seal |
A few repair rules matter more than anything else: don’t overtighten, use the right gasket material for the oil and heat, clean flange faces well, and pressure-test the joint after reassembly with dry nitrogen at 3 to 5 psi. If the same leak keeps coming back, I would stop blaming the gasket alone and look at the joint itself.
Below, I’ll break down the main failure points, the signs that confirm a seal problem, and the fixes that make the most sense for each case.
Transformer Seal Failures: Key Stats, Leak Points & Repair Thresholds
Common Transformer Seal Failures and Their Causes
Tank Cover, Manhole, and Access Gasket Leaks
Tank cover and manhole gaskets usually fail for pretty simple reasons: creep, heat cycling, a poor bolt pattern, too much torque, or dirty flange surfaces that ruin gasket compression.
When compression is lost, the gasket can’t do its job. And that’s often where leaks begin.
Once you know the usual leak points, the next move is to confirm which seal is actually failing.
Radiator, Valve, and Piping Seal Failures
Radiator flanges tend to leak when joint weight, vibration, and thermal cycling slowly work the connection loose. They’re also the most common leak point, making up roughly 30% of all transformer oil leaks.
Valve stem packing can dry out and shrink over time, especially on valves that rarely get used. That often leads to slow seepage around the stem.
Piping joints and hose connections can leak too, mainly when seals harden or fittings back off a bit.
Most transformer leaks don’t show up as sudden blowouts. They usually begin as slow seepage.
Bushing, Breather, and Conservator Seal Degradation
Bushing gaskets can harden and crack under UV exposure and temperature swings. When that happens, the seal between the bushing flange and the tank starts to give way. Bushing-related leaks make up about 15% of common failure points.
In conservators, a torn bladder can let oil move into the air side. That kind of failure is easy to miss at first, and then one day oil shows up in the silica gel breather.
A dry breather oil seal creates a different problem. It lets unfiltered, moisture-laden air move in freely.
These failure patterns set up the next step: inspect the leak source, the sealing surface, and the hardware before replacing parts.
How to Inspect and Confirm a Seal Problem
Visual Leak Checks and Condition Clues
Start by cleaning the area. Then trace the oil path to the highest point where it starts. Oil on the outside of the transformer doesn't automatically mean you have an active leak. Stains can travel, spread, and make the source look lower than it is. That’s why the topmost point matters. After that, back up what you see with gauge readings and oil-level trends.
Once the surface is clean, look for oily rings around flanges, wet stains running down bushing porcelain, or crusted residue along seams. A dry oil crust on a weld can point to a slow leak that has oxidized over time.
Check the gasket itself with good lighting and safe access. If it looks hardened, cracked, brittle, or pushed out of the joint, it has lost compression and should be replaced. If the gasket still looks okay, tighten the nuts in a criss-cross pattern to the specified torque. If the seepage stops, the issue was likely low torque rather than a failed gasket.
Some leaks are stubborn. They hide in tiny gaps and don’t show up right away. In those cases, pressurize the tank to 2–5 psi with dry nitrogen and spray soapy water on the joints you suspect. If bubbles appear right away, you’ve found an active leak at that exact spot. UV dye and a flashlight can also help trace hairline leaks.
Oil Level and Moisture Indicators That Support the Diagnosis
Visual checks only tell part of the story. The oil level gauge and breather condition help confirm what’s going on.
A healthy sealed transformer will usually hold about 1.5 to 2 psi. If the pressure/vacuum gauge stays at 0 while the unit warms under load, that’s a strong sign there’s a breach somewhere in the system.
Watch the Magnetic Oil Gauge (MOG) over time. A clear drop within a few days usually points to a moderate or severe leak. A slow drop over a few weeks leans more toward minor seepage. Once oil loss gets past that point and you also see dripping or puddling, retorquing usually won’t cut it. Gasket replacement is often the better move.
Moisture clues matter too. If the silica gel in the breather changes from blue to pink or white, moisture is getting in. An empty breather oil cup points to seal failure. And if oil tests show dielectric strength below 30 kV or moisture above 50 ppm, the seals may be letting in outside air and moisture.
If the same joint keeps leaking, the gasket may not be the main issue.
When Repeated Seal Failures Point to Larger Transformer Issues
If a new gasket fails at the same spot within a few months, don’t assume the gasket was bad.
"Many teams waste time and resources replacing parts without addressing the underlying issue. For example, a client once replaced gaskets three times in six months only to discover that the real problem was excessive vibration." - CHH Power
Leaks that keep coming back in the same place often point to damage at the sealing surface. A warped flange, often caused by repeated overtightening, won’t let a gasket sit flat. Pitting or crevice corrosion on the mating surface can form tiny channels that oil keeps slipping through. In cases like that, swapping in another gasket won’t solve much. Check the flange with a straightedge, then grind or machine it before resealing.
This table helps separate a gasket issue from a joint issue:
| Condition | What It Looks Like | Next Step |
|---|---|---|
| Warped flange | New gasket fails at the same spot | Check flange flatness |
| Pitting corrosion | Oil seeps through small pinholes | Inspect for corrosion |
| Vibration | Bolts found loose at every inspection | Check vibration |
| Overpressure | Oil weeps from multiple gaskets at once | Check pressure relief and breather |
When several seals keep failing on an older transformer, it’s smart to compare repair cost with replacement cost before installing yet another seal.
How to Fix Transformer Oil Leak | Step-by-Step Guide
sbb-itb-501186b
Practical Fixes for Common Seal Failures
Once you've confirmed where the leak is coming from, the next step is simple: match the repair to how bad the leak is.
Retorquing and Reseating for Minor Seepage
If seepage is under 0.5 liters per week, start with retorquing the fasteners.
First, make the transformer safe to work on. De-energize it, isolate it fully, confirm isolation with a voltage tester, and let the unit cool for at least 4 hours. After that, use a calibrated torque wrench and tighten the fasteners in a star pattern over three passes, following the manufacturer's torque spec.
This part matters: do not overtighten nuts and bolts just to stop a leak. That can crush the gasket or warp the flange, which often creates a new leak path instead of fixing the old one.
If the seepage is still there after retorquing, it's time to replace the gasket.
Replacing Failed Gaskets at Covers, Radiators, Valves, and Bushings
If a gasket is aged, hard, cracked, or no longer springy, replace it fully. This fix is for gasket damage, not for a flange that's already warped.
The job usually looks like this:
- Isolate the equipment
- Drain oil into clean, dedicated containers if the joint sits below the oil line
- Clean the mating surfaces
- Install the new gasket
- Reassemble the joint evenly
- Check that the seal is holding
Clean both flange faces with a lint-free cloth and anhydrous ethanol to remove oil, rust, and debris. Then apply a light coat of clean transformer oil to the gasket before installing it. When you compress the gasket, aim for about one-third of its original thickness. Too little compression and it seeps. Too much and the gasket takes a permanent set.
Material choice also matters:
- NBR for standard oil-wetted flanges
- Viton for higher heat
- cork-nitrile for older pitted surfaces
- Never use EPDM with mineral oil
"EPDM (Ethylene Propylene) rubber is NOT compatible with mineral oil. EPDM will absorb hydrocarbons, swell, and fail." - Tan, Electrical Engineer, Transformer4U
After reassembly, pressurize the tank to 3–5 psi with dry nitrogen and check each joint with soapy water. If you see bubbles, the seal still isn't holding.
Restoring Breather and Conservator Seals to Control Moisture
Sometimes the tank seals are fine, but moisture still shows up. When that happens, check the breather and conservator next. A leak in either area can contaminate the oil even when the main tank joints look tight. That's the sneaky part.
Start with the silica gel breather. Replace the desiccant when 50%–60% of the media has changed color from blue to pink or white. Then inspect the breather oil cup. It should be filled with clean transformer oil so unfiltered air can't slip past the desiccant. In hot climates, top it off monthly. Also check the breather housing fittings and connection points for leaks or loose spots.
On conservator-type transformers, the internal rubber bladder keeps air away from the oil. Over time, that bladder can harden or crack. When that happens, you can get bad oil-level readings and moisture ingress. During overhaul, pressure-test the bladder. Also check thermometer pockets and oil gauges for seepage after calibration.
Preventive Maintenance and Closing Takeaways
Inspection Schedules, Records, and Spare Parts Planning
Once the leak is fixed, the next job is preventing the next one.
Preventive maintenance costs far less than an emergency leak repair or a full replacement. A simple routine goes a long way: inspect the transformer monthly, verify critical fastener torque every 6 to 12 months, and run annual thermography plus DGA. Plan internal inspection and gasket replacement every 5 to 10 years.
It also helps to track replacement timing by part type. Pay close attention to parts like bushing gaskets and Buchholz relay seals.
A schedule on paper isn't enough by itself. You need a record of what happened, where it happened, and who fixed it. Log every repair with the date, leak location, part number, torque value, and technician name. That paper trail makes repeat trouble much easier to spot, especially when the same joint keeps showing up.
Keep the right spare parts on hand before you need them. Stock OEM-grade NBR and Viton gaskets matched to the transformer's oil and temperature range, with coverage for the most common failure points:
- Covers
- Radiators
- Valves
- Bushings
Key Points for Repair-Versus-Replacement Decisions
Recurring seepage is a sign to reassess the joint, not just swap the gasket again.
Minor seepage can often be handled with retorquing or a targeted gasket replacement. But once a leak becomes active and starts dripping, the job usually shifts into planned outage work, oil handling, and heavier labor. If the same joint keeps failing, don't keep changing gaskets on autopilot. Check for vibration, alignment issues, or flange damage.
When repeated seal failures point to broader deterioration, a major overhaul is often the more practical move than another spot repair.
FAQs
How can I tell if a leak is active or just old oil staining?
Clean off any old oil residue first. If the pressure vacuum gauge is at zero, pressurize the tank to about 2 lbs with a nitrogen bottle. Then spray the areas you suspect with soapy water. Active leaks will bubble right away.
If you don't see bubbles, dry the area and check the gauge again a few hours later. If the pressure still holds, the mark was probably just old staining. You can also wipe dark, baked-on residue with a clean cloth to see if there's fresh oil underneath.
When is retorquing enough, and when should the gasket be replaced?
Retorquing is enough when leaks come from uneven compression or loose bolts, and the gasket is still seated the way it should be. Tighten the bolts with even pressure in a diagonal or star pattern so the load stays balanced.
Replace the gasket if it’s old, brittle, cracked, damaged by heat or oil, flattened from overtightening, or not compatible with the transformer oil.
Why do transformer seal leaks keep coming back?
Transformer seal leaks often come back because they usually have more than one cause, not just a single bad gasket. Heat, oxygen, oil exposure, and thermal cycling can all wear seals down over time. Rubber and nitrile gaskets may harden, become brittle, or lose the compression they need to keep oil in place.
Leaks also tend to return when the root repair issue never gets fixed. In many cases, the gasket isn't the whole problem. The trouble can come from incorrect bolt torque, dirty mating surfaces, or materials that don't work well together.