Inverter Compatibility: Matching Panels and Batteries
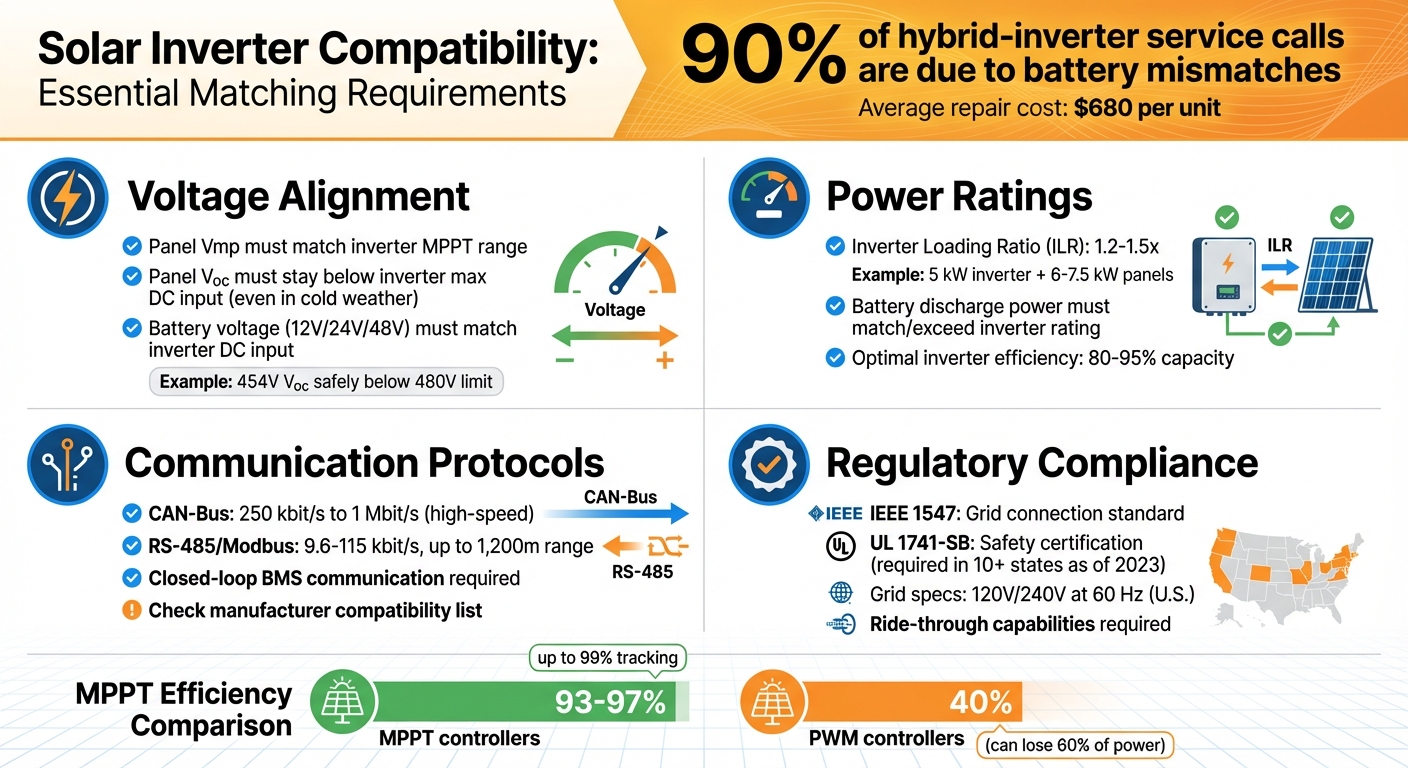
When it comes to solar power systems, compatibility is everything. Mismatched inverters, panels, and batteries lead to inefficiencies, costly failures, and reduced performance. For example, about 90% of hybrid-inverter service calls are due to battery mismatches, with average repair costs reaching $680 per unit. The key factors to get right include:
- Voltage alignment: Ensure panel and battery voltages match the inverter's specifications.
- Communication protocols: Use systems with compatible protocols like CAN bus or RS485 for smooth operation.
- Temperature considerations: Design systems to handle extreme weather to avoid voltage or performance issues.
- Regulatory compliance: Follow grid standards like IEEE 1547 and UL 1741 certifications for safety and integration.
Solar Inverter Compatibility Checklist: Voltage, Power, and Protocol Requirements
Is My Inverter Battery Ready? | Adding A Solar Battery To An Existing Solar System | Teho

Technical Factors Affecting Compatibility
The technical specifications of your solar system are critical for its overall performance and durability. These specs - like the ratings on your panels, inverter, and batteries - set the boundaries for how well components work together. To ensure everything functions smoothly, it's essential to dive into key details like voltage and power ratings.
Voltage and Power Ratings
Your solar panels' voltage needs to align with your inverter's Maximum Power Point Tracking (MPPT) operating voltage range. If the Maximum Power Voltage (Vmp) of the panels falls outside this range, the inverter may not start or could operate at a much lower efficiency. A bigger issue arises if the Open-Circuit Voltage (Voc) of your panel string exceeds the inverter's maximum DC input voltage - this could cause irreversible hardware damage.
Temperature plays a huge role in these calculations. Cold weather can increase panel voltage, so it's crucial to design your system to handle the lowest expected temperatures. For instance, in July 2024, a system designer using the EG4 6000XP off-grid inverter (with a 480V maximum input) configured a string of 28 SunPower 320W panels in a 7s2p setup. The string's Voc reached 454V, staying safely below the 480V limit, even in freezing conditions. Meanwhile, the Vmp of 370V dropped to around 320V in hot weather, aligning perfectly with the inverter's nominal MPPT voltage of 320VDC.
Battery voltage is another critical factor. Your battery bank's nominal voltage - whether it's 12V, 24V, or 48V - must match the inverter's DC input specification. For example, a 48V battery won't work with a 24V inverter.
The Inverter Loading Ratio (ILR) provides some wiggle room. Many systems "over-panel" by installing 1.2 to 1.5 times more DC solar capacity than the inverter's AC rating. For example, pairing a 5 kW inverter with 6 kW to 7.5 kW of panels helps maintain peak efficiency as sunlight conditions shift throughout the day.
MPPT and Energy Conversion
Once you've sorted out voltage concerns, MPPT technology takes over to ensure efficient energy conversion. Maximum Power Point Tracking (MPPT) is essential for getting the most out of your solar system. These controllers adjust in real time to maximize power output as sunlight and panel conditions change. The difference in performance is striking: MPPT controllers can achieve 93% to 97% efficiency, while older PWM (Pulse Width Modulation) controllers might lose up to 60% of available power due to their inability to optimize voltage differences between panels and batteries.
"MPPT is of course the newer technology of the two and is able to convert high PV input voltage without significant loss of solar power." – MPP Solar
However, MPPT only works if your panel voltage stays within the inverter's specified range. If the voltage strays, the system may shut down or operate less effectively. When properly aligned, MPPT tracking efficiency can reach up to 99%, and overall system efficiency can hit 97%.
For setups with challenges like varying roof angles or partial shading, inverters equipped with multiple MPPT trackers are a game-changer. These trackers optimize each section of the array independently, ensuring that one shaded panel doesn't drag down the performance of the entire system.
Solar Panel Types and Inverter Selection
The type of solar panels you choose plays a big role in determining which inverter will work best with your system. Whether you're using monocrystalline, polycrystalline, thin-film, or PERC panels, understanding their unique characteristics can help you avoid compatibility issues and ensure your system runs efficiently.
Monocrystalline and Polycrystalline Panels
The efficiency and power density of your panels directly impact inverter requirements. Monocrystalline panels, for example, offer about 22% efficiency, while polycrystalline panels reach around 18%. This higher efficiency in monocrystalline panels often calls for inverters with higher input ratings to handle the increased power output.
It’s critical to match the panel string's open-circuit voltage (Voc) and maximum power voltage (Vmp) with the inverter's input limits. For instance, a 100W monocrystalline panel and a 100W polycrystalline panel can deliver similar performance if their electrical specs align. However, mixing different panel types within the same string can cause problems. The entire string's output will be limited by the panel with the lowest performance.
If you're planning to expand your system or use mixed panel types, consider using microinverters or string inverters with multiple MPPT (Maximum Power Point Tracking) trackers. These options prevent underperforming panels from dragging down the entire system's output.
Thin-Film and PERC Technologies
Panels like thin-film and PERC (Passivated Emitter and Rear Cell) introduce additional complexities, requiring inverters with advanced features. These panels often need inverters equipped with multiple MPPT channels to handle fluctuations in voltage caused by environmental factors. Some high-capacity inverters even come with up to eight MPPT channels, making them suitable for more intricate layouts.
To optimize performance, DC optimizers can regulate each panel’s voltage for efficient conversion, while microinverters allow each panel to operate independently. This is especially important in situations where shading, dirt, or heat affects parts of your array unevenly. In fact, real-world systems can lose anywhere from 10% to 25% of potential output due to these issues.
Modern inverters also rely on updated firmware to track the power curves of newer high-efficiency panels accurately. When sizing your inverter, aim for one that’s rated at about 85% to 90% of your total panel wattage. This ensures the inverter operates near its peak efficiency, which is typically around 95% when running at 80% to 95% of its maximum capacity.
Battery and Inverter Matching
When pairing a battery with an inverter, it’s not just about matching voltage. You also need to consider communication protocols, voltage ranges, and power ratings. Getting this wrong can lead to system failures, safety risks, and expensive repairs. In fact, mismatched batteries are responsible for 90% of hybrid-inverter service calls.
Communication Protocols and Control Systems
Modern battery systems depend heavily on closed-loop communication. This means the Battery Management System (BMS) constantly monitors key parameters like the state of charge (SoC), temperature, and voltage limits. Based on these readings, it adjusts the charge and discharge rates to avoid overcharging or overheating.
"Closed loop allows the batteries in the system to provide real-time status to the equipment and dynamically control its operation."
Two common communication protocols are widely used: CAN-Bus, which operates at high speeds (250 kbit/s to 1 Mbit/s), and RS-485/Modbus, which supports long-distance communication up to 1,200 meters (around 3,937 feet) at speeds ranging from 9.6 kbit/s to 115 kbit/s.
If the communication between the battery and inverter isn’t compatible, you could face issues like "BMS Comms Fail" alarms, inaccurate SoC readings, or even system boot failures. To avoid these problems, check the inverter manufacturer’s compatibility list before buying. For RS-485 setups, always use shielded twisted-pair cables with 120 Ω terminators at both ends to minimize signal reflections.
Once communication is properly set up, the next step is managing power flow effectively.
Power Flow Management
Hybrid inverters are designed to do more than just export surplus solar energy. They manage energy flow between solar panels, batteries, electrical loads, and the grid. These systems can store energy, provide backup power during outages, and optimize battery usage based on electricity rates.
When pairing a battery with an inverter, the battery’s maximum discharge power (measured in kW) must match or exceed the inverter’s rated power. For example, if your battery can only deliver 3 kW but your inverter is rated for 5 kW, the system could trigger "Overload" alarms or activate BMS protection during periods of high demand. As a general rule, a 5 kW hybrid inverter pairs best with a 5–10 kWh battery.
Temperature also impacts performance. BMS units block charging if the battery temperature falls below 32°F or rises above 113°F. This can sometimes be misinterpreted as a hardware issue. To avoid this, make sure the batteries are installed in a location where the temperature stays within this range, or look for systems with built-in thermal management features.
sbb-itb-501186b
Grid Standards and Regulatory Requirements
Ensuring your solar system meets grid standards isn't just about matching components - it's about compliance with regulations that protect grid stability and safety. Once you've paired your battery and inverter, the next step is confirming that your system adheres to U.S. grid standards. These rules, established under the Energy Policy Act of 2005, include IEEE 1547 as the national standard for connecting distributed energy resources, like solar systems, to the grid.
Voltage and Frequency Requirements
Inverters play a critical role in converting the DC power generated by solar panels and batteries into AC power that matches grid specifications. In the U.S., this typically means 120V/240V at 60 Hz. Modern inverters are designed to meet these standards while contributing to grid stability. For example, IEEE 1547-2018 requires inverters to have "ride-through" capabilities, allowing them to stay operational during brief voltage or frequency fluctuations. This feature minimizes the risk of widespread grid failures caused by multiple solar systems disconnecting simultaneously.
Smart inverters take this a step further, actively stabilizing the grid by regulating voltage through dynamic power adjustments and responding to grid frequency signals.
"Transitioning to an electrical grid with more inverters requires building smarter inverters that can respond to changes in frequency and other disruptions... and help stabilize the grid."
- U.S. Department of Energy
These technical features are complemented by certification requirements to ensure both safety and seamless integration.
Certifications and Safety Standards
Two key certifications are essential for compliance and safety: IEEE 1547, which sets the baseline for grid connection, and UL 1741, which ensures inverter safety. The latest version, UL 1741-SB, aligns with IEEE 1547-2018 and introduces interoperability testing. This means inverters must support at least one communication protocol - such as IEEE 2030.5, SunSpec Modbus, or DNP3 - for remote utility monitoring.
As of January 1, 2023, states like New York, Massachusetts, Connecticut, Rhode Island, New Hampshire, Vermont, and Maine require all new solar installations to use UL 1741-SB certified inverters. California and New Mexico adopted the same requirement starting April 1, 2023. Notably, in March 2023, Enphase Energy announced its IQ8 Microinverter system as the first home energy setup certified to UL 1741-SB standards.
Before purchasing equipment, check local utility interconnection rules. While some areas may still accept older UL 1741-SA hardware, choosing UL 1741-SB certified components can help future-proof your system. Additionally, if you're planning to add a battery to an existing solar setup, be aware that this might require a new interconnection agreement and an upgrade to IEEE 1547-2018 compliant hardware.
Methods for Ensuring Component Compatibility
System Analysis and Design
To start, calculate your daily energy consumption in watt-hours by multiplying the wattage of each appliance by the number of hours it operates daily. Next, determine your peak instantaneous power demand - this is the maximum combined wattage your home requires at any given moment. This figure helps you identify the minimum inverter size necessary.
It's also crucial to ensure your solar panel string's voltage at maximum power (Vmp) aligns with your inverter's Maximum Power Point Tracking (MPPT) range. Additionally, your DC solar capacity should exceed the inverter's AC rating by 20%–50%, resulting in an Inverter Load Ratio (ILR) of 1.2–1.5. Your battery bank's nominal voltage (12V, 24V, or 48V) must match the inverter's fixed DC input voltage.
When calculating panel string voltage, keep in mind that open-circuit voltage (Voc) increases during colder weather. Double-check that your string's Voc won't surpass the inverter's maximum DC input voltage, even on the coldest days.
These calculations build the foundation for selecting an inverter that integrates seamlessly with your system while offering advanced functionality.
Selecting Modular and Multi-Function Inverters
After conducting the necessary system analysis, consider modular inverters as they simplify integration by combining solar and battery management in one unit. Hybrid inverters are particularly useful as they handle solar production, battery charging, and grid interaction simultaneously, reducing compatibility concerns. These systems are often "battery-ready", allowing you to start with a grid-tied setup and add storage later without replacing key components.
If shading or multiple roof orientations are factors, look for inverters with multiple MPPT trackers. Modern hybrid inverters also support a variety of communication protocols, including CAN-Bus, RS-485, and SunSpec, ensuring smooth interaction with different Battery Management Systems (BMS). For lithium-ion batteries, confirm that the inverter supports the specific communication protocols required by your BMS, such as CAN bus or RS-485. Some advanced inverter models even incorporate AI to optimize charge and discharge cycles.
"A 5 kW hybrid inverter typically pairs well with a 5–10 kWh battery. Oversizing the battery can lead to underutilization, while undersizing may limit performance."
Once your modular inverter is installed, ongoing monitoring becomes essential to ensure long-term system efficiency.
Maintenance and Monitoring
Real-time monitoring of energy production, consumption, and battery status is key to identifying and addressing mismatches quickly. For lithium battery systems, ensure that your BMS maintains continuous closed-loop communication with the inverter. This enables the battery to dynamically adjust charge and discharge parameters as needed.
Proper installation and maintenance also play a critical role. Inverters should have at least 10 inches of clearance to prevent overheating, especially in temperatures exceeding 158°F. Regularly inspect wiring for signs of heat damage or melting, as these could indicate incorrect wire gauges or loose connections. Using a multimeter, check the DC voltage at the battery terminals to confirm it remains within the operating range - for instance, 11V to 15V for a 12V system.
Environmental and Installation Factors
When it comes to system performance, technical specs are just one piece of the puzzle. The environment and installation setup can have just as much impact.
Temperature and Climate Effects
Temperature swings can greatly influence how your inverter, panels, and batteries perform together. For instance, solar panel open-circuit voltage (Voc) increases as temperatures drop. If your system isn't sized correctly, cold mornings could push the total Voc of your panel string beyond the inverter's maximum DC input voltage. This can lead to inverter lockout or even permanent damage. Always check that your array's Voc under extreme cold stays within the inverter's limits.
On the flip side, high temperatures can cause inverters to reduce their AC output, a process known as thermal derating. While most inverters operate safely between -4°F and 104°F, their case temperature can exceed 158°F during heavy use. To prepare for summer peaks, review your inverter's data sheet for details on the "start derating temperature" and "derating slope".
Batteries are also highly sensitive to temperature. For example, lithium batteries (LiFePO4) must stop charging when temperatures dip below 41°F to avoid damage. Lead-acid batteries, on the other hand, need temperature-compensated charging, where the charge voltage is adjusted based on the weather - higher in the cold and lower in the heat. Using external temperature sensors can help your inverter or charge controller fine-tune charging algorithms in real time.
If you're installing a system at high altitudes, there are extra considerations. The thinner air reduces the effectiveness of air cooling for power electronics. Inverters installed above 6,560 feet require power reduction adjustments to function safely.
Beyond temperature, the physical placement of components and shading can also make a big difference in system efficiency.
Shading and System Layout
Proper system layout is critical to minimizing performance losses caused by environmental factors. Start by placing the inverter in a location that protects it from unnecessary stress. Inverters should be mounted on flat, shaded, and well-ventilated surfaces, with at least 4 inches of clearance for cooling. Avoid direct sunlight and positioning above batteries, as batteries can release heat or gases that may harm the inverter. Additionally, inverters need to be installed in dry locations since exposure to rain, high humidity (above 95%), or moisture can shorten their lifespan, cause shutdowns, or lead to hardware failures.
If shading from trees, chimneys, or other obstructions is unavoidable, DC optimizers or microinverters can help reduce power losses. These devices allow for module-level monitoring and ensure that shaded panels don’t drag down the performance of the entire string. Keep in mind that solar panels only generate about 50% of their typical energy output under clouds or shade compared to direct sunlight. A thorough site assessment is essential before designing the layout to identify potential shading issues. Finally, to minimize voltage losses in cables, mount inverters as close as possible to the battery bank.
Conclusion
Ensuring your inverter setup works seamlessly boils down to three main factors: matching voltage, aligning power ratings, and establishing effective communication between the battery and inverter. Pay attention to Vmp alignment, keep Voc within the inverter’s limits, and aim for an ILR (Inverter Loading Ratio) between 1.2 and 1.5.
Battery and inverter communication relies on compatible protocols like CAN bus or RS485. These protocols are essential for optimizing charging, preventing battery wear, and ensuring the system operates smoothly without failures.
Regulatory compliance is another key piece of the puzzle. Make sure your system meets local grid standards - such as 120V/60Hz in North America - and is certified with standards like UL 1741-SB or UL 9540A. Don’t overlook the importance of Rapid Shutdown (RSD) devices, which are vital for first responder safety.
Using certified and high-quality components not only boosts system performance but also helps avoid delays when connecting to the grid. Platforms like Electrical Trader provide access to verified equipment that meets certification requirements, reducing the risk of compliance issues.
Plan for periodic maintenance to keep your system running reliably for years to come. Regularly check temperatures, measure voltages, and monitor performance to identify and address potential compatibility problems before they turn into costly repairs.
FAQs
How can I make sure my solar panels work with my inverter in terms of voltage?
To make sure your solar panels and inverter work well together, you need to check that their voltage specifications match up. Pay close attention to the open-circuit voltage (Voc) and maximum power point voltage (Vmp) of your solar panels. These values must fit within the inverter's input voltage range.
Start by looking at the inverter's input voltage rating - common choices are 12V, 24V, or 48V DC. Next, verify that your solar panels' Voc and Vmp values fall within this range. This step is crucial for the inverter to effectively convert the DC power from your panels into usable AC power.
Additionally, make sure the panels' maximum voltage under standard test conditions doesn’t exceed the inverter’s maximum input voltage. Matching the voltages properly is key to ensuring safe and efficient operation, while also protecting your equipment from damage or performance problems.
Why are communication protocols important when pairing batteries with inverters?
Communication protocols are key to making sure batteries and inverters work in harmony. These protocols enable the two systems to share data, allowing for correct setup, smooth operation, and improved safety. Without proper communication, the system could run into issues like incorrect charging or discharging, potentially lowering efficiency or even causing damage to components.
To prevent these problems, it’s crucial that the inverter and battery use compatible communication standards. This compatibility ensures they can work together effectively, maximizing energy storage and usage for your system.
Why is it important for my solar power system to meet regulatory standards?
Ensuring your solar power system meets regulatory standards is crucial for its safety, efficiency, and legal standing. These rules are in place to minimize electrical risks, maintain optimal system performance, and facilitate a smooth connection to your local utility grid. Plus, meeting these standards is often a prerequisite for securing permits, insurance coverage, and warranties.
By staying compliant, you protect your investment, extend the lifespan of your system, and steer clear of potential legal or operational setbacks. Adhering to these guidelines ensures your solar setup operates safely, dependably, and within the bounds of the law.